- Page 1 and 2:
ArcGIS® 9 Using ArcCatalog
- Page 3 and 4:
Contents 1 Introducing ArcCatalog 1
- Page 5 and 6:
Finding values in a table 116 Addin
- Page 7:
15 Customizing ArcCatalog 233 Basic
- Page 10 and 11:
What can you do with ArcCatalog? Af
- Page 12 and 13:
Search for maps and data If you kno
- Page 14 and 15:
Tips on learning ArcCatalog This bo
- Page 16 and 17:
Exercise 1: Building a catalog of g
- Page 18 and 19:
When the Catalog already contains a
- Page 20 and 21:
Exercise 2: Exploring data and addi
- Page 22 and 23:
13. Click the tin_study TIN dataset
- Page 24 and 25:
coverage’s polygon feature class
- Page 26 and 27:
9. Right-click the heading of the T
- Page 28 and 29:
5. Click the Stylesheet dropdown ar
- Page 30 and 31:
5. In the ArcMap window, click the
- Page 32 and 33:
1. Click the feature mask layer in
- Page 34 and 35:
With this search, ArcCatalog will l
- Page 36 and 37:
3. When the study area fills the St
- Page 38 and 39:
9. Click OK. A shapefile’s coordi
- Page 40 and 41:
2. Click OK to start using ArcMap w
- Page 42 and 43:
The Attribute tab currently shows m
- Page 44 and 45:
20. Click the Color Ramp dropdown a
- Page 46 and 47:
Starting ArcCatalog Starting ArcCat
- Page 48 and 49:
Browsing through the Catalog Browsi
- Page 50 and 51:
When browsing through a long list o
- Page 52 and 53:
Hiding and showing the Catalog tree
- Page 54 and 55:
times, allowing you to keep track o
- Page 56 and 57:
Tip Searching for words within a to
- Page 59 and 60:
What’s in the Catalog? 4 IN THIS
- Page 61 and 62:
Maps, layers, and graphs You can ac
- Page 63 and 64:
Coverages and INFO tables Coverages
- Page 65 and 66:
Personal geodatabases let you manag
- Page 67 and 68:
Raster datasets contain a rectangul
- Page 69 and 70:
CAD drawings You can access CAD dra
- Page 71 and 72:
SDC data ArcCatalog provides read-o
- Page 73 and 74:
Address locators An address locator
- Page 75 and 76:
ArcGIS servers The GIS Servers fold
- Page 77 and 78:
Coordinate systems There are two ty
- Page 79 and 80: Building the Catalog 5 IN THIS CHAP
- Page 81 and 82: Adding spatial database connections
- Page 83 and 84: Adding OLE DB connections 1. Double
- Page 85 and 86: Tip Working with GIS servers You wo
- Page 87 and 88: username or password isn’t saved
- Page 89 and 90: Hiding folders and items 1. Click t
- Page 91 and 92: tab in the Options dialog box. If y
- Page 93: Tip Editing a file type Edit the pr
- Page 96 and 97: Viewing an item’s contents In the
- Page 98 and 99: Working in Details view Sometimes y
- Page 100 and 101: Changing the columns you see When y
- Page 102 and 103: its short name as defined in the CS
- Page 104 and 105: Organizing your data With ArcCatalo
- Page 106 and 107: Converting data to a different form
- Page 108 and 109: Previewing an item’s geographic d
- Page 110 and 111: you decide whether or not you’ve
- Page 112 and 113: Tip Seeing the entire dataset After
- Page 114 and 115: Creating thumbnails 1. In the Catal
- Page 116 and 117: Previewing the values in a table Th
- Page 118 and 119: columns remain fixed. Freezing a ta
- Page 120 and 121: Tip Rearranging frozen columns Afte
- Page 122 and 123: Sorting records in a table Sorting
- Page 124 and 125: Finding values in a table Occasiona
- Page 126 and 127: Adding and deleting columns When ex
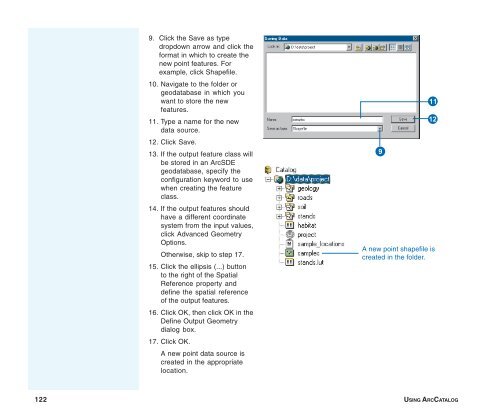
- Page 128 and 129: Creating new data sources from the
- Page 132 and 133: Exploring an item’s metadata The
- Page 134 and 135: Metadata for folders While metadata
- Page 136 and 137: Creating and updating metadata By d
- Page 138 and 139: Importing and exporting metadata Im
- Page 140 and 141: Writing documentation Automatically
- Page 142 and 143: Editing metadata Two metadata edito
- Page 144 and 145: which entry is currently displayed.
- Page 146 and 147: Adding enclosures Documentation suc
- Page 148 and 149: Requirements for publishing to an A
- Page 150 and 151: esources describing barracks, train
- Page 152 and 153: Preparing metadata for publication
- Page 154 and 155: FGDC and ISO metadata elements. If
- Page 156 and 157: loaded into the database as the doc
- Page 158 and 159: Managing published documents Once a
- Page 160 and 161: Creating relationships between docu
- Page 162 and 163: Searching for items Defining the na
- Page 164 and 165: Searching with geographic criteria
- Page 166 and 167: Searching with temporal criteria Th
- Page 168 and 169: Defining a general range of time 1
- Page 170 and 171: Exploring the results of your searc
- Page 172 and 173: Selecting a shortcut’s original i
- Page 174 and 175: Opening a map Opening an existing m
- Page 176 and 177: Creating layers It takes time to an
- Page 178 and 179: Creating a layer from the data 1. R
- Page 180 and 181:
Creating a group layer from the dat
- Page 182 and 183:
data using this method. However, if
- Page 184 and 185:
Joining attributes using a relation
- Page 186 and 187:
Creating new shapefiles and dBASE t
- Page 188 and 189:
Adding and deleting attributes Addi
- Page 190 and 191:
Creating and updating indexes With
- Page 192 and 193:
Defining a shapefile’s coordinate
- Page 194 and 195:
2. Navigate to the coordinate syste
- Page 196 and 197:
Tip Modifying default parameters Wh
- Page 198 and 199:
Modifying a coordinate system’s p
- Page 200 and 201:
ArcInfo and ArcEditor Creating a ne
- Page 202 and 203:
ArcInfo and ArcEditor Generating to
- Page 204 and 205:
ArcInfo and ArcEditor Defining a co
- Page 206 and 207:
ArcInfo and ArcEditor Defining a co
- Page 208 and 209:
ArcInfo and ArcEditor Modifying a c
- Page 210 and 211:
ArcInfo and ArcEditor Recalculating
- Page 212 and 213:
ArcInfo and ArcEditor Maintaining a
- Page 214 and 215:
ArcInfo and ArcEditor Adding a rede
- Page 216 and 217:
ArcInfo and ArcEditor Deleting an a
- Page 218 and 219:
ArcInfo and ArcEditor What is a rel
- Page 220 and 221:
ArcInfo and ArcEditor Creating a co
- Page 222 and 223:
ArcInfo and ArcEditor 13. Click the
- Page 224 and 225:
Raster dataset properties A raster
- Page 226 and 227:
When you select a geodatabase raste
- Page 228 and 229:
Changing raster dataset previewing
- Page 230 and 231:
Not all raster datasets have file e
- Page 232 and 233:
or a TIN. If the raster dataset alr
- Page 234 and 235:
Setting a nongrid raster dataset’
- Page 236 and 237:
You cannot build pyramids on a rast
- Page 238 and 239:
Additional raster dataset file info
- Page 241 and 242:
Customizing ArcCatalog 15 IN THIS C
- Page 243 and 244:
Customizing toolbars Hiding and sho
- Page 245 and 246:
Displaying toolbars with large icon
- Page 247 and 248:
Tip Creating access keys All menus
- Page 249 and 250:
Tip Why open the Customize dialog b
- Page 251 and 252:
Changing a command’s appearance G
- Page 253 and 254:
Changing the caption 1. Show the to
- Page 255 and 256:
Removing a shortcut key 1. Click th
- Page 257 and 258:
window. To add your macro to a spec
- Page 259 and 260:
Creating custom commands with VBA A
- Page 261 and 262:
Working with UIControls If you crea
- Page 263 and 264:
Updating the ArcID module 1. Click
- Page 265:
Using the ArcObjects Developer Help
- Page 268 and 269:
ArcStorm database An ArcStorm datab
- Page 270 and 271:
command 1. An instruction to a comp
- Page 272 and 273:
datum In the most general sense, an
- Page 274 and 275:
feature class A collection of geogr
- Page 276 and 277:
Geospatial Data Clearinghouse A dec
- Page 278 and 279:
layout view In ArcMap and ArcReader
- Page 280 and 281:
overshoot The portion of an arc dig
- Page 282 and 283:
aster A spatial data model that def
- Page 284 and 285:
shapefile A vector data storage for
- Page 286 and 287:
updated automatically; they will go
- Page 288 and 289:
VPF feature class See feature class
- Page 291 and 292:
Index Symbols .rrd files 231 A Acce
- Page 293 and 294:
Content Theme (continued) categorie
- Page 295 and 296:
Feature classes. See also data sour
- Page 297 and 298:
J Joins 35, 174-175, 175, 176. See
- Page 299 and 300:
R Raster. See also data sources ban
- Page 301:
Tolerances (continued) fuzzy 195, 2