Using ArcCatalog
Using ArcCatalog
Using ArcCatalog

Create successful ePaper yourself
Turn your PDF publications into a flip-book with our unique Google optimized e-Paper software.
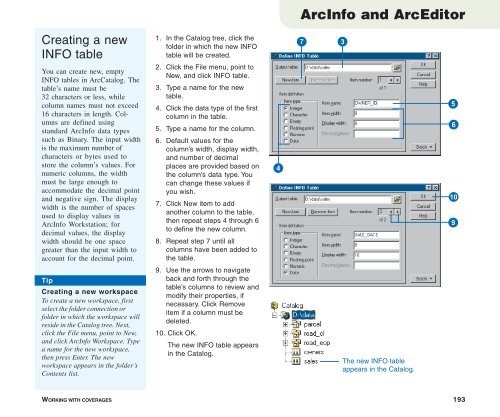
ArcInfo and ArcEditor<br />
Creating a new<br />
INFO table<br />
1. In the Catalog tree, click the<br />
folder in which the new INFO<br />
table will be created.<br />
2. Click the File menu, point to<br />
New, and click INFO table.<br />
3. Type a name for the new<br />
table.<br />
4. Click the data type of the first<br />
column in the table.<br />
5. Type a name for the column.<br />
6. Default values for the<br />
column’s width, display width,<br />
and number of decimal<br />
places are provided based on<br />
the column’s data type. You<br />
can change these values if<br />
you wish.<br />
7. Click New item to add<br />
another column to the table,<br />
then repeat steps 4 through 6<br />
to define the new column.<br />
8. Repeat step 7 until all<br />
columns have been added to<br />
the table.<br />
9. Use the arrows to navigate<br />
back and forth through the<br />
table’s columns to review and<br />
modify their properties, if<br />
necessary. Click Remove<br />
item if a column must be<br />
deleted.<br />
10. Click OK.<br />
The new INFO table appears<br />
in the Catalog.<br />
7<br />
3<br />
You can create new, empty<br />
INFO tables in <strong>ArcCatalog</strong>. The<br />
table’s name must be<br />
32 characters or less, while<br />
column names must not exceed<br />
16 characters in length. Columns<br />
are defined using<br />
standard ArcInfo data types<br />
such as Binary. The input width<br />
is the maximum number of<br />
characters or bytes used to<br />
store the column’s values. For<br />
numeric columns, the width<br />
must be large enough to<br />
accommodate the decimal point<br />
and negative sign. The display<br />
width is the number of spaces<br />
used to display values in<br />
ArcInfo Workstation; for<br />
decimal values, the display<br />
width should be one space<br />
greater than the input width to<br />
account for the decimal point.<br />
4<br />
5<br />
6<br />
Q<br />
9<br />
Tip<br />
Creating a new workspace<br />
To create a new workspace, first<br />
select the folder connection or<br />
folder in which the workspace will<br />
reside in the Catalog tree. Next,<br />
click the File menu, point to New,<br />
and click ArcInfo Workspace. Type<br />
a name for the new workspace,<br />
then press Enter. The new<br />
workspace appears in the folder’s<br />
Contents list.<br />
The new INFO table<br />
appears in the Catalog.<br />
WORKING WITH COVERAGES 193