Using ArcCatalog
Using ArcCatalog
Using ArcCatalog

Create successful ePaper yourself
Turn your PDF publications into a flip-book with our unique Google optimized e-Paper software.
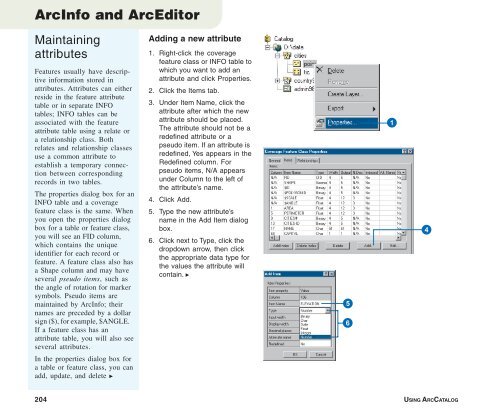
ArcInfo and ArcEditor<br />
Maintaining<br />
attributes<br />
Features usually have descriptive<br />
information stored in<br />
attributes. Attributes can either<br />
reside in the feature attribute<br />
table or in separate INFO<br />
tables; INFO tables can be<br />
associated with the feature<br />
attribute table using a relate or<br />
a relationship class. Both<br />
relates and relationship classes<br />
use a common attribute to<br />
establish a temporary connection<br />
between corresponding<br />
records in two tables.<br />
The properties dialog box for an<br />
INFO table and a coverage<br />
feature class is the same. When<br />
you open the properties dialog<br />
box for a table or feature class,<br />
you will see an FID column,<br />
which contains the unique<br />
identifier for each record or<br />
feature. A feature class also has<br />
a Shape column and may have<br />
several pseudo items, such as<br />
the angle of rotation for marker<br />
symbols. Pseudo items are<br />
maintained by ArcInfo; their<br />
names are preceded by a dollar<br />
sign ($), for example, $ANGLE.<br />
If a feature class has an<br />
attribute table, you will also see<br />
several attributes.<br />
In the properties dialog box for<br />
a table or feature class, you can<br />
add, update, and delete u<br />
Adding a new attribute<br />
1. Right-click the coverage<br />
feature class or INFO table to<br />
which you want to add an<br />
attribute and click Properties.<br />
2. Click the Items tab.<br />
3. Under Item Name, click the<br />
attribute after which the new<br />
attribute should be placed.<br />
The attribute should not be a<br />
redefined attribute or a<br />
pseudo item. If an attribute is<br />
redefined, Yes appears in the<br />
Redefined column. For<br />
pseudo items, N/A appears<br />
under Column to the left of<br />
the attribute’s name.<br />
4. Click Add.<br />
5. Type the new attribute’s<br />
name in the Add Item dialog<br />
box.<br />
6. Click next to Type, click the<br />
dropdown arrow, then click<br />
the appropriate data type for<br />
the values the attribute will<br />
contain. u<br />
5<br />
6<br />
1<br />
4<br />
204 USING ARCCATALOG