1928 Cadillac - GM Heritage Center
1928 Cadillac - GM Heritage Center
1928 Cadillac - GM Heritage Center

Create successful ePaper yourself
Turn your PDF publications into a flip-book with our unique Google optimized e-Paper software.
52 CADILLAC OPERATOR'S MANUAL<br />
GENERAL CARE 53<br />
is thus indicated by the specific gravity of the solution. As the battery is<br />
charged, the specific gravity of the solution increases, reaching 1.270 to<br />
1.285 when the battery is fully charged. The specific gravity of the solution<br />
decreases as the battery is discharged. A fully discharged battery has<br />
a specific gravity of 1.150 to 1.165.<br />
A hydrometer is the instrument used to measure the specific gravity of<br />
a solution. A hydrometer syringe is a hydrometer especially designed for<br />
convenience in testing the specific gravity of the acid solution in the storage<br />
battery. A hydrometer syringe can be obtained at any battery service station.<br />
Be sure and get a reliable instrument, for cheap ones may be in error<br />
as much as 25 or 30 points.<br />
The specific gravity of the acid solution should never be tested immediately<br />
after adding distilled water. If the solution is below the plates,<br />
so that it cannot be reached with the syringe, add the necessary amount<br />
of water, then drive the car for a few hours before taking the hydrometer<br />
reading.<br />
Cooling System<br />
The cooling system should be kept filled with 6 gallons of water, except<br />
in freezing weather, when a suitable anti-freezing solution, such as those<br />
described on page 46, must be used.<br />
The cooling system should be drained and flushed every 4000 miles. If<br />
possible, this should be done at a <strong>Cadillac</strong> service station, or where there<br />
are facilities for reversing the flow of water through the radiator. If this<br />
is not possible, use the following method:<br />
Run the engine until the opening of the radiator shutters indicates that<br />
the engine is warm. Stop the engine and immediately open the drain valve.<br />
After the liquid has drained off, refill the cooling system with hot water<br />
and repeat the operation described above. If, in draining the second time,<br />
the water is very dirty, it may be advisable to repeat the flushing operation<br />
a third time, placing one or two handfuls of sal-soda in through the radiator<br />
filler. The sal-soda must not be permitted to get on the finish of the<br />
hood or radiator. If sal-soda is used, the cooling system must be drained<br />
and flushed again before refilling for use.<br />
Gasoline Filter<br />
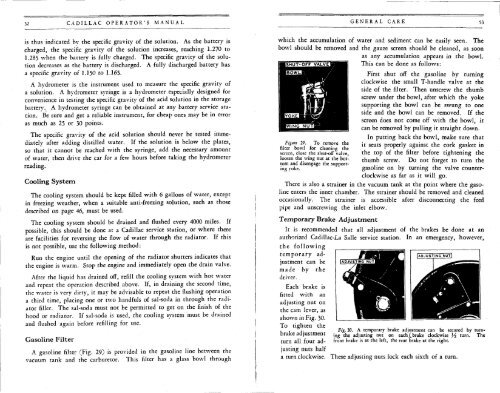
A gasoline filter (Fig. 29) is provided in the gasoline line between the<br />
vacuum tank and the carburetor. This filter has a glass bowl through<br />
which the accumulation of water and sediment can be easily seen. The<br />
bowl should be removed and the gauze screen should be cleaned, as soon<br />
as any accumulation appears in the bowl.<br />
This can be done as follows:<br />
HsEH \ / First shut off the gasoline by turning<br />
clockwise the small T-handle valve at the<br />
side of the filter. Then unscrew the thumb<br />
screw under the bowl, after which the yoke<br />
supporting the bowl can be swung to one<br />
side and the bowl can be removed. If the<br />
screen does not come off" with the bowl, it<br />
can be removed by pulling it straight down.<br />
Eamassn<br />
figure 29. To remove the<br />
filter bowl for cleaning the<br />
screen, close the shut-off valve,<br />
loosen the wing nut at the bottom<br />
and disengage the supposing<br />
yoke.<br />
In putting back the bowl, make sure that<br />
it seats properly against the cork gasket in<br />
the top of the filter before tightening the<br />
thumb screw. Do not forget to turn the<br />
gasoline on by turning the valve counterclockwise<br />
as far as it will go.<br />
There is also a strainer in the vacuum tank at the point where the gasoline<br />
enters the inner chamber. The strainer should be removed and cleaned<br />
occasionally. The strainer is accessible after disconnecting the feed<br />
pipe and unscrewing the inlet elbow.<br />
Temporary Brake Adjustment<br />
It is recommended that all adjustment of the brakes be done at an<br />
authorized <strong>Cadillac</strong>-La Salle service station. In an emergency, however,<br />
the following<br />
temporary adjustment<br />
can be<br />
made by the<br />
driver.<br />
Each brake is<br />
fitted with an<br />
adjusting nut on<br />
the cam lever, as<br />
shown in Fig. 30.<br />
To tigh ten the<br />
Fig. 30. A temporary brake adjustment can be secured by turning<br />
the adjusting nut on cachXbrake clockwise H turn. The<br />
brake adjustment<br />
turn all four adjusting<br />
nuts half<br />
front brake is at the left, the rear brake at the right.<br />
a turn clockwise. These adjusting nuts lock each sixth of a turn