1928 Cadillac - GM Heritage Center
1928 Cadillac - GM Heritage Center
1928 Cadillac - GM Heritage Center

Create successful ePaper yourself
Turn your PDF publications into a flip-book with our unique Google optimized e-Paper software.
38 CADILLAC OPERATOR'S MANUAL<br />
OPERATION 39<br />
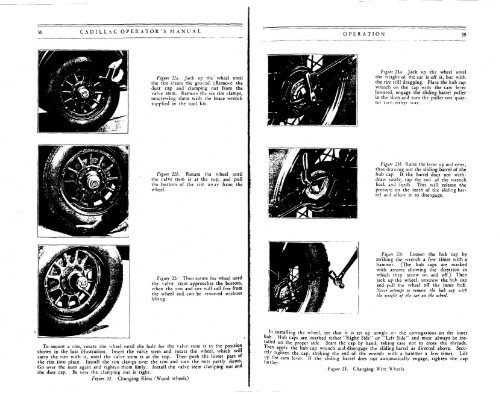
Figure 22,1. Jack up the wheel until<br />
the tire clears the ground. [Remove the<br />
dust cap and clamping nut from the<br />
valve stem. Remove the six rim clamps,<br />
unscrewing them with the brace wrench<br />
supplied in the tool kit.<br />
Figure 23a Jack up the wheel until<br />
the weight of the car is off it, but with<br />
the tire still dragging. Place the hub cap<br />
wrench on the cap with the cam lever<br />
lowered, engage the sliding barrel puller<br />
in the slots and turn the puller one quarter<br />
turn either wav.<br />
Figure 22b. Rotate the wheel until<br />
the valve stem is at the top, and pull<br />
the bottom of the rim away from the<br />
wheel.<br />
Figure 2H Raise the lever up and over,<br />
thus drawing out the sliding barrel of the<br />
hub cap. If the barrel does not withdraw<br />
easily, tap the end of the wrench<br />
back and forth. This will release the<br />
pressure on the teeth of the sliding barrel<br />
and allow it to disengage.<br />
y<br />
''<br />
j^flwifieqSi<br />
aSl^fe -^E SPSfisli<br />
•Sv ^^kjjf&Ft^f^&a ^Kl<br />
W^mmm<br />
^BHI^BSpw^S^b!r>fl<br />
^^H&T^^^^vfllH^^lkr ^Kr M^M<br />
^^B^I -i^Wr<br />
Figure 22c Then rotate the wheel until<br />
the valve stem approaches the bottom,<br />
when the rim and tire will roll free from<br />
the wheel and can be removed without<br />
lifting.<br />
Figure 23c Loosen the hub cap by<br />
striking the wrench a few times with a<br />
hammer. (The hub caps are marked<br />
with arrows showing the direction in<br />
which they screw on and off.) Then<br />
jack up the wheel, unscrew the hub cap<br />
and pull the wheel off the inner hub.<br />
Ncter attempt to remove the hub cap uith<br />
the Height of the car on the wheel.<br />
H|^^^^2^MP<br />
To mount a rim, rotate the wheel until the hole for the valve stem is in the position<br />
shown in the last illustration. Insert the valve stem and rotate the wheel, which will<br />
carry the rim with it, until the valve stem is at the top. Then push the lower part of<br />
the rim into place. Install the rim clamps over the rim and turn the nuts partly down.<br />
Go over the nuts again and tighten them fimly. Install chc valve stem clamping nut and<br />
the dust cap. Be sure the clamping nut is tight.<br />
Figure 22. Changing Rims (Wood wheels)<br />
In installing the wheel, sec that it is set up snugly on the corrugations on the inner<br />
hub. Hub caps are marked either "Right Side" or "Left Side" and must always be installed<br />
on the proper side. Start the cap by hand, taking care not to cross the threads.<br />
Ihen apply the hubcap wrench and disengage the sliding barrel as directed above. Securely<br />
tighten the cap, striking the end of the wrench with a hammer a few times. Lift<br />
up the cam lever. If the sliding barrel does not automatically engage, tighten the cap<br />
'•'•rther.<br />
Figure 23. Changing Wire Wheels