1928 Cadillac - GM Heritage Center
1928 Cadillac - GM Heritage Center
1928 Cadillac - GM Heritage Center

You also want an ePaper? Increase the reach of your titles
YUMPU automatically turns print PDFs into web optimized ePapers that Google loves.
30 CADILLAC OPERATOR'S MANUAL<br />
The Touring Car and Phaeton curtains are in six sections, each of which is<br />
marked to indicate its position, as "Left Front," "Right <strong>Center</strong>." The front<br />
and center sections on both sides are each provided with a rod, the lower end<br />
of which tits in a socket in the top of the door. When a curtain is folded for<br />
stowing, this rod is parallel with the bottom of thecurtain as shown inFig. 11.<br />
Before the curtain can be attached<br />
to the door, the rod<br />
must be moved to the position<br />
shown by the dotted lines. The<br />
upper end of the rod is slotted<br />
to engage with the stiffener<br />
that runs along the upper edge<br />
of the curtain.<br />
The folding flap on the door<br />
curtains has the upper rear<br />
corner cut off diagonally. This<br />
is to permit its being tucked<br />
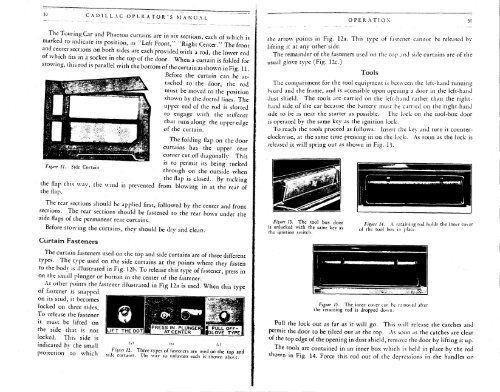
Figure 11. Side Curtain<br />
through on the outside when<br />
the flap is closed. By tucking<br />
the flap this way, the wind is prevented from blowing in at the rear of<br />
the flap.<br />
The rear sections should be applied first, followed by the center and front<br />
sections. The rear sections should be fastened to the rear bows under the<br />
side flaps of the permanent rear curtains.<br />
Before stowing the curtains, they should be dry and clean.<br />
OPERATION 31<br />
the arrow points in Fig. 12a. This type of f.istener cannot be released bv<br />
lifting it at any other side.<br />
The remainder of the fasteners used on the top and side curtains are of the<br />
usual glove type (Fig. 12c.)<br />
Tools<br />
The compartment for the tool equipment is between the left-hand running<br />
board and the frame, and is accessible upon opening a door in the left-hand<br />
dust shield. The tools are carried on the left-hand rather than the righthand<br />
side of the car because the battery must be carried on the right-hand<br />
side to be as near the starter as possible. The lock on the tool-box door<br />
is operated by the same key as the ignition lock.<br />
To reach the tools proceed as follows: Insert the kev and turn it counterclockwise,<br />
at the same time pressing in on the lock. As soon as the lock is<br />
released it will spring out as shown in Fig. 13.<br />
Curtain Fasteners<br />
The curtain fasteners used on the top and side curtains are of three different<br />
types. The type used on the side curtains at the points where they fasten<br />
to the body is illustrated in Fig. 12b. To release this type of fastener, press in<br />
on the small plunger or button in the center of the fastener.<br />
At other points the fastener illustrated in Fig 12a is used. When this type<br />
of fastener is snapped<br />
on its stud, it becomes<br />
locked on three sides,<br />
To release the fastener<br />
it must be lifted on<br />
the side that is not<br />
locked. This side is<br />
U) (bl (L)<br />
• r i u i ii<br />
indicated bv the small _. ,, T, cl , , . .<br />
Figure 12. Three types ot fasteners are used on rhe top and<br />
projection to which side curtains. The way to unfasten each is shown above.<br />
Figure 15. The inner cover can be removed atter<br />
the retaining rod is dropped down.<br />
Pull the lock out as far as it will go. This will release the catches and<br />
permit the door to be tilted out at the top. As soon as the catches are clear<br />
of the top edge of the opening in dust shield, remove the door by lifting it up.<br />
The tools are contained in an inner box which is held in place by the rod<br />
shown in Fig. 14. Force this rod out of the depressions in the handles on