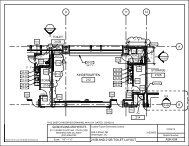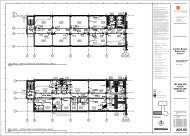
DSLBD Office Fit Out - Broughton Construction Company
DSLBD Office Fit Out - Broughton Construction Company
DSLBD Office Fit Out - Broughton Construction Company

You also want an ePaper? Increase the reach of your titles
YUMPU automatically turns print PDFs into web optimized ePapers that Google loves.
2. Wet gypsum panels on surfaces that will become compressed where curve radius prevents using dry panels.<br />
Comply with gypsum board manufacturer's written recommendations for curve radii, wetting methods,<br />
stacking panels after wetting, and other preparations that precede installing wetted gypsum panels.<br />
3. On convex sides of partitions, begin installation at one end of curved surface and fasten gypsum panels to<br />
studs as they are wrapped around curve. On concave side, start fastening panels to stud at center of curve<br />
and work outward to panel ends. Fasten panels to framing with screws spaced 12 inches (300 mm) o.c.<br />
4. For double-layer construction, fasten base layer to studs with screws 16 inches (400 mm) o.c. Center<br />
gypsum board face layer over joints in base layer, and fasten to studs with screws spaced 12 inches (300<br />
mm) o.c.<br />
5. Allow wetted gypsum panels to dry before applying joint treatment.<br />
3.9 INSTALLING TRIM ACCESSORIES<br />
A. General: For trim with back flanges intended for fasteners, attach to framing with same fasteners used for panels.<br />
Otherwise, attach trim according to manufacturer's written instructions.<br />
B. Control Joints:<br />
1. Break panel behind joint and back by double framing member. Apply acoustical sealant to fill gap and attach<br />
control joint to face layer with 9/16” galvanized staples spaced 6” o.c. on both flanges along entire length of<br />
joint.<br />
2. Install in ceiling areas exceeding 2,500 square feet. Distance between ceiling control joints shall not exceed<br />
50”-0” in either direction. A control joints shall be installed where ceiling framing or furring changes direction.<br />
3. Distance between control joints in partitions and furring shall not exceed 30’-0”, and a control joint occurs in<br />
structure and exterior wall. Partition height door frames may be considered a control joint.<br />
3.10 FINISHING GYPSUM BOARD ASSEMBLIES<br />
A. General: Treat gypsum board joints, interior angles, edge trim, control joints, penetrations, fastener heads, surface<br />
defects, and elsewhere as required to prepare gypsum board surfaces for decoration. Promptly remove residual joint<br />
compound from adjacent surfaces.<br />
B. Prefill open joints, rounded or beveled edges, and damaged surface areas.<br />
C. Apply joint tape over gypsum board joints, except those with trim having flanges not intended for tape.<br />
D. Gypsum Board Finish Levels:<br />
1. Typical finish level for exposed to view locations where flat paints, light textures or wall coverings are to be<br />
applied:<br />
a. Level 4: Embed tape and apply separate first, fill, and finish coats of joint compound to tape,<br />
fasteners, and trim flanges at panel surfaces. Compound shall be smooth and free of tool marks,<br />
ridges and other blemishes.<br />
2. Typical finish level for exposed to view locations where gloss, semi gloss, enamel or non textured flat paints<br />
are specified; where severe lighting conditions occur or where noted on drawings. Severe lighting may<br />
include overhead or side wall washers.<br />
a. Level 5: Embed tape and apply separate first, fill, and finish coats of joint compound to tape. Apply<br />
skim coat to entire surface. Compound shall be smooth and free of tool marks, ridges and other<br />
blemishes. Apply drywall primer to prepared surface before application of finish paint.<br />
END OF SECTION 09 21 00<br />
GYPSUM BOARD ASSEMBLIES 09 21 16 - 12