1 Surgery CAMLOG Compendium
1 Surgery CAMLOG Compendium
1 Surgery CAMLOG Compendium

You also want an ePaper? Increase the reach of your titles
YUMPU automatically turns print PDFs into web optimized ePapers that Google loves.
<strong>Surgery</strong> Manual<br />
CYLINDER-LINE Insertion<br />
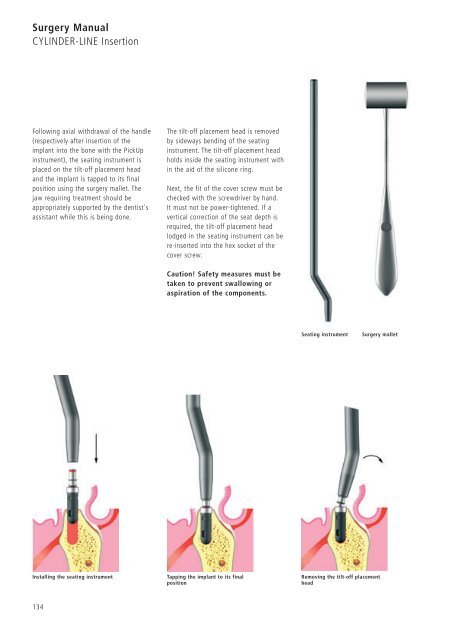
Following axial withdrawal of the handle<br />
(respectively after insertion of the<br />
implant into the bone with the PickUp<br />
instrument), the seating instrument is<br />
placed on the tilt-off placement head<br />
and the implant is tapped to its final<br />
position using the surgery mallet. The<br />
jaw requiring treatment should be<br />
appropriately supported by the dentist's<br />
assistant while this is being done.<br />
134<br />
The tilt-off placement head is removed<br />
by sideways bending of the seating<br />
instrument. The tilt-off placement head<br />
holds inside the seating instrument with<br />
in the aid of the silicone ring.<br />
Next, the fit of the cover screw must be<br />
checked with the screwdriver by hand.<br />
It must not be power-tightened. If a<br />
vertical correction of the seat depth is<br />
required, the tilt-off placement head<br />
lodged in the seating instrument can be<br />
re-inserted into the hex socket of the<br />
cover screw.<br />
Caution! Safety measures must be<br />
taken to prevent swallowing or<br />
aspiration of the components.<br />
Installing the seating instrument Tapping the implant to its final<br />
position<br />
Seating instrument <strong>Surgery</strong> mallet<br />
Removing the tilt-off placement<br />
head