1 Surgery CAMLOG Compendium
1 Surgery CAMLOG Compendium
1 Surgery CAMLOG Compendium

Create successful ePaper yourself
Turn your PDF publications into a flip-book with our unique Google optimized e-Paper software.
General Information<br />
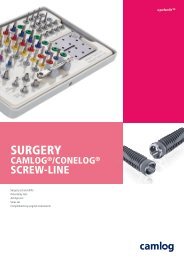
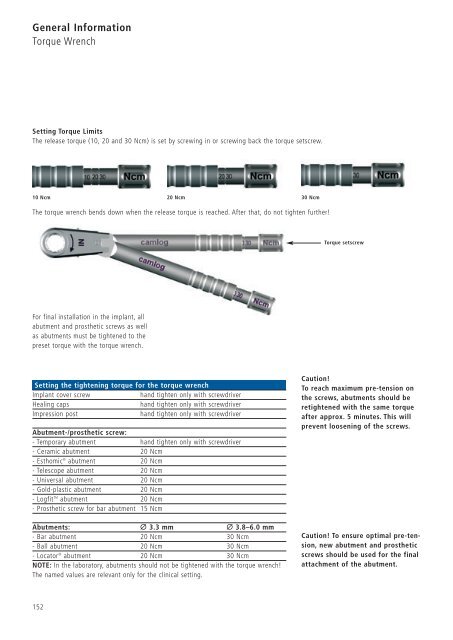
Torque Wrench<br />
Setting Torque Limits<br />
The release torque (10, 20 and 30 Ncm) is set by screwing in or screwing back the torque setscrew.<br />
10 Ncm 20 Ncm 30 Ncm<br />
The torque wrench bends down when the release torque is reached. After that, do not tighten further!<br />
For final installation in the implant, all<br />
abutment and prosthetic screws as well<br />
as abutments must be tightened to the<br />
preset torque with the torque wrench.<br />
Setting the tightening torque for the torque wrench<br />
Implant cover screw hand tighten only with screwdriver<br />
Healing caps hand tighten only with screwdriver<br />
Impression post hand tighten only with screwdriver<br />
Abutment-/prosthetic screw:<br />
- Temporary abutment hand tighten only with screwdriver<br />
- Ceramic abutment 20 Ncm<br />
- Esthomic ® abutment 20 Ncm<br />
- Telescope abutment 20 Ncm<br />
- Universal abutment 20 Ncm<br />
- Gold-plastic abutment 20 Ncm<br />
- Logfit TM abutment 20 Ncm<br />
- Prosthetic screw for bar abutment 15 Ncm<br />
Abutments: Ø 3.3 mm Ø 3.8–6.0 mm<br />
- Bar abutment 20 Ncm 30 Ncm<br />
- Ball abutment 20 Ncm 30 Ncm<br />
- Locator ® abutment 20 Ncm 30 Ncm<br />
NOTE: In the laboratory, abutments should not be tightened with the torque wrench!<br />
The named values are relevant only for the clinical setting.<br />
152<br />
Torque setscrew<br />
Caution!<br />
To reach maximum pre-tension on<br />
the screws, abutments should be<br />
retightened with the same torque<br />
after approx. 5 minutes. This will<br />
prevent loosening of the screws.<br />
Caution! To ensure optimal pre-tension,<br />
new abutment and prosthetic<br />
screws should be used for the final<br />
attachment of the abutment.