- Page 1:
CAMLOG Compendium 1 Surgery
- Page 4 and 5:
CAMLOG Compendium | 1 Surgery Bibli
- Page 6 and 7:
CAMLOG Compendium | 1 Surgery 4. Pr
- Page 9 and 10:
I. General System Information 1. In
- Page 11 and 12:
3. Implant Configuration Macroscopi
- Page 13 and 14:
Bioseal Bevel/Implant Shoulder Foll
- Page 15 and 16:
Tube-in-Tube Connection The long-te
- Page 17 and 18:
4. Mechanics and Biomechanics Mecha
- Page 19 and 20:
II. CAMLOG Concept 1. Team Concept
- Page 21 and 22:
2. Treatment Concept Introduction I
- Page 23 and 24:
Fixed Restorations Single Crowns Si
- Page 25 and 26:
Implant-Supported Bridges Implant-s
- Page 27 and 28:
Bar supported Dentures Bars are sui
- Page 29 and 30:
2. Anamnesis Introduction The medic
- Page 31 and 32:
Articulator Set-Up The diagnostic c
- Page 33 and 34:
Planning Template A planning templa
- Page 35 and 36:
5. Implant Position Verification Go
- Page 37 and 38:
Final Prosthesis Design The surgica
- Page 39:
SCREW-CYLINDER-LINE Implant The SCR
- Page 42 and 43:
Surgery Manual CAMLOG ® Surgery Sy
- Page 44 and 45:
Surgery Manual CAMLOG ® Surgery Sy
- Page 46 and 47:
Surgery Manual Implant Healing 4. H
- Page 48 and 49:
Surgery Manual SCREW-LINE Insertion
- Page 50 and 51:
Surgery Manual SCREW-LINE Insertion
- Page 52 and 53:
Surgery Manual SCREW-LINE Insertion
- Page 54 and 55:
Surgery Manual SCREW-LINE Insertion
- Page 56 and 57:
Surgery Manual SCREW-LINE Insertion
- Page 58 and 59:
Surgery Manual SCREW-LINE Insertion
- Page 60 and 61:
Surgery Manual SCREW-LINE Insertion
- Page 62 and 63:
Surgery Manual SCREW-LINE Insertion
- Page 64 and 65:
Surgery Manual SCREW-LINE Insertion
- Page 66 and 67:
Surgery Manual SCREW-LINE Insertion
- Page 68 and 69:
Surgery Manual SCREW-LINE Insertion
- Page 70 and 71:
Surgery Manual SCREW-LINE Insertion
- Page 73 and 74:
6. ROOT-LINE Implant Introduction T
- Page 75 and 76:
Incision Line The sample indication
- Page 77 and 78:
13 mm 11 mm 9 mm 13 mm 11 mm 9 mm 1
- Page 79 and 80:
Paralleling Pin with Depth Marks On
- Page 81 and 82:
Pre-Drilling An internally irrigate
- Page 83 and 84:
Depth Stop During form drilling the
- Page 85 and 86:
Form Drilling Once pre-drilling is
- Page 87 and 88:
Manual thread tapping is performed
- Page 89 and 90:
Implant Positioning The protocol-co
- Page 91 and 92:
Placing the PickUp on the insertion
- Page 93 and 94:
Next, extract the retention screw o
- Page 95 and 96:
Accessories Adapter for Screw Impla
- Page 97:
Accessories Once the retention scre
- Page 100 and 101:
Surgery Manual SCREW-CYLINDER-LINE
- Page 102 and 103:
Surgery Manual SCREW-CYLINDER-LINE
- Page 104 and 105:
Surgery Manual SCREW-CYLINDER-LINE
- Page 106 and 107:
Surgery Manual SCREW-CYLINDER-LINE
- Page 108 and 109:
Surgery Manual SCREW-CYLINDER-LINE
- Page 110 and 111:
Surgery Manual SCREW-CYLINDER-LINE
- Page 112 and 113: Surgery Manual SCREW-CYLINDER-LINE
- Page 114 and 115: Surgery Manual SCREW-CYLINDER-LINE
- Page 116 and 117: Surgery Manual SCREW-CYLINDER-LINE
- Page 118 and 119: Surgery Manual SCREW-CYLINDER-LINE
- Page 120 and 121: Surgery Manual SCREW-CYLINDER-LINE
- Page 122 and 123: Surgery Manual SCREW-CYLINDER-LINE
- Page 124 and 125: 116
- Page 126 and 127: Surgery Manual CYLINDER-LINE Insert
- Page 128 and 129: Surgery Manual CYLINDER-LINE Insert
- Page 130 and 131: Surgery Manual CYLINDER-LINE Insert
- Page 132 and 133: Surgery Manual CYLINDER-LINE Insert
- Page 134 and 135: Surgery Manual CYLINDER-LINE Insert
- Page 136 and 137: Surgery Manual CYLINDER-LINE Insert
- Page 138 and 139: Surgery Manual CYLINDER-LINE Insert
- Page 140 and 141: Surgery Manual CYLINDER-LINE Insert
- Page 142 and 143: Surgery Manual CYLINDER-LINE Insert
- Page 144 and 145: 136
- Page 146 and 147: Surgery Manual Healing Cap Healing
- Page 148 and 149: Transfer System Introduction 10. Tr
- Page 150 and 151: Transfer System Closed Impression M
- Page 152 and 153: Transfer System Open Impression Met
- Page 154 and 155: Transfer System Open Impression Met
- Page 156 and 157: Provisional Solution Introduction 1
- Page 158 and 159: Provisional Solution Preparing the
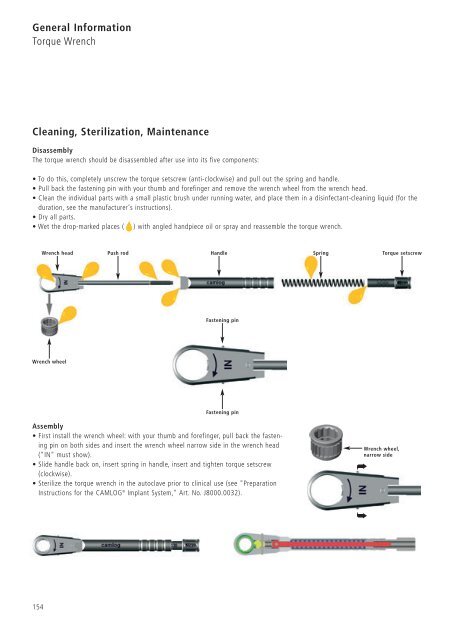
- Page 160 and 161: General Information Torque Wrench S
- Page 164 and 165: 156
- Page 166 and 167: Informations Materials Titanium Gra
- Page 168 and 169: 160
- Page 170 and 171: 162
- Page 172: ➤ ➤ ISBN 978-3-13-134351-2 CAML