


You also want an ePaper? Increase the reach of your titles
YUMPU automatically turns print PDFs into web optimized ePapers that Google loves.
cover both ends <strong>of</strong> the core with tape so there are no<br />
open ends.<br />
2. Pad the striking area<br />
The next step in creating a weapon is padding the<br />
striking area <strong>of</strong> the weapon. There are several things<br />
that you will need to do in this step. First, you should<br />
measure and cut the pipe foam to the desired<br />
blade/shaft length. Remember to measure the length<br />
to include an additional 2 1/2” to account for an 1/2”<br />
<strong>of</strong> foam past the core <strong>of</strong> the weapon, and the thrusting<br />
tip. Next, you should slide the pipe foam over the<br />
core so that a 1/2” <strong>of</strong> foam hangs over one end. Make<br />
sure that the foam is snug to the core; if it rattles then<br />
the closed cell foam is too large and you will need to<br />
build out the core so that foam does not rattle. Cut <strong>of</strong>f<br />
1” <strong>of</strong> pipe foam (not from the piece you are using for<br />
the blade) and cut it into two equal halves. Compress<br />
one <strong>of</strong> the halves and stuff it into the end <strong>of</strong> the blade<br />
foam. Using a piece <strong>of</strong> tape, cover the small piece <strong>of</strong><br />
foam that has been put into the end <strong>of</strong> the blade.<br />
3. Add a crossguard (optional)<br />
The next<br />
step is an<br />
optional step<br />
when<br />
creating a<br />
weapon<br />
though it is<br />
strongly<br />
encouraged.<br />
Certain weapon types have cross guards, including<br />
most types <strong>of</strong> swords and occasionally other hafted<br />
weapons. First, you need to cut a section <strong>of</strong> closed<br />
cell pipe foam <strong>of</strong> the appropriate size. Then cut a hole<br />
in the middle <strong>of</strong> the cross guard foam and slide the<br />
crossguard down the core until it meets the blade.<br />
Secure the crossguard to the blade using two strips <strong>of</strong><br />
duct tape, then stuff the ends <strong>of</strong> the crossguard with<br />
open cell foam to strengthen the crossguard. Close<br />
<strong>of</strong>f the ends <strong>of</strong> the crossguard with tape. Secure the<br />
cross guard to the grip by taking strips <strong>of</strong> tape from<br />
the crossguard to the grip. This will secure the blade<br />
and crossguard to the grip.<br />
4. Add a<br />
pommel<br />
(optional)<br />
The next step<br />
is to add a<br />
pommel at<br />
the end <strong>of</strong><br />
the weapon.<br />
Cut a piece <strong>of</strong> closed cell foam so that is about 3<br />
inches long. Place the foam on the butt end <strong>of</strong> the<br />
weapon so that the foam hangs at least one inch over<br />
the weapon’s core. As with the blade tip, place a half<br />
circle <strong>of</strong> compressed closed<br />
cell foam into the end <strong>of</strong> the<br />
foam and cover it with tape.<br />
Secure the pommel to the core<br />
with tape in such a way that at<br />
least one inch <strong>of</strong> closed cell<br />
foam extends past the core.<br />
Make sure that the pommel is secure to the core and<br />
is not loose.<br />
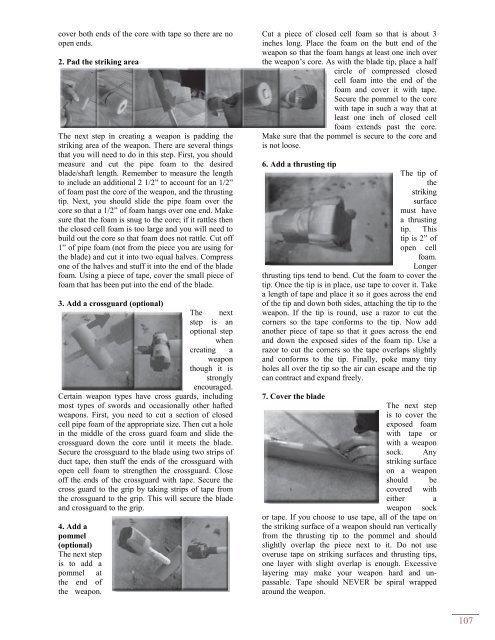
6. Add a thrusting tip<br />
The tip <strong>of</strong><br />
the<br />
striking<br />
surface<br />
must have<br />
a thrusting<br />
tip. This<br />
tip is 2” <strong>of</strong><br />
open cell<br />
foam.<br />
Longer<br />
thrusting tips tend to bend. Cut the foam to cover the<br />
tip. Once the tip is in place, use tape to cover it. Take<br />
a length <strong>of</strong> tape and place it so it goes across the end<br />
<strong>of</strong> the tip and down both sides, attaching the tip to the<br />
weapon. If the tip is round, use a razor to cut the<br />
corners so the tape conforms to the tip. Now add<br />
another piece <strong>of</strong> tape so that it goes across the end<br />
and down the exposed sides <strong>of</strong> the foam tip. Use a<br />
razor to cut the corners so the tape overlaps slightly<br />
and conforms to the tip. Finally, poke many tiny<br />
holes all over the tip so the air can escape and the tip<br />
can contract and expand freely.<br />
7. Cover the blade<br />
The next step<br />
is to cover the<br />
exposed foam<br />
with tape or<br />
with a weapon<br />
sock. Any<br />
striking surface<br />
on a weapon<br />
should be<br />
covered with<br />
either a<br />
weapon sock<br />
or tape. If you choose to use tape, all <strong>of</strong> the tape on<br />
the striking surface <strong>of</strong> a weapon should run vertically<br />
from the thrusting tip to the pommel and should<br />
slightly overlap the piece next to it. Do not use<br />
overuse tape on striking surfaces and thrusting tips,<br />
one layer with slight overlap is enough. Excessive<br />
layering may make your weapon hard and unpassable.<br />
Tape should NEVER be spiral wrapped<br />
around the weapon.<br />
107