
Create successful ePaper yourself
Turn your PDF publications into a flip-book with our unique Google optimized e-Paper software.
Gas connections<br />
ChefTop <br />
BakerTop <br />
Gas Setup<br />
The gas type in the gas pipe network must be checked by a qualified technician that, if necessary, replaces<br />
the nozzle, adjusts the primary air and sets the type of gas on the oven control panel and apply the label.<br />
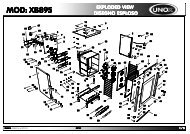
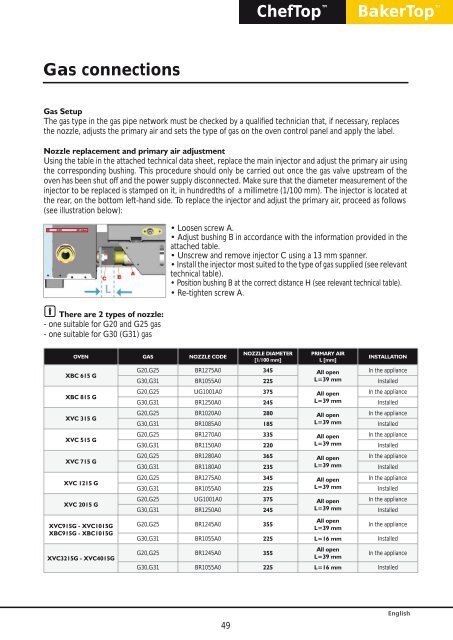
Nozzle replacement and primary air adjustment<br />
Using the table in the attached technical data sheet, replace the main injector and adjust the primary air using<br />
the corresponding bushing. This procedure should only be carried out once the gas valve upstream of the<br />
oven has been shut off and the power supply disconnected. Make sure that the diameter measurement of the<br />
injector to be replaced is stamped on it, in hundredths of a millimetre (1/100 mm). The injector is located at<br />
the rear, on the bottom left-hand side. To replace the injector and adjust the primary air, proceed as follows<br />
(see illustration below):<br />
There are 2 types of nozzle:<br />
- one suitable for G20 and G25 gas<br />
- one suitable for G30 (G31) gas<br />
OVEN GAS NOZZLE CODE<br />
XBC 615 G<br />
XBC 815 G<br />
XVC 315 G<br />
XVC 515 G<br />
XVC 715 G<br />
XVC 1215 G<br />
XVC 2015 G<br />
XVC915G - XVC1015G<br />
XBC915G - XBC1015G<br />
XVC3215G - XVC4015G<br />
• Loosen screw A.<br />
• Adjust bushing B in accordance with the information provided in the<br />
attached table.<br />
• Unscrew and remove injector C using a 13 mm spanner.<br />
• Install the injector most suited to the type of gas supplied (see relevant<br />
technical table).<br />
• Position bushing B at the correct distance H (see relevant technical table).<br />
• Re-tighten screw A.<br />
NOZZLE DIAMETER<br />
[1/100 mm]<br />
PRIMARY AIR<br />
L [mm]<br />
INSTALLATION<br />
G20,G25 BR1275A0 345 All open In the appliance<br />
G30,G31 BR1055A0 225 L=39 mm<br />
Installed<br />
G20,G25 UG1001A0 375 All open In the appliance<br />
G30,G31 BR1250A0 245 L=39 mm<br />
Installed<br />
G20,G25 BR1020A0 280 All open In the appliance<br />
G30,G31 BR1085A0 185 L=39 mm<br />
Installed<br />
G20,G25 BR1270A0 335 All open In the appliance<br />
G30,G31 BR1150A0 220 L=39 mm<br />
Installed<br />
G20,G25 BR1280A0 365 All open In the appliance<br />
G30,G31 BR1180A0 235 L=39 mm<br />
Installed<br />
G20,G25 BR1275A0 345 All open In the appliance<br />
G30,G31 BR1055A0 225 L=39 mm<br />
Installed<br />
G20,G25 UG1001A0 375 All open In the appliance<br />
G30,G31 BR1250A0 245 L=39 mm<br />
Installed<br />
G20,G25 BR1245A0 355<br />
All open<br />
L=39 mm<br />
In the appliance<br />
G30,G31 BR1055A0 225 L=16 mm Installed<br />
G20,G25 BR1245A0 355<br />
All open<br />
L=39 mm<br />
In the appliance<br />
G30,G31 BR1055A0 225 L=16 mm Installed<br />
49<br />
English