RECIPROC® UPGRADE - Vdw-dental.com
RECIPROC® UPGRADE - Vdw-dental.com
RECIPROC® UPGRADE - Vdw-dental.com

Create successful ePaper yourself
Turn your PDF publications into a flip-book with our unique Google optimized e-Paper software.
57<br />
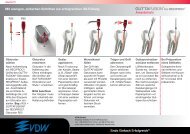
RECIPROC REVERSE Function<br />
(for VDW RECIPROC ® Instruments)<br />
This function (see details in chapter 7.4.5 MENU:<br />
Device Settings) enables more <strong>com</strong>fortable work<br />
and uses audible signals to alert you to the following<br />
events or necessary actions:<br />
• A low, fast beeping sound indicates increased<br />
stress along the entire length of the instrument. It<br />
is therefore necessary to enlarge the canal with<br />
lateral brushing motions. This will reduce the<br />
stress on the instrument.<br />
• A higher, slower beeping sound indicates an<br />
even higher stress on the instrument. The micromotor<br />
will therefore switch automatically to<br />
continuous clockwise rotation in order to release<br />
the instrument. Once the foot pedal has been<br />
released and pressed again, the micromotor will<br />
change back into reciprocating mode. It is now<br />
essential to brush laterally, to enlarge the root<br />
canal.<br />
NOTES<br />
Use an ISO size 10 C-PILOT ® File to check<br />
that the canal is not blocked. Before<br />
brushing, repeat the following steps:<br />
• Clean the instrument in the Interim<br />
Stand.<br />
• Irrigate the canal.<br />
• Use an ISO size 10 C-PILOT ® File to<br />
check that the canal is not blocked.<br />
If the RECIPROC REVERSE Function has been<br />
deactivated (see details in chapter 7.4.5: MENU:<br />
Device Settings), the motor will stop as soon as<br />
the factory-preset maximum torque has been<br />
reached. If this happens, remove the file from the<br />
root canal, clean the instrument and start over.<br />
However, we re<strong>com</strong>mend that you always work<br />
with the RECIPROC REVERSE function, as it is<br />
more <strong>com</strong>fortable.<br />
7.5.5 Integrated Apex Locator<br />
The VDW.GOLD ® features an integrated apex locator<br />
for length determination of the root canal.<br />
The apex locator can be used in 2 ways:<br />
Combined Length Determination: The working<br />
length is determined while the root canal is being<br />
prepared. The micromotor and the apex locator<br />
are thus active simultaneously (use of the VDW<br />
6:1 contra-angle and the lip clip).<br />
Separate Length Determination: The working<br />
length is determined manually (without the micromotor)<br />
using the file clip and the lip clip.<br />
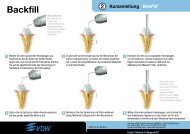
7.5.6 The Apex Locator LED Display<br />
As you are determining the length of the root<br />
canal, the apex locator LED display shows you<br />
the current position of the tip of the instrument.<br />
Fig. 6 Apex Locator LED Display<br />
The following areas are identified using a colour<br />
scale (LEDs):<br />
1) LED display: 3 blue LEDs<br />
Area: Median coronal canal section<br />
Warning Signal: Slow sound sequence<br />
2/3) LED display: 3 green LEDs/ 1 orange LED<br />
Area: Apical section: Apical constriction<br />
area to apical foramen<br />
Warning Signal: Increasing signal<br />
frequency (sound sequence). A constant<br />
beep will begin sounding when the orange<br />
LED has been reached.<br />
4) LED display: 1 red LED<br />
Area: Apical foramen surpassed<br />
(overinstrumentation)<br />
Warning Signal: Very loud warning signal<br />
1<br />
2<br />
3<br />
4<br />
en<br />
Endo Easy Efficient ®