SAS 9.1.3 Intelligence Platform: System Administration Guide
SAS 9.1.3 Intelligence Platform: System Administration Guide
SAS 9.1.3 Intelligence Platform: System Administration Guide

You also want an ePaper? Increase the reach of your titles
YUMPU automatically turns print PDFs into web optimized ePapers that Google loves.
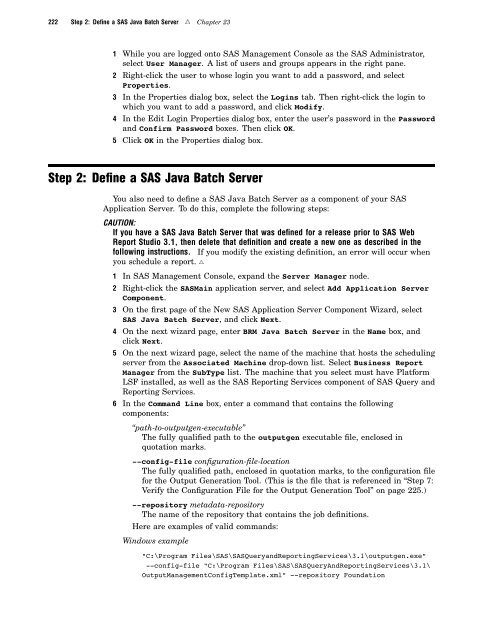
222 Step 2: Define a <strong>SAS</strong> Java Batch Server R Chapter 23<br />
1 While you are logged onto <strong>SAS</strong> Management Console as the <strong>SAS</strong> Administrator,<br />
select User Manager. A list of users and groups appears in the right pane.<br />
2 Right-click the user to whose login you want to add a password, and select<br />
Properties.<br />
3 In the Properties dialog box, select the Logins tab. Then right-click the login to<br />
which you want to add a password, and click Modify.<br />
4 In the Edit Login Properties dialog box, enter the user’s password in the Password<br />
and Confirm Password boxes. Then click OK.<br />
5 Click OK in the Properties dialog box.<br />
Step 2: Define a <strong>SAS</strong> Java Batch Server<br />
You also need to define a <strong>SAS</strong> Java Batch Server as a component of your <strong>SAS</strong><br />
Application Server. To do this, complete the following steps:<br />
CAUTION:<br />
If you have a <strong>SAS</strong> Java Batch Server that was defined for a release prior to <strong>SAS</strong> Web<br />
Report Studio 3.1, then delete that definition and create a new one as described in the<br />
following instructions. If you modify the existing definition, an error will occur when<br />
you schedule a report. R<br />
1 In <strong>SAS</strong> Management Console, expand the Server Manager node.<br />
2 Right-click the <strong>SAS</strong>Main application server, and select Add Application Server<br />
Component.<br />
3 On the first page of the New <strong>SAS</strong> Application Server Component Wizard, select<br />
<strong>SAS</strong> Java Batch Server, and click Next.<br />
4 On the next wizard page, enter BRM Java Batch Server in the Name box, and<br />
click Next.<br />
5 On the next wizard page, select the name of the machine that hosts the scheduling<br />
server from the Associated Machine drop-down list. Select Business Report<br />
Manager from the SubType list. The machine that you select must have <strong>Platform</strong><br />
LSF installed, as well as the <strong>SAS</strong> Reporting Services component of <strong>SAS</strong> Query and<br />
Reporting Services.<br />
6 In the Command Line box, enter a command that contains the following<br />
components:<br />
“path-to-outputgen-executable”<br />
The fully qualified path to the outputgen executable file, enclosed in<br />
quotation marks.<br />
--config-file configuration-file-location<br />
The fully qualified path, enclosed in quotation marks, to the configuration file<br />
for the Output Generation Tool. (This is the file that is referenced in “Step 7:<br />
Verify the Configuration File for the Output Generation Tool” on page 225.)<br />
--repository metadata-repository<br />
The name of the repository that contains the job definitions.<br />
Here are examples of valid commands:<br />
Windows example<br />
"C:\Program Files\<strong>SAS</strong>\<strong>SAS</strong>QueryandReportingServices\3.1\outputgen.exe"<br />
--config-file "C:\Program Files\<strong>SAS</strong>\<strong>SAS</strong>QueryAndReportingServices\3.1\<br />
OutputManagementConfigTemplate.xml" --repository Foundation