


You also want an ePaper? Increase the reach of your titles
YUMPU automatically turns print PDFs into web optimized ePapers that Google loves.
Quilting the Quilt - Which CS Feature To use<br />
Phase 3 - Borders<br />
Borders - Mitered<br />
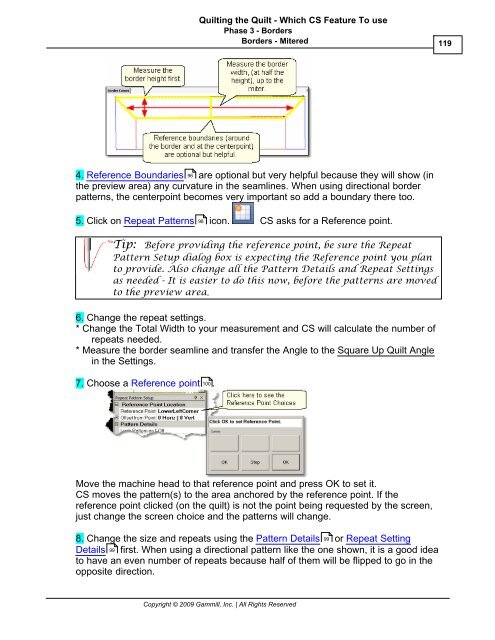
4. Reference Boundaries 96 are optional but very helpful because they will show (in<br />
the preview area) any curvature in the seamlines. When using directional border<br />
patterns, the centerpoint becomes very important so add a boundary there too.<br />
5. Click on Repeat Patterns 98 icon. CS asks for a Reference point.<br />
Tip: Before providing the reference point, be sure the Repeat<br />
Pattern Setup dialog box is expecting the Reference point you plan<br />
to provide. Also change all the Pattern Details and Repeat Settings<br />
as needed - It is easier to do this now, before the patterns are moved<br />
to the preview area.<br />
6. Change the repeat settings.<br />
* Change the Total Width to your measurement and CS will calculate the number of<br />
repeats needed.<br />
* Measure the border seamline and transfer the Angle to the Square Up Quilt Angle<br />
in the Settings.<br />
7. Choose a Reference point 100 .<br />
Move the machine head to that reference point and press OK to set it.<br />
CS moves the pattern(s) to the area anchored by the reference point. If the<br />
reference point clicked (on the quilt) is not the point being requested by the screen,<br />
just change the screen choice and the patterns will change.<br />
8. Change the size and repeats using the Pattern Details 99 or Repeat Setting<br />
Details 99<br />
first. When using a directional pattern like the one shown, it is a good idea<br />
to have an even number of repeats because half of them will be flipped to go in the<br />
opposite direction.<br />
Copyright © 2009 <strong>Gammill</strong>, Inc. | All Rights Reserved<br />
119


