


You also want an ePaper? Increase the reach of your titles
YUMPU automatically turns print PDFs into web optimized ePapers that Google loves.
Quilting the Quilt - Which CS Feature To use<br />
Phase 4 - Backgrounds<br />
Pantographs using Edge_To_Edge<br />
Tip: When rolling the quilt top, leave extra space above the<br />
registration points if your patterns are nested. The space between<br />
the pickup roller and the registration points is used when patterns<br />
are nested, so be sure there is enough room.<br />
Feature: Edge To Edge - Continue<br />
Edge-To-Edge Continue is a special feature that aligns pantograph rows together<br />
properly after the quilt has been rolled.<br />
Assumptions:<br />
This assumes the first section (or more) is done, the registration points have been<br />
marked and the quilt has been rolled.<br />
Steps to follow: (all these steps are considered ‘edit’ mode because you can’t<br />
return to the E2E Setup details).<br />
9. Click EdgeToEdge_Continue<br />
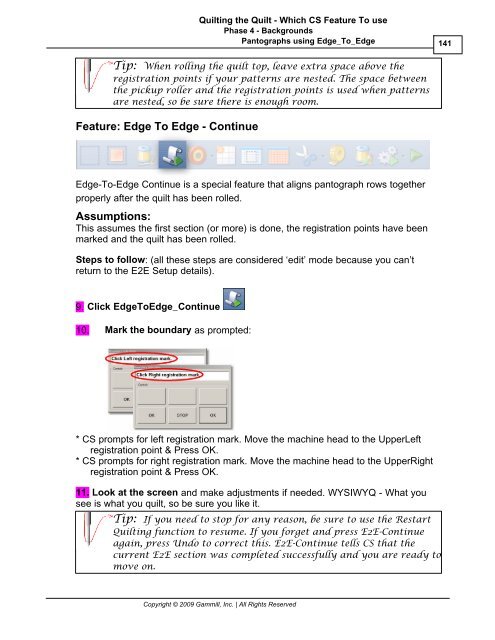
10. Mark the boundary as prompted:<br />
* CS prompts for left registration mark. Move the machine head to the UpperLeft<br />
registration point & Press OK.<br />
* CS prompts for right registration mark. Move the machine head to the UpperRight<br />
registration point & Press OK.<br />
11. Look at the screen and make adjustments if needed. WYSIWYQ - What you<br />
see is what you quilt, so be sure you like it.<br />
Tip: If you need to stop for any reason, be sure to use the Restart<br />
Quilting function to resume. If you forget and press E2E-Continue<br />
again, press Undo to correct this. E2E-Continue tells CS that the<br />
current E2E section was completed successfully and you are ready to<br />
move on.<br />
Copyright © 2009 <strong>Gammill</strong>, Inc. | All Rights Reserved<br />
141


