


Create successful ePaper yourself
Turn your PDF publications into a flip-book with our unique Google optimized e-Paper software.
86<br />
Getting Started with CreativeStudio<br />
Tip: Wondering when/why you will ever use these buttons and<br />
settings in Baste Mode? You probably won't use them here but you<br />
will need them in Regulated Sewing Mode. To maintain consistency,<br />
the settings and buttons for Baste and Regulated modes are the<br />
same.<br />
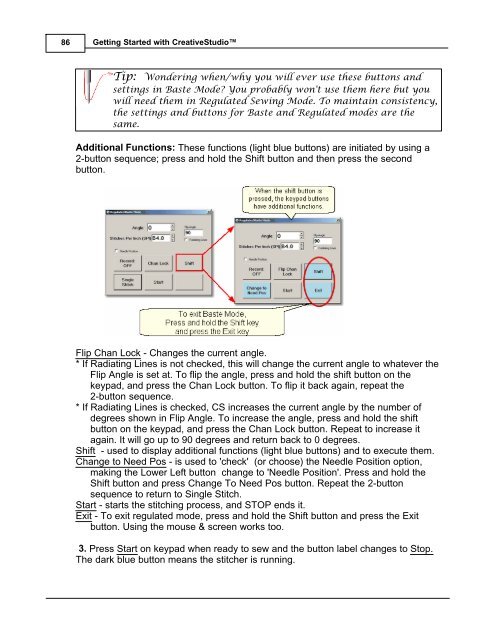
Additional Functions: These functions (light blue buttons) are initiated by using a<br />
2-button sequence; press and hold the Shift button and then press the second<br />
button.<br />
Flip Chan Lock - Changes the current angle.<br />
* If Radiating Lines is not checked, this will change the current angle to whatever the<br />
Flip Angle is set at. To flip the angle, press and hold the shift button on the<br />
keypad, and press the Chan Lock button. To flip it back again, repeat the<br />
2-button sequence.<br />
* If Radiating Lines is checked, CS increases the current angle by the number of<br />
degrees shown in Flip Angle. To increase the angle, press and hold the shift<br />
button on the keypad, and press the Chan Lock button. Repeat to increase it<br />
again. It will go up to 90 degrees and return back to 0 degrees.<br />
Shift - used to display additional functions (light blue buttons) and to execute them.<br />
Change to Need Pos - is used to 'check' (or choose) the Needle Position option,<br />
making the Lower Left button change to 'Needle Position'. Press and hold the<br />
Shift button and press Change To Need Pos button. Repeat the 2-button<br />
sequence to return to Single Stitch.<br />
Start - starts the stitching process, and STOP ends it.<br />
Exit - To exit regulated mode, press and hold the Shift button and press the Exit<br />
button. Using the mouse & screen works too.<br />
3. Press Start on keypad when ready to sew and the button label changes to Stop.<br />
The dark blue button means the stitcher is running.


