Manual - AEQ International
Manual - AEQ International
Manual - AEQ International

You also want an ePaper? Increase the reach of your titles
YUMPU automatically turns print PDFs into web optimized ePapers that Google loves.
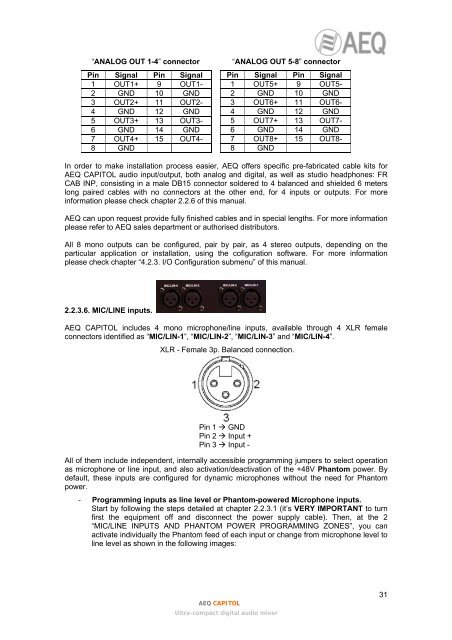
“ANALOG OUT 1-4” connectorPin Signal Pin Signal1 OUT1+ 9 OUT1-2 GND 10 GND3 OUT2+ 11 OUT2-4 GND 12 GND5 OUT3+ 13 OUT3-6 GND 14 GND7 OUT4+ 15 OUT4-8 GND“ANALOG OUT 5-8” connectorPin Signal Pin Signal1 OUT5+ 9 OUT5-2 GND 10 GND3 OUT6+ 11 OUT6-4 GND 12 GND5 OUT7+ 13 OUT7-6 GND 14 GND7 OUT8+ 15 OUT8-8 GNDIn order to make installation process easier, <strong>AEQ</strong> offers specific pre-fabricated cable kits for<strong>AEQ</strong> CAPITOL audio input/output, both analog and digital, as well as studio headphones: FRCAB INP, consisting in a male DB15 connector soldered to 4 balanced and shielded 6 meterslong paired cables with no connectors at the other end, for 4 inputs or outputs. For moreinformation please check chapter 2.2.6 of this manual.<strong>AEQ</strong> can upon request provide fully finished cables and in special lengths. For more informationplease refer to <strong>AEQ</strong> sales department or authorised distributors.All 8 mono outputs can be configured, pair by pair, as 4 stereo outputs, depending on theparticular application or installation, using the cofiguration software. For more informationplease check chapter “4.2.3. I/O Configuration submenu” of this manual.2.2.3.6. MIC/LINE inputs.<strong>AEQ</strong> CAPITOL includes 4 mono microphone/line inputs, available through 4 XLR femaleconnectors identified as “MIC/LIN-1”, “MIC/LIN-2”, “MIC/LIN-3” and “MIC/LIN-4”.XLR - Female 3p. Balanced connection.Pin 1 GNDPin 2 Input +Pin 3 Input -All of them include independent, internally accessible programming jumpers to select operationas microphone or line input, and also activation/deactivation of the +48V Phantom power. Bydefault, these inputs are configured for dynamic microphones without the need for Phantompower.- Programming inputs as line level or Phantom-powered Microphone inputs.Start by following the steps detailed at chapter 2.2.3.1 (it’s VERY IMPORTANT to turnfirst the equipment off and disconnect the power supply cable). Then, at the 2“MIC/LINE INPUTS AND PHANTOM POWER PROGRAMMING ZONES”, you canactivate individually the Phantom feed of each input or change from microphone level toline level as shown in the following images:<strong>AEQ</strong> CAPITOLUltra-compact digital audio mixer31