Manual - AEQ International
Manual - AEQ International
Manual - AEQ International

Create successful ePaper yourself
Turn your PDF publications into a flip-book with our unique Google optimized e-Paper software.
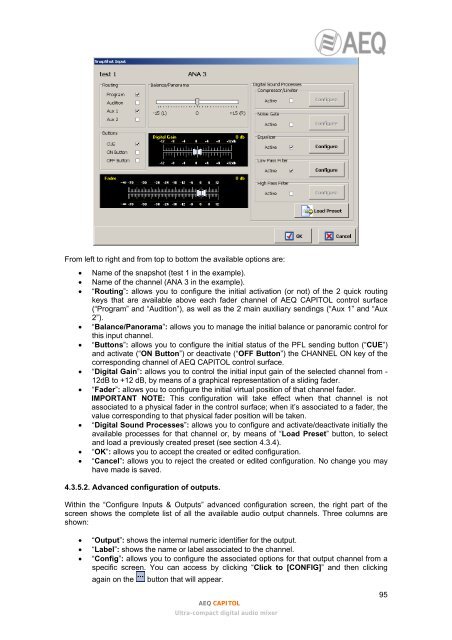
From left to right and from top to bottom the available options are:• Name of the snapshot (test 1 in the example).• Name of the channel (ANA 3 in the example).• “Routing”: allows you to configure the initial activation (or not) of the 2 quick routingkeys that are available above each fader channel of <strong>AEQ</strong> CAPITOL control surface(“Program” and “Audition”), as well as the 2 main auxiliary sendings (“Aux 1” and “Aux2”).• “Balance/Panorama”: allows you to manage the initial balance or panoramic control forthis input channel.• “Buttons”: allows you to configure the initial status of the PFL sending button (“CUE”)and activate (“ON Button”) or deactivate (“OFF Button”) the CHANNEL ON key of thecorresponding channel of <strong>AEQ</strong> CAPITOL control surface.• “Digital Gain”: allows you to control the initial input gain of the selected channel from -12dB to +12 dB, by means of a graphical representation of a sliding fader.• “Fader”: allows you to configure the initial virtual position of that channel fader.IMPORTANT NOTE: This configuration will take effect when that channel is notassociated to a physical fader in the control surface; when it’s associated to a fader, thevalue corresponding to that physical fader position will be taken.• “Digital Sound Processes”: allows you to configure and activate/deactivate initially theavailable processes for that channel or, by means of “Load Preset” button, to selectand load a previously created preset (see section 4.3.4).• “OK”: allows you to accept the created or edited configuration.• “Cancel”: allows you to reject the created or edited configuration. No change you mayhave made is saved.4.3.5.2. Advanced configuration of outputs.Within the “Configure Inputs & Outputs” advanced configuration screen, the right part of thescreen shows the complete list of all the available audio output channels. Three columns areshown:• “Output”: shows the internal numeric identifier for the output.• “Label”: shows the name or label associated to the channel.• “Config”: allows you to configure the associated options for that output channel from aspecific screen. You can access by clicking “Click to [CONFIG]” and then clickingagain on the button that will appear.<strong>AEQ</strong> CAPITOLUltra-compact digital audio mixer95