

Rover 214 & 414 Service and Repair Manual - Rover club
Rover 214 & 414 Service and Repair Manual - Rover club
Rover 214 & 414 Service and Repair Manual - Rover club

You also want an ePaper? Increase the reach of your titles
YUMPU automatically turns print PDFs into web optimized ePapers that Google loves.
3•8 Cooling, heating <strong>and</strong> ventilation systems<br />
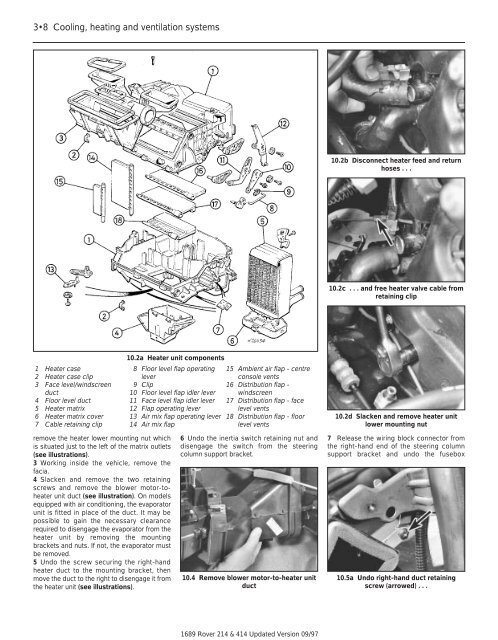
1 Heater case<br />
2 Heater case clip<br />
3 Face level/windscreen<br />
duct<br />
4 Floor level duct<br />
5 Heater matrix<br />
6 Heater matrix cover<br />
7 Cable retaining clip<br />
remove the heater lower mounting nut which<br />
is situated just to the left of the matrix outlets<br />
(see illustrations).<br />
3 Working inside the vehicle, remove the<br />
facia.<br />
4 Slacken <strong>and</strong> remove the two retaining<br />
screws <strong>and</strong> remove the blower motor-toheater<br />
unit duct (see illustration). On models<br />
equipped with air conditioning, the evaporator<br />
unit is fitted in place of the duct. It may be<br />
possible to gain the necessary clearance<br />
required to disengage the evaporator from the<br />
heater unit by removing the mounting<br />
brackets <strong>and</strong> nuts. If not, the evaporator must<br />
be removed.<br />
5 Undo the screw securing the right-h<strong>and</strong><br />
heater duct to the mounting bracket, then<br />
move the duct to the right to disengage it from<br />
the heater unit (see illustrations).<br />
10.2a Heater unit components<br />
8 Floor level flap operating<br />
lever<br />
9 Clip<br />
10 Floor level flap idler lever<br />
11 Face level flap idler lever<br />
12 Flap operating lever<br />
13 Air mix flap operating lever<br />
14 Air mix flap<br />
15 Ambient air flap - centre<br />
console vents<br />
16 Distribution flap -<br />
windscreen<br />
17 Distribution flap - face<br />
level vents<br />
18 Distribution flap - floor<br />
level vents<br />
6 Undo the inertia switch retaining nut <strong>and</strong><br />
disengage the switch from the steering<br />
column support bracket.<br />
10.4 Remove blower motor-to-heater unit<br />
duct<br />
1689 <strong>Rover</strong> <strong>214</strong> & <strong>414</strong> Updated Version 09/97<br />
10.2b Disconnect heater feed <strong>and</strong> return<br />
hoses . . .<br />
10.2c . . . <strong>and</strong> free heater valve cable from<br />
retaining clip<br />
10.2d Slacken <strong>and</strong> remove heater unit<br />
lower mounting nut<br />
7 Release the wiring block connector from<br />
the right-h<strong>and</strong> end of the steering column<br />
support bracket <strong>and</strong> undo the fusebox<br />
10.5a Undo right-h<strong>and</strong> duct retaining<br />
screw (arrowed) . . .