

Rover 214 & 414 Service and Repair Manual - Rover club
Rover 214 & 414 Service and Repair Manual - Rover club
Rover 214 & 414 Service and Repair Manual - Rover club

Create successful ePaper yourself
Turn your PDF publications into a flip-book with our unique Google optimized e-Paper software.
9•8 Braking system<br />
piston in as far as possible <strong>and</strong> extract the<br />
circlip <strong>and</strong> washer. Withdraw the primary<br />
piston assembly <strong>and</strong> spring.<br />
20 Undo the grub screw from the underside<br />
of the master cylinder body then use the<br />
wooden dowel to press the secondary<br />
piston into the body <strong>and</strong> withdraw the<br />
secondary piston retaining pin. Extract<br />
the secondary piston assembly <strong>and</strong> spring. If<br />
necessary, the piston can be dislodged by<br />
tapping the master cylinder body on a<br />
wooden block.<br />
21 Examine <strong>and</strong> overhaul the master cylinder<br />
components as described above in<br />
paragraphs 9 to 14.<br />
22 Fit the spring to the secondary piston<br />
assembly <strong>and</strong> use a clean wooden dowel to<br />
press the assembly fully into the master<br />
cylinder bore. Align the slot in the piston with<br />
the retaining pin hole then insert the<br />
secondary piston retaining pin. Refit the grub<br />
screw <strong>and</strong> tighten it securely.<br />
23 Fit the spring to the primary piston<br />
assembly <strong>and</strong> press the assembly into position<br />
using the wooden dowel. Refit the washer <strong>and</strong><br />
secure the piston assembly in position with the<br />
circlip, ensuring that it is correctly located in its<br />
groove in the master cylinder bore.<br />
24 Fit the flat washer <strong>and</strong> refit the dust cap to<br />
the rear of the master cylinder body.<br />
25 Align the lugs on the new mounting seals<br />
with the slots in the master cylinder body <strong>and</strong><br />
press them into position. Carefully refit the<br />
reservoir, ensuring that it is pressed fully into<br />
the master cylinder body.<br />
11.2a Remove lower caliper guide<br />
pin bolt . . .<br />
11.3 Removing circular shim from caliper<br />
piston<br />
Refitting<br />
26 Remove all traces of dirt from the master<br />
cylinder <strong>and</strong> servo unit mating surfaces, then<br />
fit a new O-ring to the groove on the master<br />
cylinder body.<br />
27 Fit the master cylinder to the servo unit,<br />
ensuring that the servo unit pushrod enters<br />
the master cylinder bore centrally. Refit the<br />
master cylinder washers <strong>and</strong> mounting nuts<br />
<strong>and</strong> tighten them to the specified torque.<br />
28 Wipe clean the brake pipe unions then<br />
refit them to the master cylinder ports<br />
<strong>and</strong> tighten them to the specified torque<br />
setting.<br />
29 Refill the master cylinder reservoir with<br />
new fluid <strong>and</strong> bleed the hydraulic system.<br />
10 Front brake pads -<br />
inspection<br />
Refer to Chapter 1.<br />
11 Front brake pads -<br />
renewal 2<br />
Warning: Renew both sets of<br />
front brake pads at the same<br />
time. Never renew the pads on<br />
only one wheel as uneven braking may<br />
result. The dust created by pad wear may<br />
contain asbestos, which is a health hazard.<br />
11.2b . . . <strong>and</strong> pivot caliper away from disc<br />
11.4 Removing pads with springs <strong>and</strong><br />
shims<br />
1689 <strong>Rover</strong> <strong>214</strong> & <strong>414</strong> Updated Version 09/97<br />
Never blow it with compressed air or<br />
inhale it. An approved filtering mask<br />
should be worn when working on the<br />
brakes. DO NOT use petroleum-based<br />
solvents to clean brake parts. Use brake<br />
cleaner or methylated spirit only.<br />
Removal<br />
1 Chock the rear wheels, firmly apply the<br />
h<strong>and</strong>brake then jack up the front of the<br />
vehicle <strong>and</strong> support it on axle st<strong>and</strong>s. Remove<br />
both front roadwheels.<br />
2 Remove the lower caliper guide pin bolt<br />
whilst, if necessary, using a slim open-ended<br />
spanner to prevent the guide pin itself from<br />
rotating. Pivot the caliper away from the disc<br />
to gain access to the brake pads <strong>and</strong> tie it to<br />
the suspension strut using a piece of wire<br />
(see illustrations).<br />
3 Remove the circular shim which is fitted to<br />
the caliper piston (see illustration).<br />
4 Remove the brake pads from the caliper<br />
mounting bracket whilst noting the correct<br />
position of the pad retainer springs <strong>and</strong> pad<br />
shims (see illustration).<br />
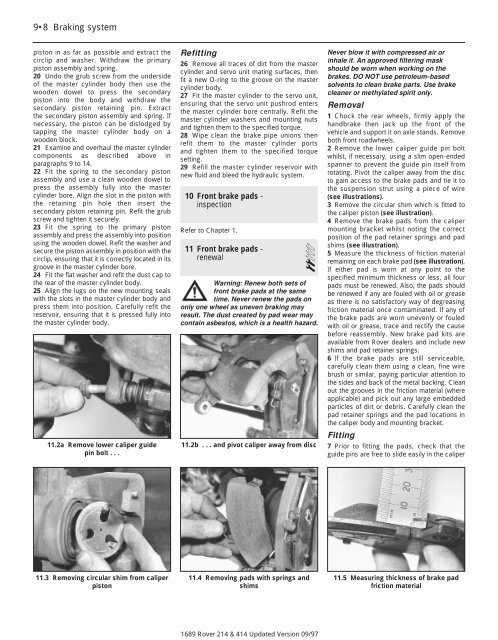
5 Measure the thickness of friction material<br />
remaining on each brake pad (see illustration).<br />
If either pad is worn at any point to the<br />
specified minimum thickness or less, all four<br />
pads must be renewed. Also, the pads should<br />
be renewed if any are fouled with oil or grease<br />
as there is no satisfactory way of degreasing<br />
friction material once contaminated. If any of<br />
the brake pads are worn unevenly or fouled<br />
with oil or grease, trace <strong>and</strong> rectify the cause<br />
before reassembly. New brake pad kits are<br />
available from <strong>Rover</strong> dealers <strong>and</strong> include new<br />
shims <strong>and</strong> pad retainer springs.<br />
6 If the brake pads are still serviceable,<br />
carefully clean them using a clean, fine wire<br />
brush or similar, paying particular attention to<br />
the sides <strong>and</strong> back of the metal backing. Clean<br />
out the grooves in the friction material (where<br />
applicable) <strong>and</strong> pick out any large embedded<br />
particles of dirt or debris. Carefully clean the<br />
pad retainer springs <strong>and</strong> the pad locations in<br />
the caliper body <strong>and</strong> mounting bracket.<br />
Fitting<br />
7 Prior to fitting the pads, check that the<br />
guide pins are free to slide easily in the caliper<br />
11.5 Measuring thickness of brake pad<br />
friction material