

Rover 214 & 414 Service and Repair Manual - Rover club
Rover 214 & 414 Service and Repair Manual - Rover club
Rover 214 & 414 Service and Repair Manual - Rover club

You also want an ePaper? Increase the reach of your titles
YUMPU automatically turns print PDFs into web optimized ePapers that Google loves.
9.39 Ensure timing belt tensioner spring is<br />
correctly hooked onto pillar bolt<br />
Tensioner pulley<br />
39 Refit the tensioner pulley assembly <strong>and</strong><br />
tighten the pulley Allen screw <strong>and</strong> the<br />
backplate clamp bolt lightly. Hook the<br />
tensioner spring over the pillar bolt <strong>and</strong> check<br />
that the tensioner is free to move under spring<br />
tension <strong>and</strong> that the pulley bears correctly<br />
against the timing belt (see illustration).<br />
40 On K16 engines, remove the camshaft<br />
sprocket locking tool.<br />
41 Carry out the operations described above<br />
in paragraphs 27 to 32.<br />
10 Camshaft oil seals - renewal<br />
4<br />
Note: If a right-h<strong>and</strong> oil seal is to be renewed<br />
with the timing belt still in place, then check<br />
that the belt is free from oil contamination.<br />
Renew the belt if signs of oil contamination<br />
are found. Cover the belt to protect it from<br />
contamination while work is in progress <strong>and</strong><br />
ensure that all traces of oil are removed from<br />
the area before the belt is refitted.<br />
Right-h<strong>and</strong> seal(s)<br />
1 Remove the camshaft sprocket(s).<br />
2 Punch or drill two small holes opposite<br />
each other in the oil seal. Screw a self-tapping<br />
screw into each <strong>and</strong> pull on the screws with<br />
pliers to extract the seal.<br />
3 Clean the seal housing <strong>and</strong> polish off any<br />
burrs or raised edges which may have caused<br />
the seal to fail in the first place.<br />
4 Lubricate the lips of the new seal with clean<br />
engine oil <strong>and</strong> drive it into position until it<br />
seats on its locating shoulder. Use a suitable<br />
tubular drift, such as a socket, which bears<br />
only on the hard outer edge of the seal (see<br />
illustration). Take care not to damage the<br />
seal lips during fitting <strong>and</strong> note that the seal<br />
lips should face inwards.<br />
5 Refit the camshaft sprocket(s).<br />
Left-h<strong>and</strong> seals - K16 engines<br />
6 Disconnect the battery negative lead.<br />
7 To reach the inlet camshaft seal, remove<br />
the distributor.<br />
8 To reach the exhaust camshaft seal,<br />
10.4 Fitting a new camshaft right-h<strong>and</strong> oil<br />
seal - K16 engine<br />
unfasten the rubber strap securing the air<br />
intake duct to its support bracket, disconnect<br />
the vacuum pipe from the air temperature<br />
control valve <strong>and</strong> unclip the pipe from the<br />
support bracket. Undo the bracket’s retaining<br />
bolts <strong>and</strong> remove the bracket from the<br />
cylinder head (see illustration).<br />
9 Remove the old seal <strong>and</strong> install the new one<br />
as described above in paragraphs 2 to 4.<br />
10 On the inlet camshaft, refit the distributor.<br />
11 On the exhaust camshaft, refit the air<br />
intake duct support bracket, tightening its<br />
screws to the specified torque wrench setting.<br />
Reconnect <strong>and</strong> secure the air temperature<br />
control valve vacuum pipe <strong>and</strong> refit the rubber<br />
strap to secure the air intake duct.<br />
12 Connect the battery negative lead.<br />
11 Camshafts <strong>and</strong> hydraulic<br />
tappets - removal, inspection<br />
<strong>and</strong> refitting<br />
4<br />
If faulty tappets are<br />
diagnosed <strong>and</strong> the engine’s<br />
service history is unknown,<br />
it is always worth trying the<br />
effect of renewing the engine oil <strong>and</strong><br />
filter (using only good quality engine oil<br />
of the recommended viscosity <strong>and</strong><br />
specification) before going to the<br />
expense of renewing any of the<br />
tappets.<br />
Note: Prior to removing the camshaft(s), obtain<br />
<strong>Rover</strong> sealant kit LVV 10002 which also<br />
contains a plastic scraper. Read the<br />
instructions supplied with the kit <strong>and</strong> take care<br />
not to allow the sealant to contact the fingers,<br />
as it will bond the skin. If difficulty is<br />
experienced with the removal of hardened<br />
sealant from mating surfaces, it will be<br />
necessary to use a foam action gasket remover.<br />
Removal<br />
K8 engines<br />
1 Remove the cylinder head cover (see<br />
illustration 11.0a overleaf).<br />
2 Remove the distributor.<br />
3 Remove the camshaft sprocket.<br />
1689 <strong>Rover</strong> <strong>214</strong> & <strong>414</strong> Updated Version 09/97<br />
Engine in-car repair procedures 2A•13<br />
10.8 Remove air intake duct support<br />
bracket to reach exhaust camshaft lefth<strong>and</strong><br />
oil seal - K16 engine<br />
4 Carefully prise the oil feed tube away from<br />
the camshaft bearing caps <strong>and</strong> remove it<br />
from the head assembly. Remove the<br />
O-rings from the oil rail <strong>and</strong> discard them.<br />
The O-rings must be renewed whenever they<br />
are disturbed.<br />
5 The camshaft right <strong>and</strong> left-h<strong>and</strong> end<br />
bearing caps are noticeably different <strong>and</strong><br />
cannot be confused. The intermediate bearing<br />
caps (which are all similar) are marked by the<br />
manufacturer with a number (1, 2, 3, or 4)<br />
stamped in the boss next to the oil feed hole.<br />
Before unbolting any of the caps, make<br />
written notes to ensure that each can be<br />
easily identified <strong>and</strong> refitted in its original<br />
location.<br />
6 Working in the reverse of the tightening<br />
sequence (see illustration 11.29), slacken the<br />
camshaft bearing cap bolts progressively, by<br />
one turn at a time. Work only as described to<br />
release the pressure of the valve springs on<br />
the bearing caps gradually <strong>and</strong> evenly.<br />
7 Withdraw the bearing caps, noting the<br />
presence of the locating dowels on the end<br />
caps, then remove the camshaft <strong>and</strong> withdraw<br />
the oil seal.<br />
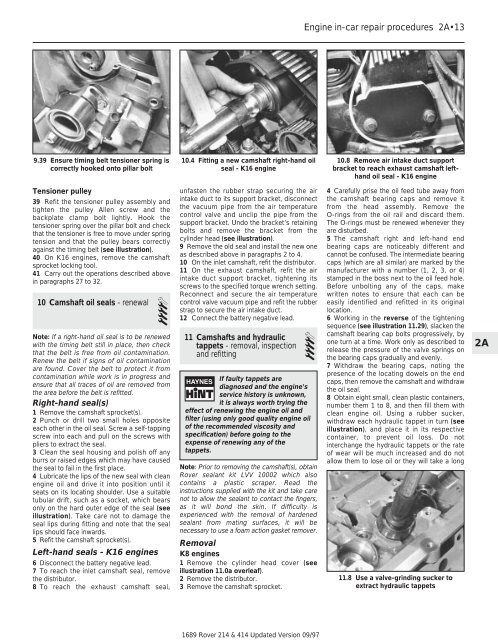
8 Obtain eight small, clean plastic containers,<br />
number them 1 to 8, <strong>and</strong> then fill them with<br />
clean engine oil. Using a rubber sucker,<br />
withdraw each hydraulic tappet in turn (see<br />
illustration), <strong>and</strong> place it in its respective<br />
container, to prevent oil loss. Do not<br />
interchange the hydraulic tappets or the rate<br />
of wear will be much increased <strong>and</strong> do not<br />
allow them to lose oil or they will take a long<br />
11.8 Use a valve-grinding sucker to<br />
extract hydraulic tappets<br />
2A