

Rover 214 & 414 Service and Repair Manual - Rover club
Rover 214 & 414 Service and Repair Manual - Rover club
Rover 214 & 414 Service and Repair Manual - Rover club

Create successful ePaper yourself
Turn your PDF publications into a flip-book with our unique Google optimized e-Paper software.
9 Starting system - testing<br />
2<br />
1 If the starter motor fails to operate when the<br />
switch is operated, the following may be the<br />
cause:<br />
a) The battery is faulty.<br />
b) The electrical connections between the<br />
ignition switch, solenoid, battery <strong>and</strong><br />
starter motor are somewhere failing to<br />
pass the necessary current from the<br />
battery through the starter to earth.<br />
c) The solenoid is faulty.<br />
d) The starter relay is faulty.<br />
e) The starter motor is mechanically or<br />
electrically defective.<br />
2 To check the battery, switch on the<br />
headlamps. If they dim after a few seconds<br />
then the battery is discharged. Recharge or<br />
renew the battery. If the lamps glow brightly,<br />
operate the ignition switch <strong>and</strong> see what<br />
happens to the lamps. If they dim, then you<br />
know that power is reaching the starter motor,<br />
therefore the motor must be removed <strong>and</strong><br />
renewed or overhauled to cure the fault. If the<br />
lamps stay bright (<strong>and</strong> no clicking sound can<br />
be heard from the solenoid), there is a fault in<br />
the circuit or solenoid. If the starter turns<br />
slowly when switched on, but the battery is in<br />
good condition, then either the starter must<br />
be faulty or there is considerable resistance in<br />
the circuit.<br />
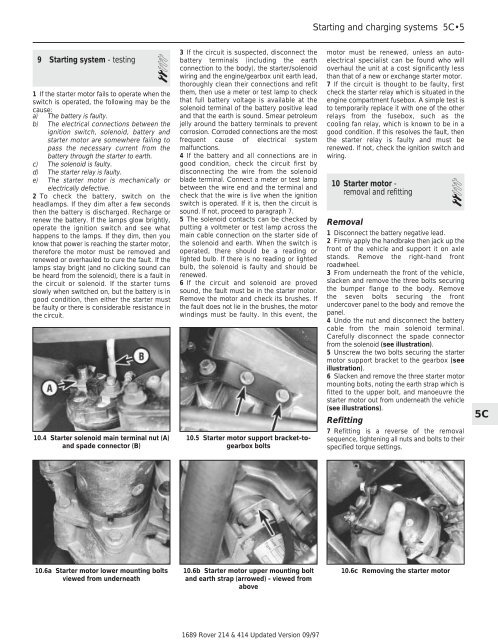
10.4 Starter solenoid main terminal nut (A)<br />
<strong>and</strong> spade connector (B)<br />
10.6a Starter motor lower mounting bolts<br />
viewed from underneath<br />
3 If the circuit is suspected, disconnect the<br />
battery terminals (including the earth<br />
connection to the body), the starter/solenoid<br />
wiring <strong>and</strong> the engine/gearbox unit earth lead,<br />
thoroughly clean their connections <strong>and</strong> refit<br />
them, then use a meter or test lamp to check<br />
that full battery voltage is available at the<br />
solenoid terminal of the battery positive lead<br />
<strong>and</strong> that the earth is sound. Smear petroleum<br />
jelly around the battery terminals to prevent<br />
corrosion. Corroded connections are the most<br />
frequent cause of electrical system<br />
malfunctions.<br />
4 If the battery <strong>and</strong> all connections are in<br />
good condition, check the circuit first by<br />
disconnecting the wire from the solenoid<br />
blade terminal. Connect a meter or test lamp<br />
between the wire end <strong>and</strong> the terminal <strong>and</strong><br />
check that the wire is live when the ignition<br />
switch is operated. If it is, then the circuit is<br />
sound. If not, proceed to paragraph 7.<br />
5 The solenoid contacts can be checked by<br />
putting a voltmeter or test lamp across the<br />
main cable connection on the starter side of<br />
the solenoid <strong>and</strong> earth. When the switch is<br />
operated, there should be a reading or<br />
lighted bulb. If there is no reading or lighted<br />
bulb, the solenoid is faulty <strong>and</strong> should be<br />
renewed.<br />
6 If the circuit <strong>and</strong> solenoid are proved<br />
sound, the fault must be in the starter motor.<br />
Remove the motor <strong>and</strong> check its brushes. If<br />
the fault does not lie in the brushes, the motor<br />
windings must be faulty. In this event, the<br />
10.5 Starter motor support bracket-togearbox<br />
bolts<br />
10.6b Starter motor upper mounting bolt<br />
<strong>and</strong> earth strap (arrowed) - viewed from<br />
above<br />
1689 <strong>Rover</strong> <strong>214</strong> & <strong>414</strong> Updated Version 09/97<br />
Starting <strong>and</strong> charging systems 5C•5<br />
motor must be renewed, unless an autoelectrical<br />
specialist can be found who will<br />
overhaul the unit at a cost significantly less<br />
than that of a new or exchange starter motor.<br />
7 If the circuit is thought to be faulty, first<br />
check the starter relay which is situated in the<br />
engine compartment fusebox. A simple test is<br />
to temporarily replace it with one of the other<br />
relays from the fusebox, such as the<br />
cooling fan relay, which is known to be in a<br />
good condition. If this resolves the fault, then<br />
the starter relay is faulty <strong>and</strong> must be<br />
renewed. If not, check the ignition switch <strong>and</strong><br />
wiring.<br />
10 Starter motor -<br />
removal <strong>and</strong> refitting 2<br />
Removal<br />
1 Disconnect the battery negative lead.<br />
2 Firmly apply the h<strong>and</strong>brake then jack up the<br />
front of the vehicle <strong>and</strong> support it on axle<br />
st<strong>and</strong>s. Remove the right-h<strong>and</strong> front<br />
roadwheel.<br />
3 From underneath the front of the vehicle,<br />
slacken <strong>and</strong> remove the three bolts securing<br />
the bumper flange to the body. Remove<br />
the seven bolts securing the front<br />
undercover panel to the body <strong>and</strong> remove the<br />
panel.<br />
4 Undo the nut <strong>and</strong> disconnect the battery<br />
cable from the main solenoid terminal.<br />
Carefully disconnect the spade connector<br />
from the solenoid (see illustration).<br />
5 Unscrew the two bolts securing the starter<br />
motor support bracket to the gearbox (see<br />
illustration).<br />
6 Slacken <strong>and</strong> remove the three starter motor<br />
mounting bolts, noting the earth strap which is<br />
fitted to the upper bolt, <strong>and</strong> manoeuvre the<br />
starter motor out from underneath the vehicle<br />
(see illustrations).<br />
Refitting<br />
7 Refitting is a reverse of the removal<br />
sequence, tightening all nuts <strong>and</strong> bolts to their<br />
specified torque settings.<br />
10.6c Removing the starter motor<br />
5C