

Rover 214 & 414 Service and Repair Manual - Rover club
Rover 214 & 414 Service and Repair Manual - Rover club
Rover 214 & 414 Service and Repair Manual - Rover club

Create successful ePaper yourself
Turn your PDF publications into a flip-book with our unique Google optimized e-Paper software.
3•10 Cooling, heating <strong>and</strong> ventilation systems<br />
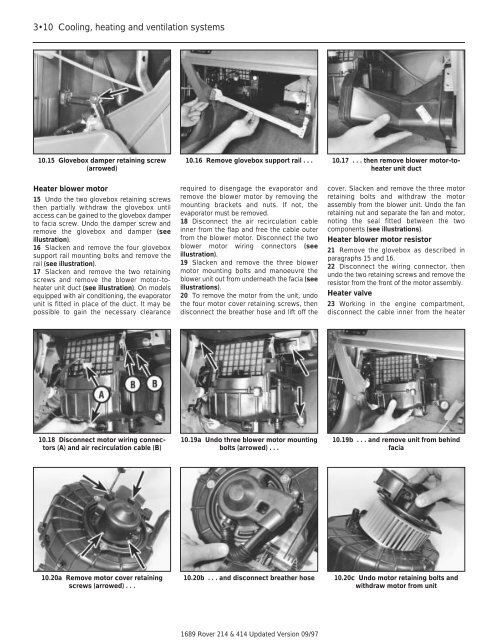
10.15 Glovebox damper retaining screw<br />
(arrowed)<br />
Heater blower motor<br />
15 Undo the two glovebox retaining screws<br />
then partially withdraw the glovebox until<br />
access can be gained to the glovebox damper<br />
to facia screw. Undo the damper screw <strong>and</strong><br />
remove the glovebox <strong>and</strong> damper (see<br />
illustration).<br />
16 Slacken <strong>and</strong> remove the four glovebox<br />
support rail mounting bolts <strong>and</strong> remove the<br />
rail (see illustration).<br />
17 Slacken <strong>and</strong> remove the two retaining<br />
screws <strong>and</strong> remove the blower motor-toheater<br />
unit duct (see illustration). On models<br />
equipped with air conditioning, the evaporator<br />
unit is fitted in place of the duct. It may be<br />
possible to gain the necessary clearance<br />
10.18 Disconnect motor wiring connectors<br />
(A) <strong>and</strong> air recirculation cable (B)<br />
10.20a Remove motor cover retaining<br />
screws (arrowed) . . .<br />
10.16 Remove glovebox support rail . . .<br />
required to disengage the evaporator <strong>and</strong><br />
remove the blower motor by removing the<br />
mounting brackets <strong>and</strong> nuts. If not, the<br />
evaporator must be removed.<br />
18 Disconnect the air recirculation cable<br />
inner from the flap <strong>and</strong> free the cable outer<br />
from the blower motor. Disconnect the two<br />
blower motor wiring connectors (see<br />
illustration).<br />
19 Slacken <strong>and</strong> remove the three blower<br />
motor mounting bolts <strong>and</strong> manoeuvre the<br />
blower unit out from underneath the facia (see<br />
illustrations).<br />
20 To remove the motor from the unit, undo<br />
the four motor cover retaining screws, then<br />
disconnect the breather hose <strong>and</strong> lift off the<br />
10.19a Undo three blower motor mounting<br />
bolts (arrowed) . . .<br />
10.20b . . . <strong>and</strong> disconnect breather hose<br />
1689 <strong>Rover</strong> <strong>214</strong> & <strong>414</strong> Updated Version 09/97<br />
10.17 . . . then remove blower motor-toheater<br />
unit duct<br />
cover. Slacken <strong>and</strong> remove the three motor<br />
retaining bolts <strong>and</strong> withdraw the motor<br />
assembly from the blower unit. Undo the fan<br />
retaining nut <strong>and</strong> separate the fan <strong>and</strong> motor,<br />
noting the seal fitted between the two<br />
components (see illustrations).<br />
Heater blower motor resistor<br />
21 Remove the glovebox as described in<br />
paragraphs 15 <strong>and</strong> 16.<br />
22 Disconnect the wiring connector, then<br />
undo the two retaining screws <strong>and</strong> remove the<br />
resistor from the front of the motor assembly.<br />
Heater valve<br />
23 Working in the engine compartment,<br />
disconnect the cable inner from the heater<br />
10.19b . . . <strong>and</strong> remove unit from behind<br />
facia<br />
10.20c Undo motor retaining bolts <strong>and</strong><br />
withdraw motor from unit