

Rover 214 & 414 Service and Repair Manual - Rover club
Rover 214 & 414 Service and Repair Manual - Rover club
Rover 214 & 414 Service and Repair Manual - Rover club

You also want an ePaper? Increase the reach of your titles
YUMPU automatically turns print PDFs into web optimized ePapers that Google loves.
lower arm balljoint moves freely without any<br />
sign of roughness <strong>and</strong> that the balljoint gaiter<br />
shows no sign of deterioration <strong>and</strong> is free<br />
from cracks <strong>and</strong> splits. Examine the shank of<br />
the pivot bolt for signs of wear or scoring.<br />
Renew worn components, as necessary.<br />
6 Check the lower arm inner pivot bush <strong>and</strong><br />
renew it if worn, cracked, split or perished.<br />
Bush renewal is best left to a <strong>Rover</strong> dealer as<br />
a press, a special bush removal/refitting<br />
m<strong>and</strong>rel <strong>and</strong> a support are required (<strong>Rover</strong><br />
<strong>Service</strong> Tool Numbers 18G 1600/2 <strong>and</strong><br />
18G 1600/1 respectively). While the old bush<br />
can be extracted using a strong bench vice<br />
<strong>and</strong> suitable sockets, it is unlikely that new<br />
bushes can be installed successfully without<br />
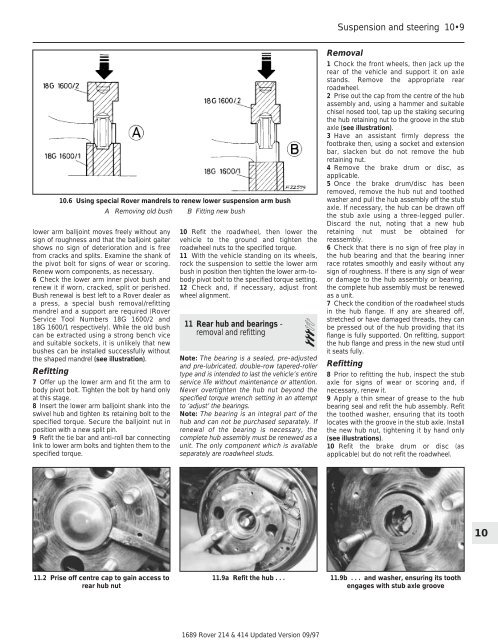
the shaped m<strong>and</strong>rel (see illustration).<br />
Refitting<br />
10.6 Using special <strong>Rover</strong> m<strong>and</strong>rels to renew lower suspension arm bush<br />
A Removing old bush B Fitting new bush<br />
7 Offer up the lower arm <strong>and</strong> fit the arm to<br />
body pivot bolt. Tighten the bolt by h<strong>and</strong> only<br />
at this stage.<br />
8 Insert the lower arm balljoint shank into the<br />
swivel hub <strong>and</strong> tighten its retaining bolt to the<br />
specified torque. Secure the balljoint nut in<br />
position with a new split pin.<br />
9 Refit the tie bar <strong>and</strong> anti-roll bar connecting<br />
link to lower arm bolts <strong>and</strong> tighten them to the<br />
specified torque.<br />
11.2 Prise off centre cap to gain access to<br />
rear hub nut<br />
10 Refit the roadwheel, then lower the<br />
vehicle to the ground <strong>and</strong> tighten the<br />
roadwheel nuts to the specified torque.<br />
11 With the vehicle st<strong>and</strong>ing on its wheels,<br />
rock the suspension to settle the lower arm<br />
bush in position then tighten the lower arm-tobody<br />
pivot bolt to the specified torque setting.<br />
12 Check <strong>and</strong>, if necessary, adjust front<br />
wheel alignment.<br />
11 Rear hub <strong>and</strong> bearings -<br />
removal <strong>and</strong> refitting 3<br />
Note: The bearing is a sealed, pre-adjusted<br />
<strong>and</strong> pre-lubricated, double-row tapered-roller<br />
type <strong>and</strong> is intended to last the vehicle’s entire<br />
service life without maintenance or attention.<br />
Never overtighten the hub nut beyond the<br />
specified torque wrench setting in an attempt<br />
to ‘adjust’ the bearings.<br />
Note: The bearing is an integral part of the<br />
hub <strong>and</strong> can not be purchased separately. If<br />
renewal of the bearing is necessary, the<br />
complete hub assembly must be renewed as a<br />
unit. The only component which is available<br />
separately are roadwheel studs.<br />
11.9a Refit the hub . . .<br />
1689 <strong>Rover</strong> <strong>214</strong> & <strong>414</strong> Updated Version 09/97<br />
Suspension <strong>and</strong> steering 10•9<br />
Removal<br />
1 Chock the front wheels, then jack up the<br />
rear of the vehicle <strong>and</strong> support it on axle<br />
st<strong>and</strong>s. Remove the appropriate rear<br />
roadwheel.<br />
2 Prise out the cap from the centre of the hub<br />
assembly <strong>and</strong>, using a hammer <strong>and</strong> suitable<br />
chisel nosed tool, tap up the staking securing<br />
the hub retaining nut to the groove in the stub<br />
axle (see illustration).<br />
3 Have an assistant firmly depress the<br />
footbrake then, using a socket <strong>and</strong> extension<br />
bar, slacken but do not remove the hub<br />
retaining nut.<br />
4 Remove the brake drum or disc, as<br />
applicable.<br />
5 Once the brake drum/disc has been<br />
removed, remove the hub nut <strong>and</strong> toothed<br />
washer <strong>and</strong> pull the hub assembly off the stub<br />
axle. If necessary, the hub can be drawn off<br />
the stub axle using a three-legged puller.<br />
Discard the nut, noting that a new hub<br />
retaining nut must be obtained for<br />
reassembly.<br />
6 Check that there is no sign of free play in<br />
the hub bearing <strong>and</strong> that the bearing inner<br />
race rotates smoothly <strong>and</strong> easily without any<br />
sign of roughness. If there is any sign of wear<br />
or damage to the hub assembly or bearing,<br />
the complete hub assembly must be renewed<br />
as a unit.<br />
7 Check the condition of the roadwheel studs<br />
in the hub flange. If any are sheared off,<br />
stretched or have damaged threads, they can<br />
be pressed out of the hub providing that its<br />
flange is fully supported. On refitting, support<br />
the hub flange <strong>and</strong> press in the new stud until<br />
it seats fully.<br />
Refitting<br />
8 Prior to refitting the hub, inspect the stub<br />
axle for signs of wear or scoring <strong>and</strong>, if<br />
necessary, renew it.<br />
9 Apply a thin smear of grease to the hub<br />
bearing seal <strong>and</strong> refit the hub assembly. Refit<br />
the toothed washer, ensuring that its tooth<br />
locates with the groove in the stub axle. Install<br />
the new hub nut, tightening it by h<strong>and</strong> only<br />
(see illustrations).<br />
10 Refit the brake drum or disc (as<br />
applicable) but do not refit the roadwheel.<br />
11.9b . . . <strong>and</strong> washer, ensuring its tooth<br />
engages with stub axle groove<br />
10