

Rover 214 & 414 Service and Repair Manual - Rover club
Rover 214 & 414 Service and Repair Manual - Rover club
Rover 214 & 414 Service and Repair Manual - Rover club

You also want an ePaper? Increase the reach of your titles
YUMPU automatically turns print PDFs into web optimized ePapers that Google loves.
10•8 Suspension <strong>and</strong> steering<br />
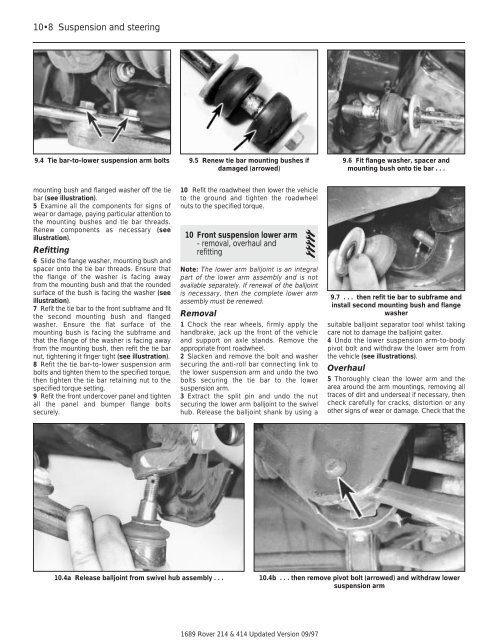
9.4 Tie bar-to-lower suspension arm bolts<br />
mounting bush <strong>and</strong> flanged washer off the tie<br />
bar (see illustration).<br />
5 Examine all the components for signs of<br />
wear or damage, paying particular attention to<br />
the mounting bushes <strong>and</strong> tie bar threads.<br />
Renew components as necessary (see<br />
illustration).<br />
Refitting<br />
6 Slide the flange washer, mounting bush <strong>and</strong><br />
spacer onto the tie bar threads. Ensure that<br />
the flange of the washer is facing away<br />
from the mounting bush <strong>and</strong> that the rounded<br />
surface of the bush is facing the washer (see<br />
illustration).<br />
7 Refit the tie bar to the front subframe <strong>and</strong> fit<br />
the second mounting bush <strong>and</strong> flanged<br />
washer. Ensure the flat surface of the<br />
mounting bush is facing the subframe <strong>and</strong><br />
that the flange of the washer is facing away<br />
from the mounting bush, then refit the tie bar<br />
nut, tightening it finger tight (see illustration).<br />
8 Refit the tie bar-to-lower suspension arm<br />
bolts <strong>and</strong> tighten them to the specified torque,<br />
then tighten the tie bar retaining nut to the<br />
specified torque setting.<br />
9 Refit the front undercover panel <strong>and</strong> tighten<br />
all the panel <strong>and</strong> bumper flange bolts<br />
securely.<br />
10.4a Release balljoint from swivel hub assembly . . .<br />
9.5 Renew tie bar mounting bushes if<br />
damaged (arrowed)<br />
10 Refit the roadwheel then lower the vehicle<br />
to the ground <strong>and</strong> tighten the roadwheel<br />
nuts to the specified torque.<br />
10 Front suspension lower arm<br />
- removal, overhaul <strong>and</strong><br />
refitting<br />
5<br />
Note: The lower arm balljoint is an integral<br />
part of the lower arm assembly <strong>and</strong> is not<br />
available separately. If renewal of the balljoint<br />
is necessary, then the complete lower arm<br />
assembly must be renewed.<br />
Removal<br />
1 Chock the rear wheels, firmly apply the<br />
h<strong>and</strong>brake, jack up the front of the vehicle<br />
<strong>and</strong> support on axle st<strong>and</strong>s. Remove the<br />
appropriate front roadwheel.<br />
2 Slacken <strong>and</strong> remove the bolt <strong>and</strong> washer<br />
securing the anti-roll bar connecting link to<br />
the lower suspension arm <strong>and</strong> undo the two<br />
bolts securing the tie bar to the lower<br />
suspension arm.<br />
3 Extract the split pin <strong>and</strong> undo the nut<br />
securing the lower arm balljoint to the swivel<br />
hub. Release the balljoint shank by using a<br />
1689 <strong>Rover</strong> <strong>214</strong> & <strong>414</strong> Updated Version 09/97<br />
9.6 Fit flange washer, spacer <strong>and</strong><br />
mounting bush onto tie bar . . .<br />
9.7 . . . then refit tie bar to subframe <strong>and</strong><br />
install second mounting bush <strong>and</strong> flange<br />
washer<br />
suitable balljoint separator tool whilst taking<br />
care not to damage the balljoint gaiter.<br />
4 Undo the lower suspension arm-to-body<br />
pivot bolt <strong>and</strong> withdraw the lower arm from<br />
the vehicle (see illustrations).<br />
Overhaul<br />
5 Thoroughly clean the lower arm <strong>and</strong> the<br />
area around the arm mountings, removing all<br />
traces of dirt <strong>and</strong> underseal if necessary, then<br />
check carefully for cracks, distortion or any<br />
other signs of wear or damage. Check that the<br />
10.4b . . . then remove pivot bolt (arrowed) <strong>and</strong> withdraw lower<br />
suspension arm