

Rover 214 & 414 Service and Repair Manual - Rover club
Rover 214 & 414 Service and Repair Manual - Rover club
Rover 214 & 414 Service and Repair Manual - Rover club

You also want an ePaper? Increase the reach of your titles
YUMPU automatically turns print PDFs into web optimized ePapers that Google loves.
11.7 Check condition of guide pins <strong>and</strong><br />
gaiters before refitting pads<br />
bracket <strong>and</strong> check that the rubber guide pin<br />
gaiters are undamaged (see illustration).<br />
Brush the dust <strong>and</strong> dirt from the caliper <strong>and</strong><br />
piston but do not inhale it as it is injurious to<br />
health. Inspect the dust seal around the piston<br />
for damage <strong>and</strong> the piston for evidence of<br />
fluid leaks, corrosion or damage. Renew as<br />
necessary.<br />
8 On refitting, first fit the pad retainer springs<br />
to the caliper mounting bracket (see<br />
illustration).<br />
9 Apply a thin smear of high-temperature<br />
brake grease (silicone- or PBC/Poly Butyl<br />
Cuprysil-based) or anti-seize compound (eg<br />
Holts Copaslip) to the sides <strong>and</strong> back of each<br />
pad’s metal backing <strong>and</strong> to those surfaces of<br />
the caliper body <strong>and</strong> mounting bracket which<br />
bear on the pads. Fit the shims to the back of<br />
both pads <strong>and</strong> apply a thin smear of lubricant<br />
to the back of each shim. Do not allow the<br />
lubricant to foul the friction material (see<br />
illustration).<br />
10 Install the brake pads in the caliper<br />
mounting bracket, ensuring that the friction<br />
material is against the disc.<br />
11 If new brake pads have been fitted, the<br />
caliper piston must be pushed back into the<br />
cylinder to make room for them. Either use a<br />
G-clamp or similar tool, or use suitable pieces<br />
of wood as levers. Provided that the master<br />
cylinder reservoir has not been overfilled with<br />
hydraulic fluid there should be no spillage but<br />
keep a careful watch on the fluid level while<br />
retracting the piston. If the fluid level rises<br />
above the MAX level line at any time, the<br />
surplus should be syphoned off or ejected via<br />
a plastic tube connected to the bleed screw.<br />
12 Apply a thin smear of the recommended<br />
lubricant (see above) to the circular shim <strong>and</strong><br />
fit the shim to the caliper piston. Pivot the<br />
caliper body down over the brake pads then<br />
refit the bottom guide pin bolt <strong>and</strong> tighten it to<br />
the specified torque wrench setting.<br />
13 Check that the caliper body slides<br />
smoothly in the mounting bracket, then<br />
depress the brake pedal repeatedly until the<br />
pads are pressed into firm contact with the<br />
brake disc <strong>and</strong> normal (non-assisted) pedal<br />
pressure is restored.<br />
14 Repeat the above procedure on the<br />
remaining front brake caliper.<br />
11.8 Fit pad retainer springs to caliper<br />
bracket . . .<br />
15 Refit the roadwheels, then lower the<br />
vehicle to the ground <strong>and</strong> tighten the<br />
roadwheel nuts to the specified torque<br />
setting.<br />
16 On completion, check the hydraulic fluid<br />
level.<br />
12 Front brake caliper -<br />
removal, overhaul <strong>and</strong> refitting 4<br />
Warning: Brake hydraulic fluid<br />
may be under considerable<br />
pressure in a pipeline, take care<br />
not to allow hydraulic fluid to<br />
spray into the face or eyes when loosening<br />
a connection.<br />
Removal<br />
1 Chock the rear wheels, firmly apply the<br />
h<strong>and</strong>brake, jack up the front of the vehicle<br />
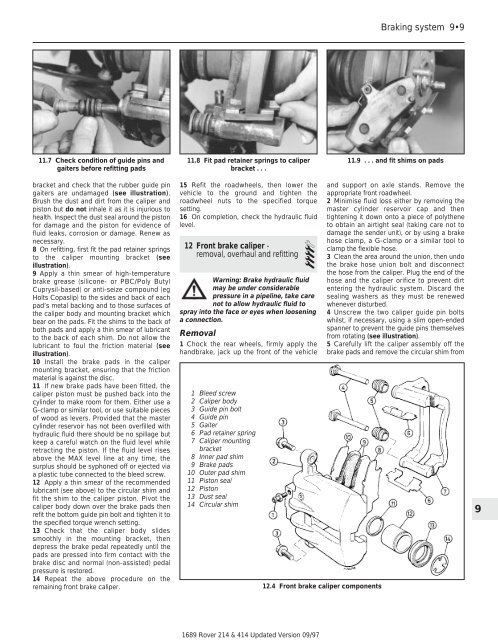
1 Bleed screw<br />
2 Caliper body<br />
3 Guide pin bolt<br />
4 Guide pin<br />
5 Gaiter<br />
6 Pad retainer spring<br />
7 Caliper mounting<br />
bracket<br />
8 Inner pad shim<br />
9 Brake pads<br />
10 Outer pad shim<br />
11 Piston seal<br />
12 Piston<br />
13 Dust seal<br />
14 Circular shim<br />
1689 <strong>Rover</strong> <strong>214</strong> & <strong>414</strong> Updated Version 09/97<br />
12.4 Front brake caliper components<br />
Braking system 9•9<br />
11.9 . . . <strong>and</strong> fit shims on pads<br />
<strong>and</strong> support on axle st<strong>and</strong>s. Remove the<br />
appropriate front roadwheel.<br />
2 Minimise fluid loss either by removing the<br />
master cylinder reservoir cap <strong>and</strong> then<br />
tightening it down onto a piece of polythene<br />
to obtain an airtight seal (taking care not to<br />
damage the sender unit), or by using a brake<br />
hose clamp, a G-clamp or a similar tool to<br />
clamp the flexible hose.<br />
3 Clean the area around the union, then undo<br />
the brake hose union bolt <strong>and</strong> disconnect<br />
the hose from the caliper. Plug the end of the<br />
hose <strong>and</strong> the caliper orifice to prevent dirt<br />
entering the hydraulic system. Discard the<br />
sealing washers as they must be renewed<br />
whenever disturbed.<br />
4 Unscrew the two caliper guide pin bolts<br />
whilst, if necessary, using a slim open-ended<br />
spanner to prevent the guide pins themselves<br />
from rotating (see illustration).<br />
5 Carefully lift the caliper assembly off the<br />
brake pads <strong>and</strong> remove the circular shim from<br />
9