- Page 1 and 2:
WSCAD 5.2 Getting Started © Copyri
- Page 3 and 4:
Table Of Contents Introduction.....
- Page 5 and 6:
Introduction General Introduction W
- Page 7:
Introduction The 'WebHelp' is alway
- Page 10 and 11:
Getting Started Text find/replace -
- Page 12 and 13:
Getting Started Creation helping li
- Page 14 and 15:
Getting Started With the Demo versi
- Page 16 and 17:
Getting Started The mouse pointer/c
- Page 18 and 19:
Getting Started 16 The status displ
- Page 20 and 21:
Getting Started General In addition
- Page 23 and 24:
Design capture General In this chap
- Page 25 and 26:
Design capture The project 'WSCAD e
- Page 27 and 28:
Creating new pages for a drawing se
- Page 29 and 30:
Design capture Four Drawing sheets
- Page 31 and 32:
Design capture You will see this st
- Page 33 and 34:
Placing Components General In WSCAD
- Page 35 and 36:
Design capture The 'Symbol Explorer
- Page 37 and 38:
Placing symbols with database Inter
- Page 39 and 40:
Design capture Select '1LA7083-6AA1
- Page 41 and 42:
Design capture Now place another mo
- Page 43 and 44:
Design capture You can also modify
- Page 45 and 46:
Terminal browser Design capture To
- Page 47 and 48:
Input via Terminal Number Interesti
- Page 49 and 50:
Hint Design capture Circuit diagram
- Page 51 and 52:
Design capture The Contactor list d
- Page 53 and 54:
Design capture For the assignment o
- Page 55 and 56:
Design capture Make no changes in t
- Page 57 and 58:
Contactor Manager symbols Symbol De
- Page 59 and 60:
Contact Design capture the '!'. Now
- Page 61 and 62:
Mark all coils (-Q..) Design captur
- Page 63 and 64:
Design capture After OK button the
- Page 65 and 66:
Design capture Exit the Contactor B
- Page 67 and 68:
Design capture Position the cursor
- Page 69 and 70:
Design capture In the appearing PLC
- Page 71 and 72:
Hint Design capture Obviously we wo
- Page 73 and 74:
Modifying the PLC byte address Func
- Page 75 and 76:
Inserting connections (destination
- Page 77 and 78:
Inserting corners This button activ
- Page 79 and 80:
Naming lines General This function
- Page 81 and 82:
Design capture Enter 'P11' as the l
- Page 83 and 84:
Finally, go back to page 1 of the d
- Page 85 and 86:
Design capture Click 'New' to load
- Page 87 and 88:
Design capture Draw another cable l
- Page 89: Design capture Now select the objec
- Page 92 and 93: Getting Started First select the me
- Page 94 and 95: Getting Started For the 'Output sty
- Page 96 and 97: Getting Started Inserting component
- Page 98 and 99: Getting Started Exit the dialog wit
- Page 100 and 101: Getting Started Position the cabine
- Page 102 and 103: Getting Started The first component
- Page 104 and 105: Getting Started Select the number '
- Page 106 and 107: Getting Started Hint Please ensure
- Page 108 and 109: Getting Started Repeat this process
- Page 111 and 112: Automated listings General In WSCAD
- Page 113 and 114: Automated listings Via the 'File de
- Page 115 and 116: Project data Automated listings The
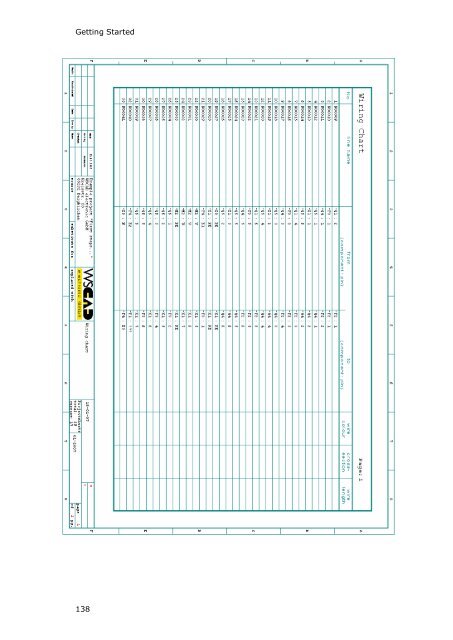
- Page 117 and 118: Cable chart Automated listings The
- Page 119 and 120: Accept the default settings and sta
- Page 121: Hint Automated listings Remember th
- Page 124 and 125: Getting Started Now you are going t
- Page 126 and 127: Getting Started (i.e. cross referen
- Page 128 and 129: Getting Started By entering into a
- Page 130 and 131: Printout of important drawings 128
- Page 132 and 133: Getting Started 130
- Page 134 and 135: Getting Started 132
- Page 136 and 137: Getting Started 134
- Page 138 and 139: Getting Started 136
- Page 142 and 143: Getting Started 140
- Page 144: Getting Started 142