Advice for the Project Management Professional (PMP)
Advice for the Project Management Professional (PMP)
Advice for the Project Management Professional (PMP)

You also want an ePaper? Increase the reach of your titles
YUMPU automatically turns print PDFs into web optimized ePapers that Google loves.
Licensed to:<br />
340<br />
Appendix A<br />
TIP<br />
In this section, you will go through several steps to create a <strong>Project</strong> 2007 file named scope.mpp. If you<br />
want to download <strong>the</strong> completed file to check your work or continue to <strong>the</strong> next section, a copy of scope.<br />
mpp is available on <strong>the</strong> companion Web site <strong>for</strong> this text, from <strong>the</strong> author’s Web site, or from your instructor.<br />
Try to complete an entire section of this appendix (project scope management, project time management,<br />
and so on) in one sitting to create <strong>the</strong> complete file.<br />
Creating a New <strong>Project</strong> File<br />
To create a new project file:<br />
Start date<br />
text box<br />
1. Create a blank project. Open <strong>Project</strong> 2007, and close <strong>the</strong> <strong>Project</strong> Guide Tasks<br />
pane. A blank project file automatically opens when you start <strong>Project</strong> 2007.<br />
The default filenames are <strong>Project</strong>1, <strong>Project</strong>2, and so on. If <strong>Project</strong> 2007 is<br />
already open and you want to open a new file, click <strong>the</strong> New button on <strong>the</strong><br />
toolbar or select File and <strong>the</strong>n New from <strong>the</strong> Menu bar, as with o<strong>the</strong>r Office<br />
2003 programs.<br />
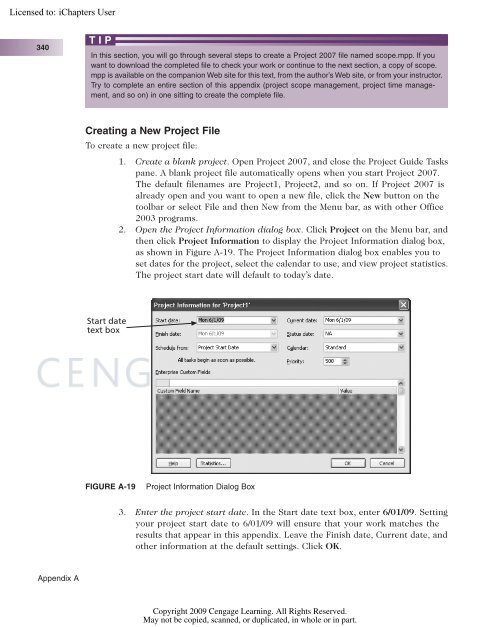
2. Open <strong>the</strong> <strong>Project</strong> In<strong>for</strong>mation dialog box. Click <strong>Project</strong> on <strong>the</strong> Menu bar, and<br />
<strong>the</strong>n click <strong>Project</strong> In<strong>for</strong>mation to display <strong>the</strong> <strong>Project</strong> In<strong>for</strong>mation dialog box,<br />
as shown in Figure A-19. The <strong>Project</strong> In<strong>for</strong>mation dialog box enables you to<br />
set dates <strong>for</strong> <strong>the</strong> project, select <strong>the</strong> calendar to use, and view project statistics.<br />
The project start date will default to today’s date.<br />
FIGURE A-19 <strong>Project</strong> In<strong>for</strong>mation Dialog Box<br />
3. Enter <strong>the</strong> project start date. In <strong>the</strong> Start date text box, enter 6/01/09. Setting<br />
your project start date to 6/01/09 will ensure that your work matches <strong>the</strong><br />
results that appear in this appendix. Leave <strong>the</strong> Finish date, Current date, and<br />
o<strong>the</strong>r in<strong>for</strong>mation at <strong>the</strong> default settings. Click OK.<br />
Copyright 2009 Cengage Learning. All Rights Reserved.<br />
May not be copied, scanned, or duplicated, in whole or in part.