Advice for the Project Management Professional (PMP)
Advice for the Project Management Professional (PMP)
Advice for the Project Management Professional (PMP)

Create successful ePaper yourself
Turn your PDF publications into a flip-book with our unique Google optimized e-Paper software.
Licensed to:<br />
Tracking<br />
toolbar<br />
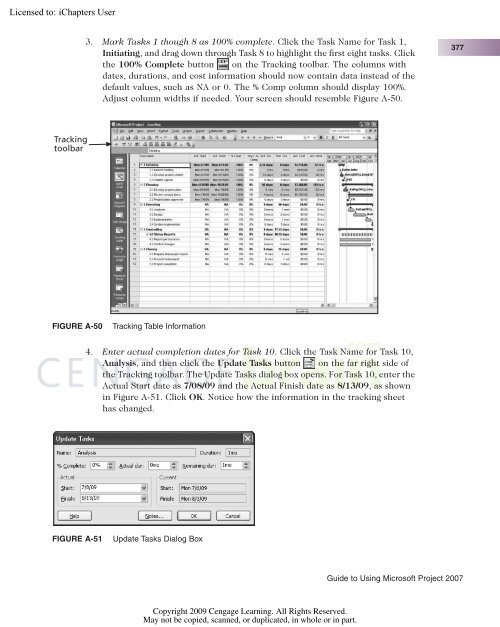
3. Mark Tasks 1 though 8 as 100% complete. Click <strong>the</strong> Task Name <strong>for</strong> Task 1,<br />
Initiating, and drag down through Task 8 to highlight <strong>the</strong> first eight tasks. Click<br />
<strong>the</strong> 100% Complete button on <strong>the</strong> Tracking toolbar. The columns with<br />
dates, durations, and cost in<strong>for</strong>mation should now contain data instead of <strong>the</strong><br />
default values, such as NA or 0. The % Comp column should display 100%.<br />
Adjust column widths if needed. Your screen should resemble Figure A-50.<br />
FIGURE A-50 Tracking Table In<strong>for</strong>mation<br />
4. Enter actual completion dates <strong>for</strong> Task 10. Click <strong>the</strong> Task Name <strong>for</strong> Task 10,<br />
Analysis, and <strong>the</strong>n click <strong>the</strong> Update Tasks button on <strong>the</strong> far right side of<br />
<strong>the</strong> Tracking toolbar. The Update Tasks dialog box opens. For Task 10, enter <strong>the</strong><br />
Actual Start date as 7/08/09 and <strong>the</strong> Actual Finish date as 8/13/09, as shown<br />
in Figure A-51. Click OK. Notice how <strong>the</strong> in<strong>for</strong>mation in <strong>the</strong> tracking sheet<br />
has changed.<br />
FIGURE A-51 Update Tasks Dialog Box<br />
Copyright 2009 Cengage Learning. All Rights Reserved.<br />
May not be copied, scanned, or duplicated, in whole or in part.<br />
377<br />
Guide to Using Microsoft <strong>Project</strong> 2007