Blackmagic ATEM Manual - Concept Music Art
Blackmagic ATEM Manual - Concept Music Art
Blackmagic ATEM Manual - Concept Music Art

You also want an ePaper? Increase the reach of your titles
YUMPU automatically turns print PDFs into web optimized ePapers that Google loves.
13<br />
Getting Started<br />
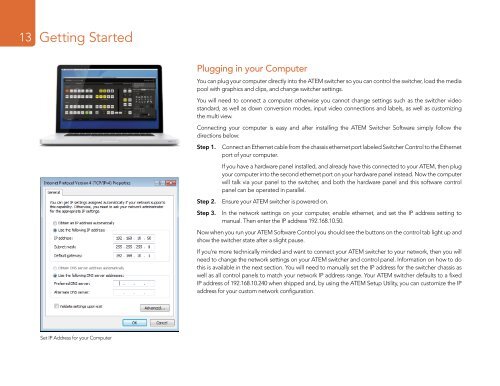
Plugging in your Computer<br />
You can plug your computer directly into the <strong>ATEM</strong> switcher so you can control the switcher, load the media<br />
pool with graphics and clips, and change switcher settings.<br />
You will need to connect a computer otherwise you cannot change settings such as the switcher video<br />
standard, as well as down conversion modes, input video connections and labels, as well as customizing<br />
the multi view.<br />
Connecting your computer is easy and after installing the <strong>ATEM</strong> Switcher Software simply follow the<br />
directions below:<br />
Step 1.<br />
Step 2.<br />
Connect an Ethernet cable from the chassis ethernet port labeled Switcher Control to the Ethernet<br />
port of your computer.<br />
If you have a hardware panel installed, and already have this connected to your <strong>ATEM</strong>, then plug<br />
your computer into the second ethernet port on your hardware panel instead. Now the computer<br />
will talk via your panel to the switcher, and both the hardware panel and this software control<br />
panel can be operated in parallel.<br />
Ensure your <strong>ATEM</strong> switcher is powered on.<br />
Step 3. In the network settings on your computer, enable ethernet, and set the IP address setting to<br />
manual. Then enter the IP address 192.168.10.50.<br />
Now when you run your <strong>ATEM</strong> Software Control you should see the buttons on the control tab light up and<br />
show the switcher state after a slight pause.<br />
If you’re more technically minded and want to connect your <strong>ATEM</strong> switcher to your network, then you will<br />
need to change the network settings on your <strong>ATEM</strong> switcher and control panel. Information on how to do<br />
this is available in the next section. You will need to manually set the IP address for the switcher chassis as<br />
well as all control panels to match your network IP address range. Your <strong>ATEM</strong> switcher defaults to a fixed<br />
IP address of 192.168.10.240 when shipped and, by using the <strong>ATEM</strong> Setup Utility, you can customize the IP<br />
address for your custom network configuration.<br />
Set IP Address for your Computer