F4200N Manual - Fisnar.fr
F4200N Manual - Fisnar.fr
F4200N Manual - Fisnar.fr

You also want an ePaper? Increase the reach of your titles
YUMPU automatically turns print PDFs into web optimized ePapers that Google loves.
<strong>F4200N</strong> Operating <strong>Manual</strong><br />
Section 4: Programming Example<br />
Part # 562187N<br />
Rev. C Jun 2011<br />
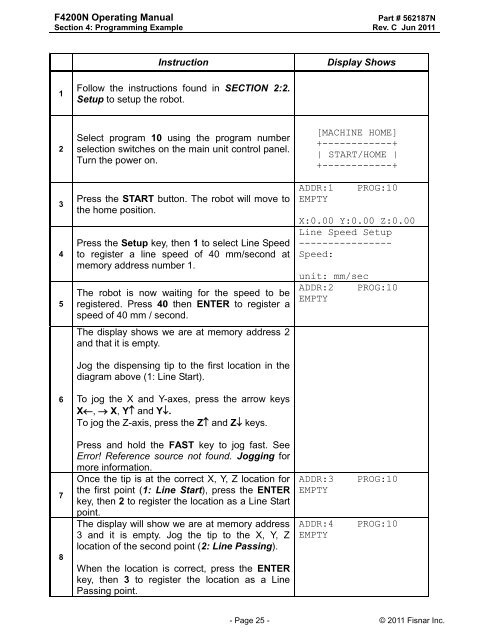
Instruction<br />
Display Shows<br />
1<br />
Follow the instructions found in SECTION 2:2.<br />
Setup to setup the robot.<br />
2<br />
3<br />
4<br />
5<br />
6<br />
Select program 10 using the program number<br />
selection switches on the main unit control panel.<br />
Turn the power on.<br />
Press the START button. The robot will move to<br />
the home position.<br />
Press the Setup key, then 1 to select Line Speed<br />
to register a line speed of 40 mm/second at<br />
memory address number 1.<br />
The robot is now waiting for the speed to be<br />
registered. Press 40 then ENTER to register a<br />
speed of 40 mm / second.<br />
The display shows we are at memory address 2<br />
and that it is empty.<br />
Jog the dispensing tip to the first location in the<br />
diagram above (1: Line Start).<br />
To jog the X and Y-axes, press the arrow keys<br />
X, X, Y and Y.<br />
To jog the Z-axis, press the Z and Z keys.<br />
[MACHINE HOME]<br />
+------------+<br />
| START/HOME |<br />
+------------+<br />
ADDR:1<br />
EMPTY<br />
PROG:10<br />
X:0.00 Y:0.00 Z:0.00<br />
Line Speed Setup<br />
----------------<br />
Speed:<br />
unit: mm/sec<br />
ADDR:2 PROG:10<br />
EMPTY<br />
7<br />
8<br />
Press and hold the FAST key to jog fast. See<br />
Error! Reference source not found. Jogging for<br />
more information.<br />
Once the tip is at the correct X, Y, Z location for<br />
the first point (1: Line Start), press the ENTER<br />
key, then 2 to register the location as a Line Start<br />
point.<br />
The display will show we are at memory address<br />
3 and it is empty. Jog the tip to the X, Y, Z<br />
location of the second point (2: Line Passing).<br />
When the location is correct, press the ENTER<br />
key, then 3 to register the location as a Line<br />
Passing point.<br />
ADDR:3<br />
EMPTY<br />
ADDR:4<br />
EMPTY<br />
PROG:10<br />
PROG:10<br />
- Page 25 - © 2011 <strong>Fisnar</strong> Inc.