F4200N Manual - Fisnar.fr
F4200N Manual - Fisnar.fr
F4200N Manual - Fisnar.fr

You also want an ePaper? Increase the reach of your titles
YUMPU automatically turns print PDFs into web optimized ePapers that Google loves.
<strong>F4200N</strong> Operating <strong>Manual</strong><br />
Section 4: Programming Example<br />
9<br />
10<br />
11<br />
12<br />
13<br />
14<br />
15<br />
16<br />
17<br />
18<br />
19<br />
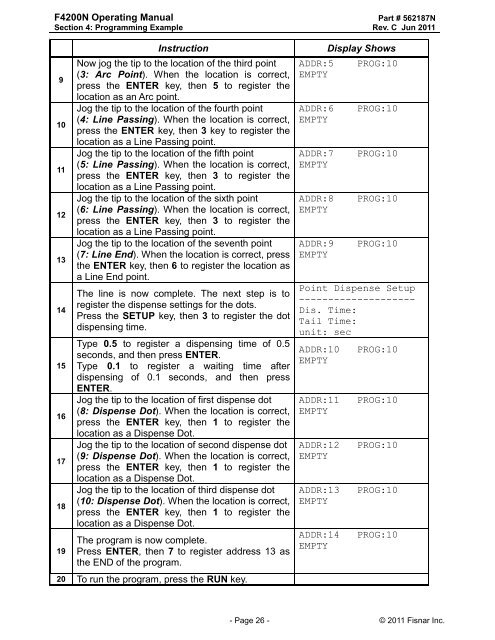
Instruction<br />
Now jog the tip to the location of the third point<br />
(3: Arc Point). When the location is correct,<br />
press the ENTER key, then 5 to register the<br />
location as an Arc point.<br />
Jog the tip to the location of the fourth point<br />
(4: Line Passing). When the location is correct,<br />
press the ENTER key, then 3 key to register the<br />
location as a Line Passing point.<br />
Jog the tip to the location of the fifth point<br />
(5: Line Passing). When the location is correct,<br />
press the ENTER key, then 3 to register the<br />
location as a Line Passing point.<br />
Jog the tip to the location of the sixth point<br />
(6: Line Passing). When the location is correct,<br />
press the ENTER key, then 3 to register the<br />
location as a Line Passing point.<br />
Jog the tip to the location of the seventh point<br />
(7: Line End). When the location is correct, press<br />
the ENTER key, then 6 to register the location as<br />
a Line End point.<br />
The line is now complete. The next step is to<br />
register the dispense settings for the dots.<br />
Press the SETUP key, then 3 to register the dot<br />
dispensing time.<br />
Type 0.5 to register a dispensing time of 0.5<br />
seconds, and then press ENTER.<br />
Type 0.1 to register a waiting time after<br />
dispensing of 0.1 seconds, and then press<br />
ENTER.<br />
Jog the tip to the location of first dispense dot<br />
(8: Dispense Dot). When the location is correct,<br />
press the ENTER key, then 1 to register the<br />
location as a Dispense Dot.<br />
Jog the tip to the location of second dispense dot<br />
(9: Dispense Dot). When the location is correct,<br />
press the ENTER key, then 1 to register the<br />
location as a Dispense Dot.<br />
Jog the tip to the location of third dispense dot<br />
(10: Dispense Dot). When the location is correct,<br />
press the ENTER key, then 1 to register the<br />
location as a Dispense Dot.<br />
The program is now complete.<br />
Press ENTER, then 7 to register address 13 as<br />
the END of the program.<br />
20 To run the program, press the RUN key.<br />
ADDR:5<br />
EMPTY<br />
ADDR:6<br />
EMPTY<br />
ADDR:7<br />
EMPTY<br />
ADDR:8<br />
EMPTY<br />
ADDR:9<br />
EMPTY<br />
Display Shows<br />
Part # 562187N<br />
Rev. C Jun 2011<br />
PROG:10<br />
PROG:10<br />
PROG:10<br />
PROG:10<br />
PROG:10<br />
Point Dispense Setup<br />
--------------------<br />
Dis. Time:<br />
Tail Time:<br />
unit: sec<br />
ADDR:10<br />
EMPTY<br />
ADDR:11<br />
EMPTY<br />
ADDR:12<br />
EMPTY<br />
ADDR:13<br />
EMPTY<br />
ADDR:14<br />
EMPTY<br />
PROG:10<br />
PROG:10<br />
PROG:10<br />
PROG:10<br />
PROG:10<br />
- Page 26 - © 2011 <strong>Fisnar</strong> Inc.