Getting Started with InfoSphere Data Architect

You also want an ePaper? Increase the reach of your titles
YUMPU automatically turns print PDFs into web optimized ePapers that Google loves.
Chapter 8 – Model Mapping and Discovery 147<br />
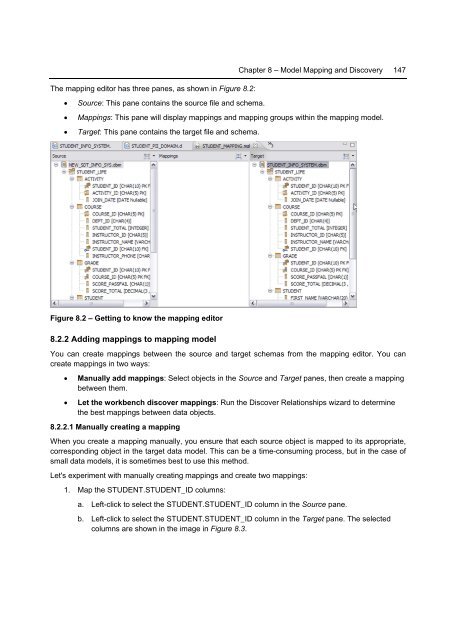
The mapping editor has three panes, as shown in Figure 8.2:<br />
• Source: This pane contains the source file and schema.<br />
• Mappings: This pane will display mappings and mapping groups <strong>with</strong>in the mapping model.<br />
• Target: This pane contains the target file and schema.<br />
Figure 8.2 – <strong>Getting</strong> to know the mapping editor<br />
8.2.2 Adding mappings to mapping model<br />
You can create mappings between the source and target schemas from the mapping editor. You can<br />
create mappings in two ways:<br />
• Manually add mappings: Select objects in the Source and Target panes, then create a mapping<br />
between them.<br />
• Let the workbench discover mappings: Run the Discover Relationships wizard to determine<br />
the best mappings between data objects.<br />
8.2.2.1 Manually creating a mapping<br />
When you create a mapping manually, you ensure that each source object is mapped to its appropriate,<br />
corresponding object in the target data model. This can be a time-consuming process, but in the case of<br />
small data models, it is sometimes best to use this method.<br />
Let's experiment <strong>with</strong> manually creating mappings and create two mappings:<br />
1. Map the STUDENT.STUDENT_ID columns:<br />
a. Left-click to select the STUDENT.STUDENT_ID column in the Source pane.<br />
b. Left-click to select the STUDENT.STUDENT_ID column in the Target pane. The selected<br />
columns are shown in the image in Figure 8.3.