Getting Started with InfoSphere Data Architect

You also want an ePaper? Increase the reach of your titles
YUMPU automatically turns print PDFs into web optimized ePapers that Google loves.
Chapter 5 – Physical <strong>Data</strong> Modeling 95<br />
As a general rule, start out <strong>with</strong> the simplest design. Only allow complexity if and when<br />
performance is impacted.<br />
5.5 Refining the physical data model<br />
Now that we have transformed a logical data model into a physical data model, we should<br />
make some final refinements before we generate the DDL to deploy the database. First, we<br />
will rearrange the columns of the STUDENT table into a more logical order. Then, we will<br />
create a role and add a user to the database.<br />
5.5.1 Rearranging columns in a physical data model<br />
When you created the logical data model, you were more concerned <strong>with</strong> modeling what<br />
attributes and data characteristics must go into each entity. Let's rearrange the columns of<br />
the STUDENT table to make the object more easily understood to an end user.<br />
To rearrange the columns, perform the following steps:<br />
1. Select the STUDENT table under the STUDENT_LIFE schema. The properties of<br />
the table display in the Properties view.<br />
2. Open the Columns tab of the Properties view.<br />
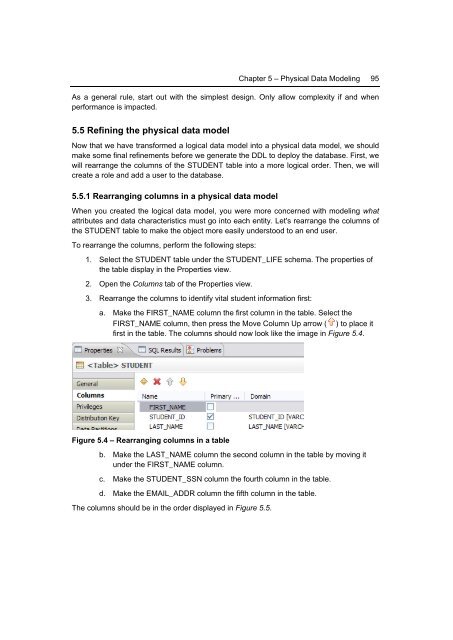
3. Rearrange the columns to identify vital student information first:<br />
a. Make the FIRST_NAME column the first column in the table. Select the<br />
FIRST_NAME column, then press the Move Column Up arrow ( ) to place it<br />
first in the table. The columns should now look like the image in Figure 5.4.<br />
Figure 5.4 – Rearranging columns in a table<br />
b. Make the LAST_NAME column the second column in the table by moving it<br />
under the FIRST_NAME column.<br />
c. Make the STUDENT_SSN column the fourth column in the table.<br />
d. Make the EMAIL_ADDR column the fifth column in the table.<br />
The columns should be in the order displayed in Figure 5.5.