manuale DIFFUSIONE BIG.pmd - Olimpia Splendid
manuale DIFFUSIONE BIG.pmd - Olimpia Splendid
manuale DIFFUSIONE BIG.pmd - Olimpia Splendid

You also want an ePaper? Increase the reach of your titles
YUMPU automatically turns print PDFs into web optimized ePapers that Google loves.
12<br />
I GB F D<br />
- Non dovrebbero esserci fonti di<br />
calore o vapore vicino al<br />
climatizzatore.<br />
- Un luogo in cui la circolazione<br />
dell'aria nella stanza è buona.<br />
- Un luogo in cui la prevenzione del<br />
rumore è tenuta in considerazione.<br />
- Non installare il climatizzatore<br />
vicino al passaggio della porta.<br />
- There should not be any heat<br />
source or steam near the unit.<br />
- A place where air circulated<br />
in the room will be good.<br />
- A place where noise<br />
prevention is taken into<br />
consideration.<br />
- Do not install the unit near<br />
the door way.<br />
- Ne placez pas le climatiseur à<br />
proximité de sources de chaleur<br />
ou de vapeur.<br />
- Un endroit où l'air circule bien dans<br />
la pièce.<br />
- Un endroit tenant compte de la<br />
prévention du bruit.<br />
- N'installez pas le climatiseur à<br />
proximité du passage de la porte.<br />
- In der Nähe der Klimaanlage<br />
sollten keine Hitze- oder<br />
Dampfquellen vorhanden sein.<br />
- Ein Ort, an dem die Luftzirkulation<br />
im Raum gut ist.<br />
- Ein Ort, an welchem dem<br />
Lärmschutz Rechnung getragen<br />
wird.<br />
- Installieren Sie die Klimaanlage<br />
nicht in der Nähe des<br />
Türdurchgangs.<br />
2.3<br />
MONTAGGIO DELL’UNITÀ<br />
INTERNA<br />
INSTALLATION OF THE<br />
INSIDE UNIT<br />
MONTAGE DE L’UNITE<br />
INTERIEURE<br />
MONTAGE DER<br />
INNENEINHEIT<br />
2.3.1<br />
Montaggio della piastra di<br />
fissaggio<br />
Installation of fastening<br />
plate<br />
Montage de la plaque de<br />
fixation<br />
Montage der Befestigungsplatte<br />
- Decidere un punto di installazione<br />
della piastra di fissaggio in base<br />
alla posizione dell'unità interna e<br />
alla direzione dei tubi.<br />
- Tenere la piastra in posizione<br />
orizzontale con un'asta<br />
orizzontale o un filo a piombo.<br />
- Realizzare dei fori di 32mm di<br />
profondità nel muro per fissare la<br />
piastra.<br />
- Inserire i tappi in plastica nei fori,<br />
fissare la piastra con le viti filettate.<br />
- Controllare che la piastra di<br />
fissaggio sia correttamente<br />
fissata, quindi realizzare il foro per<br />
i tubi.<br />
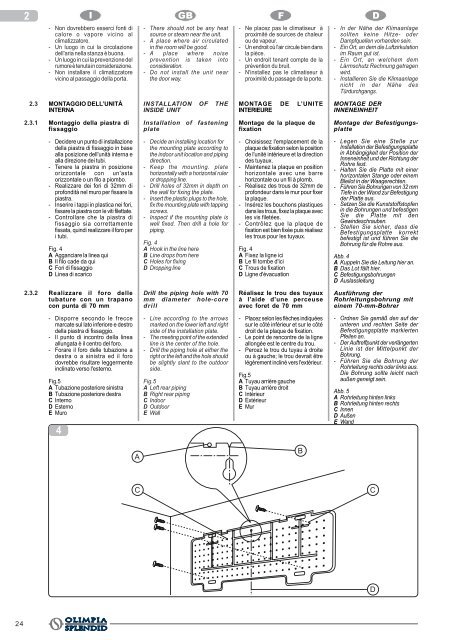
Fig. 4<br />
A Agganciare la linea qui<br />
B Il filo cade da qui<br />
C Fori di fissaggio<br />
D Linea di scarico<br />
- Decide an installing location for<br />
the mounting plate according to<br />
the indoor unit location and piping<br />
direction.<br />
- Keep the mounting. plate<br />
horizontally with a horizontal ruler<br />
or dropping line.<br />
- Drill holes of 32mm in depth on<br />
the wall for fixing the plate.<br />
- Insert the plastic plugs to the hole,<br />
fix the mounting plate with tapping<br />
screws.<br />
- Inspect if the mounting plate is<br />
well fixed. Then drill a hole for<br />
piping.<br />
Fig. 4<br />
A Hook in the line here<br />
B Line drops from here<br />
C Holes for fixing<br />
D Dropping line<br />
- Choisissez l'emplacement de la<br />
plaque de fixation selon la position<br />
de l'unité intérieure et la direction<br />
des tuyaux.<br />
- Maintenez la plaque en position<br />
horizontale avec une barre<br />
horizontale ou un fil à plomb.<br />
- Réalisez des trous de 32mm de<br />
profondeur dans le mur pour fixer<br />
la plaque.<br />
- Insérez les bouchons plastiques<br />
dans les trous, fixez la plaque avec<br />
les vis filetées.<br />
- Contrôlez que la plaque de<br />
fixation est bien fixée puis réalisez<br />
les trous pour les tuyaux.<br />
Fig. 4<br />
A Fixez la ligne ici<br />
B Le fil tombe d'ici<br />
C Trous de fixation<br />
D Ligne d'évacuation<br />
- Legen Sie eine Stelle zur<br />
Installation der Befestigungsplatte<br />
in Abhängigkeit der Position der<br />
Inneneinheit und der Richtung der<br />
Rohre fest.<br />
- Halten Sie die Platte mit einer<br />
horizontalen Stange oder einem<br />
Bleilot in der Waagerechten.<br />
- Führen Sie Bohrungen von 32 mm<br />
Tiefe in der Wand zur Befestigung<br />
der Platte aus.<br />
- Setzen Sie die Kunststoffstopfen<br />
in die Bohrungen und befestigen<br />
Sie die Platte mit den<br />
Gewindeschrauben.<br />
- Stellen Sie sicher, dass die<br />
Befestigungsplatte korrekt<br />
befestigt ist und führen Sie die<br />
Bohrung für die Rohre aus.<br />
Abb. 4<br />
A Kuppeln Sie die Leitung hier an.<br />
B Das Lot fällt hier.<br />
C Befestigungsbohrungen<br />
D Auslassleitung<br />
2.3.2<br />
Realizzare il foro delle<br />
tubature con un trapano<br />
con punta di 70 mm<br />
Drill the piping hole with 70<br />
mm diameter hole-core<br />
drill<br />
Réalisez le trou des tuyaux<br />
à l'aide d'une perceuse<br />
avec foret de 70 mm<br />
Ausführung der<br />
Rohrleitungsbohrung mit<br />
einem 70-mm-Bohrer<br />
- Disporre secondo le frecce<br />
marcate sul lato inferiore e destro<br />
della piastra di fissaggio.<br />
- Il punto di incontro della linea<br />
allungata è il centro del foro.<br />
- Forare il foro delle tubazione a<br />
destra o a sinistra ed il foro<br />
dovrebbe risultare leggermente<br />
inclinato verso l'esterno.<br />
Fig.5<br />
A Tubazione posteriore sinistra<br />
B Tubazione posteriore destra<br />
C Interno<br />
D Esterno<br />
E Muro<br />
4<br />
- Line according to the arrows<br />
marked on the lower left and right<br />
side of the installation plate.<br />
- The meeting point of the extended<br />
line is the center of the hole.<br />
- Drill the piping hole at either the<br />
right or the left and the hole should<br />
be slightly slant to the outdoor<br />
side.<br />
Fig.5<br />
A Left rear piping<br />
B Right rear piping<br />
C Indoor<br />
D Outdoor<br />
E Wall<br />
- Placez selon les flèches indiquées<br />
sur le côté inférieur et sur le côté<br />
droit de la plaque de fixation.<br />
- Le point de rencontre de la ligne<br />
allongée est le centre du trou.<br />
- Percez le trou du tuyau à droite<br />
ou à gauche; le trou devrait être<br />
légèrement incliné vers l'extérieur.<br />
Fig.5<br />
A Tuyau arrière gauche<br />
B Tuyau arrière droit<br />
C Intérieur<br />
D Extérieur<br />
E Mur<br />
- Ordnen Sie gemäß den auf der<br />
unteren und rechten Seite der<br />
Befestigungsplatte markierten<br />
Pfeilen an.<br />
- Der Auftreffpunkt der verlängerten<br />
Linie ist der Mittelpunkt der<br />
Bohrung.<br />
- Führen Sie die Bohrung der<br />
Rohrleitung rechts oder links aus.<br />
Die Bohrung sollte leicht nach<br />
außen geneigt sein.<br />
Abb. 5<br />
A Rohrleitung hinten links<br />
B Rohrleitung hinten rechts<br />
C Innen<br />
D Außen<br />
E Wand<br />
A<br />
B<br />
C<br />
C<br />
D<br />
24