- Page 1:
Front cover Advanced</stron
- Page 4 and 5:
Note: Before using this information
- Page 6 and 7:
2.1 New features in Version 1.3 of
- Page 8 and 9:
4.4.2 Configuration on the Virtual
- Page 10 and 11:
6.6.4 Managing memory resources . .
- Page 12 and 13:
3-9 Processing sharing mode and the
- Page 14 and 15:
5-14 Status window . . . . . . . .
- Page 16 and 17:
xiv Advanced <stro
- Page 18 and 19:
xvi Advanced <stro
- Page 20 and 21:
any form without payment to IBM, fo
- Page 22 and 23:
The team that wrote this redbook Th
- Page 24 and 25:
xxii Advanced <str
- Page 26 and 27:
- Additional information about the
- Page 28 and 29:
management” on page 257 discusses
- Page 30 and 31:
1.1.5 Virtual LAN 1.1.6 Virtual I/O
- Page 32 and 33:
The service processor provides the
- Page 34 and 35:
Adapter sparing Adapter sparing can
- Page 36 and 37:
1.4.1 IBM AIX 5L for System p5 syst
- Page 38 and 39:
Note: i5/OS partitions are only sup
- Page 40 and 41:
Function / capability IBM System z9
- Page 42 and 43:
1.6 The value of the Advanc
- Page 44 and 45:
18 Advanced <stron
- Page 46 and 47:
2.1 New features in Version 1.3 of
- Page 48 and 49:
► throughput and performance. For
- Page 50 and 51:
► IVM enhancements Industry leadi
- Page 52 and 53:
Shared Ethernet Adapter failover ca
- Page 54 and 55:
the partition. This allows you to c
- Page 56 and 57:
Figure 2-2 ASMI menu to enable the
- Page 58 and 59:
management interface for systems wi
- Page 60 and 61:
When setting up a partition, you ha
- Page 62 and 63:
partition with 0.50 processing unit
- Page 64 and 65:
processors and the other a single o
- Page 66 and 67:
Figure 2-5 shows the usage of the s
- Page 68 and 69:
2.4.5 Dynamic partitioning Partitio
- Page 70 and 71:
Number of virtual processors In gen
- Page 72 and 73:
The benefit of SMT is greatest wher
- Page 74 and 75:
Setting SMT mode using SMIT Use the
- Page 76 and 77:
The Hypervisor firmware and the hos
- Page 78 and 79:
Partition 2 is configured with one
- Page 80 and 81:
Note: The Virtual I/O Server suppor
- Page 82 and 83:
Most ISVs consider partitions with
- Page 84 and 85:
When a partition is running as unca
- Page 86 and 87:
► ► ► Selected IBM software p
- Page 88 and 89:
Shared pool = 4 CPU Sum EC = 3.0 PU
- Page 90 and 91:
For more information about the use
- Page 92 and 93:
Table 2-5 Licensing estimation for
- Page 94 and 95:
Maximum virtual processors used Cap
- Page 96 and 97:
2.8 Virtual and Shared Ethernet int
- Page 98 and 99:
► VLAN 2 - Node A-2 - Node B-3 -
- Page 100 and 101:
VLAN support in AIX 5L is based on
- Page 102 and 103:
2. Tagged port receives a packet ta
- Page 104 and 105:
page 78. EtherChannel and Link Aggr
- Page 106 and 107:
Note: In this type of configuration
- Page 108 and 109:
Figure 2-18 Shared Ethernet Adapter
- Page 110 and 111:
Other aspects that have to be taken
- Page 112 and 113:
► Only packets for the VLAN speci
- Page 114 and 115:
► Packets tagged with a VLAN othe
- Page 116 and 117:
► The value proposition enabling
- Page 118 and 119:
Figure 2-21 Virtual SCSI architectu
- Page 120 and 121:
Figure 2-23 and Figure 2-24 show th
- Page 122 and 123:
4. In the Virtual I/O Server, vios1
- Page 124 and 125:
The following are the steps to unco
- Page 126 and 127:
► ► A logical volume on the Vir
- Page 128 and 129:
I/O configuration, performance is a
- Page 130 and 131:
Hardware management is done by an H
- Page 132 and 133:
VMC allows IVM to provide basic log
- Page 134 and 135:
Virtual TTY In order to allow LPAR
- Page 136 and 137:
2.13.1 Linux device drivers for IBM
- Page 138 and 139:
Mirroring Linux can mirror disks by
- Page 140 and 141:
Figure 2-29 Bridging a virtual and
- Page 142 and 143:
116 Advanced <stro
- Page 144 and 145:
3.1 Getting started This section pr
- Page 146 and 147:
lspath mkpath mkvdev mkvt rmdev rmp
- Page 148 and 149:
3.1.2 Hardware resources managed Th
- Page 150 and 151:
3.2 Creating a Virtual I/O Server p
- Page 152 and 153:
3. Enter the partition name and ID
- Page 154 and 155:
5. You have the option to change th
- Page 156 and 157:
7. Select the Shared check box for
- Page 158 and 159:
9. Specify the processing sharing m
- Page 160 and 161:
11.Skip setting the I/O pools, as s
- Page 162 and 163:
2. Click the Create adapter button
- Page 164 and 165:
5. Add a virtual SCSI adapter to vi
- Page 166 and 167:
7. Select Normal for your boot mode
- Page 168 and 169:
A few seconds after the status wind
- Page 170 and 171:
3. Select the VIO_Server1 profile a
- Page 172 and 173:
You are now ready to use the newly
- Page 174 and 175:
3. Specify the Maximum virtual adap
- Page 176 and 177:
You can use the lsmap -all -net com
- Page 178 and 179:
2. Select the check box AIX or Linu
- Page 180 and 181:
2. Click Create client adapter. The
- Page 182 and 183:
4. Click Create server adapter and
- Page 184 and 185:
6. When the operation is complete,
- Page 186 and 187:
9. When you have completed adding v
- Page 188 and 189:
Server SCSI adapters have been adde
- Page 190 and 191:
Using logical partitions In our bas
- Page 192 and 193:
Note: Based on the lsdev -vpd comma
- Page 194 and 195:
It is useful to be able to map the
- Page 196 and 197:
Assuming that a NIM master is confi
- Page 198 and 199:
3. Set up the NIM master IP address
- Page 200 and 201:
3.4.6 Mirroring the Virtual I/O Ser
- Page 202 and 203:
Once the interaction between virtua
- Page 204 and 205:
Figure 3-45 shows the steps to crea
- Page 206 and 207:
Ethernet server adapter and a physi
- Page 208 and 209:
4.1 Providing higher serviceability
- Page 210 and 211:
Figure 4-1 MPIO and LV Mirroring wi
- Page 212 and 213:
Some advanced topics with respect t
- Page 214 and 215:
While EC is an Cisco-specific imple
- Page 216 and 217:
Alternatives for network high avail
- Page 218 and 219:
Figure 4-6 IP multipathing in the c
- Page 220 and 221:
SEA Failover works as follows: Two
- Page 222 and 223:
Although the alternative configurat
- Page 224 and 225:
► With NIB, the two internal netw
- Page 226 and 227:
In Figure 4-11 on page 201, a clien
- Page 228 and 229:
When Virtual I/O Server 2 returns t
- Page 230 and 231:
few cycles to set up, but none for
- Page 232 and 233:
4.1.7 Considerations The following
- Page 234 and 235:
. On step 10, allocate an unused Et
- Page 236 and 237:
7. Check the devices list on your V
- Page 238 and 239:
Figure 4-17 shows the intended solu
- Page 240 and 241:
. Click the Create Adapter button,
- Page 242 and 243:
Tip: Mismatching SEA and SEA Failov
- Page 244 and 245:
Checking which SEA is active Checki
- Page 246 and 247:
In this scenario, we attach each Vi
- Page 248 and 249:
2. Configure the SEA, as described
- Page 250 and 251:
5. Check for the vhost adapter usin
- Page 252 and 253:
8. Check again, using the lsdev com
- Page 254 and 255:
Check the mappings, as shown in Exa
- Page 256 and 257:
2. Check the MPIO configuration by
- Page 258 and 259:
To determine which path will use th
- Page 260 and 261:
7. On the first LPAR, create an enh
- Page 262 and 263:
A switch can be forced with the /us
- Page 264 and 265:
The configurations described in thi
- Page 266 and 267: We recommend using mirroring, strip
- Page 268 and 269: Supported multi-path configurations
- Page 270 and 271: Supported scenarios using one Virtu
- Page 272 and 273: Supported scenarios using multiple
- Page 274 and 275: 4.7.2 Supported Ethernet configurat
- Page 276 and 277: In order to help clients improve th
- Page 278 and 279: Clients can find the fixes and file
- Page 280 and 281: Figure 4-35 shows the basic conside
- Page 282 and 283: 256 Advanced <stro
- Page 284 and 285: 5.1 Dynamic LPAR operations This se
- Page 286 and 287: 5. Figure 5-3 shows you the Virtual
- Page 288 and 289: another partition. Use the lsslot -
- Page 290 and 291: 2. Select the adapter to be moved a
- Page 292 and 293: 5.1.3 Add memory dynamically in AIX
- Page 294 and 295: 5.1.4 Removing memory dynamically T
- Page 296 and 297: The following command shows the eff
- Page 298 and 299: 2. Figure 5-17 shows the current pr
- Page 300 and 301: et1 Defined 01-09 IEEE 802.3 Ethern
- Page 302 and 303: 1. Use the diagmenu command to unco
- Page 304 and 305: 5. Locate the blinking adapter, rep
- Page 306 and 307: ► Figure 5-19 shows you the topol
- Page 308 and 309: Example 5-4 shows how to back up th
- Page 310 and 311: Example 5-6 Creating a Virtual I/O
- Page 312 and 313: 5.2.5 Restoring the Virtual I/O Ser
- Page 314 and 315: For an AIX 5L NIM server recovery,
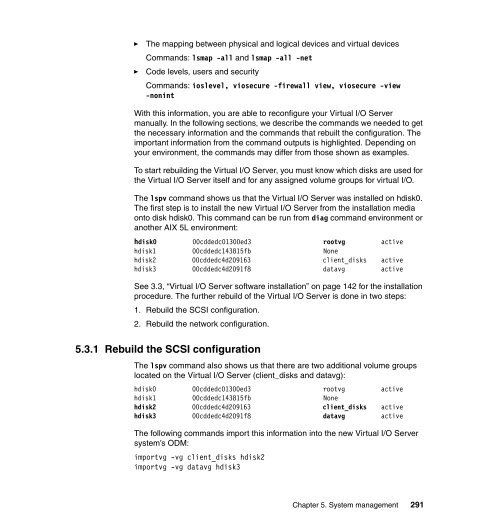
- Page 318 and 319: In Example 5-11, we look to the map
- Page 320 and 321: The last information we need is the
- Page 322 and 323: In a mirrored environment, issue th
- Page 324 and 325: Figure 5-23 shows that the virtual
- Page 326 and 327: csm.diagnostics 1.5.0.0 # Cluster S
- Page 328 and 329: os.txt.spell 5.3.0.10 # Writer's To
- Page 330 and 331: hd3 jfs2 1 2 2 open/syncd /tmp hd1
- Page 332 and 333: Adding a PCI hot plug adapter The t
- Page 334 and 335: The following is a list of empty SC
- Page 336 and 337: After the disk is replaced and brou
- Page 338 and 339: 2. Get a larger disk from the Virtu
- Page 340 and 341: The updateios command does not comm
- Page 342 and 343: Note: You can use dsh based on rsh,
- Page 344 and 345: 2 Checking if Redundancy with dual
- Page 346 and 347: STATUS=`lspath -l $n | grep Failed
- Page 348 and 349: Traditional performance measurement
- Page 350 and 351: CPU statistics in shared-processors
- Page 352 and 353: This is shown in Example 5-22 and E
- Page 354 and 355: 5.5.4 The topas command The topas c
- Page 356 and 357: capped, and uncapped. The Mem and t
- Page 358 and 359: Tip: The output of topas -cecdisp w
- Page 360 and 361: These files can now be processed wi
- Page 362 and 363: interval and count parameters. The
- Page 364 and 365: The lparstat command POWER<
- Page 366 and 367:
Note: The variable capacity weight
- Page 368 and 369:
Column Measured parameter Comments
- Page 370 and 371:
The sysstat command The sysstat com
- Page 372 and 373:
write: wps avgserv minserv maxserv
- Page 374 and 375:
5.5.7 Monitoring with PLM The Parti
- Page 376 and 377:
Use the perfwb command to start the
- Page 378 and 379:
Using the r and p switches after st
- Page 380 and 381:
The nmon process runs in the backgr
- Page 382 and 383:
The POWER Hypervis
- Page 384 and 385:
5.7 Security considerations for Vir
- Page 386 and 387:
The firewall can be switched on and
- Page 388 and 389:
Enable mail client (dismaildmndls):
- Page 390 and 391:
Network option extendednetstats (ex
- Page 392 and 393:
Enable unsecure daemons (disrmtdmns
- Page 394 and 395:
Minimum number of chars (mindiffhls
- Page 396 and 397:
370 Advanced <stro
- Page 398 and 399:
6.1 Partition Load Manager introduc
- Page 400 and 401:
Notes: ► The PLM server may resid
- Page 402 and 403:
When PLM is notified that a partiti
- Page 404 and 405:
6.1.4 Memory management PLM manages
- Page 406 and 407:
However, the managed nodes know not
- Page 408 and 409:
sh and rcp During its installation,
- Page 410 and 411:
2. Create a toc file with the inuto
- Page 412 and 413:
. Append the PLM server public key
- Page 414 and 415:
You can set up the RMC using a scri
- Page 416 and 417:
Define a PLM policy as follows: 1.
- Page 418 and 419:
Table 6-2 CPU-related tunables CPU
- Page 420 and 421:
Memory tunables Table 6-4 shows the
- Page 422 and 423:
1. Start the Web-based System Manag
- Page 424 and 425:
4. Complete the information in the
- Page 426 and 427:
. Fill out the values for the tunab
- Page 428 and 429:
8. Specify the CPU resource policy
- Page 430 and 431:
Clicking the OK button will create
- Page 432 and 433:
. From the Web-based System Manager
- Page 434 and 435:
2. Click the Groups tab, and then t
- Page 436 and 437:
Figure 6-21 Edit Policy File partit
- Page 438 and 439:
The policy_file and log_file parame
- Page 440 and 441:
In its short form, the xlplm -Q com
- Page 442 and 443:
6.3 Point-in-time and recurring rec
- Page 444 and 445:
Select the type of operation you wi
- Page 446 and 447:
6.4 Tips and troubleshooting PLM Th
- Page 448 and 449:
Note: Exchanging keys is an importa
- Page 450 and 451:
The Identity entry is either based
- Page 452 and 453:
120200c10d3ad7a20951523b7c01bd31f42
- Page 454 and 455:
► ► PLM does not directly state
- Page 456 and 457:
6.6 Resource management Owners of I
- Page 458 and 459:
Characteristics of WLM, PLM, and sh
- Page 460 and 461:
Evaluating CPU utilization Traditio
- Page 462 and 463:
Shared-processor partitions support
- Page 464 and 465:
438 Advanced <stro
- Page 466 and 467:
FDX FLOP FRU FTP GDPS GID GPFS GUI
- Page 468 and 469:
442 Advanced <stro
- Page 470 and 471:
Other publications These publicatio
- Page 472 and 473:
► ► ► ► Virtual I/O Server
- Page 474 and 475:
cfgdev command 163, 203, 264 cfgmgr
- Page 476 and 477:
excess weight, PLM 376 extendlv com
- Page 478 and 479:
Micro-Partitioning 3, 32-33 49 capp
- Page 480 and 481:
processor dispatch 43, 50 processor
- Page 482 and 483:
VIO 59 virtual processor 61 mainten
- Page 484 and 485:
target 90, 92 virtual SCSI Server a
- Page 488:
Back cover Advanced</strong