- Page 1: Administrator’s GuideKerio Techno
- Page 8 and 9: 36 Support for ActiveSync . . . . .
- Page 10: Chapter 1 IntroductionPersonal and
- Page 13 and 14: 1.2 Quick ChecklistBlackBerry suppo
- Page 15 and 16: 1.2 Quick Checklist11. If email for
- Page 17 and 18: 2.2 Conflicting software2.2 Conflic
- Page 19 and 20: 2.4 InstallationBy default, Kerio M
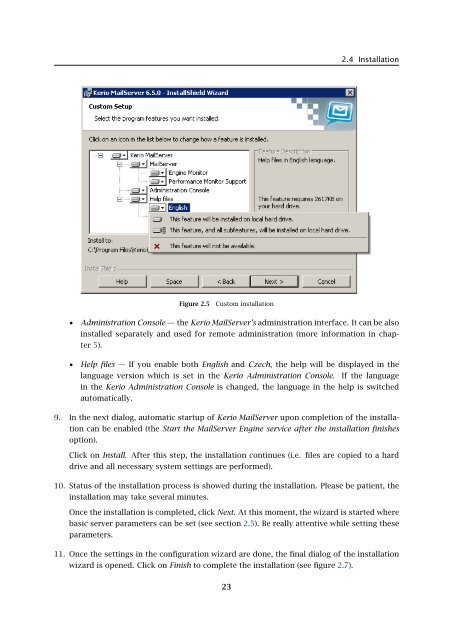
- Page 21: 2.4 InstallationSelect a folder whe
- Page 25 and 26: 2.4 InstallationKerio MailServer En
- Page 27 and 28: 2.4 InstallationThe product support
- Page 29 and 30: 2.4 Installation(Kerio Administrati
- Page 31 and 32: 2.5 Configuration WizardNote: The c
- Page 33 and 34: 2.5 Configuration WizardFigure 2.16
- Page 35 and 36: 2.6 Upgrade and UninstallationWhen
- Page 37 and 38: Chapter 3Product Registration and L
- Page 39 and 40: 3.2 Registration with the administr
- Page 41 and 42: 3.2 Registration with the administr
- Page 43 and 44: 3.3 License information and import
- Page 45 and 46: 3.4 Licensing policyOnce number of
- Page 47 and 48: 4.1 Kerio MailServer MonitorFigure
- Page 49 and 50: 4.2 Standalone processes of the ser
- Page 51 and 52: 5.2 Administration WindowThe same d
- Page 53 and 54: 5.2 Administration WindowStatus bar
- Page 55 and 56: Chapter 6ServicesIn Configuration
- Page 57 and 58: 6.1 Service Parameter Settings• a
- Page 59 and 60: 6.1 Service Parameter SettingsFigur
- Page 61 and 62: 6.3 TroubleshootingFigure 6.5The De
- Page 63 and 64: Chapter 7DomainsKerio MailServer ca
- Page 65 and 66: 7.2 GeneralFigure 7.2Domain setting
- Page 67 and 68: 7.4 FootersFigure 7.3Domain setting
- Page 69 and 70: 7.5 ForwardingFigure 7.5Domain sett
- Page 71 and 72: 7.6 Setting of Directory ServicesFi
- Page 73 and 74:
7.6 Setting of Directory ServicesFi
- Page 75 and 76:
7.7 Advanced7.7 AdvancedIn the Adva
- Page 77 and 78:
7.8 WebMail Logo3. In the Logging m
- Page 79 and 80:
8.2 Sending High Priority MessagesW
- Page 81 and 82:
Chapter 9SchedulingKerio MailServer
- Page 83 and 84:
9.2 Optimal Scheduling9.2 Optimal S
- Page 85 and 86:
10.1 Kerio MailServer CertificateFi
- Page 87 and 88:
10.1 Kerio MailServer Certificate
- Page 89 and 90:
10.2 Install certificates on client
- Page 91 and 92:
10.2 Install certificates on client
- Page 93 and 94:
10.2 Install certificates on client
- Page 95 and 96:
11.3 LanguageIf there is one of the
- Page 97 and 98:
11.3 LanguageFigure 11.1Dictionary
- Page 99 and 100:
12.2 Time IntervalsClick on Add to
- Page 101 and 102:
12.3 Setting Remote AdministrationF
- Page 103 and 104:
10312.3 Setting Remote Administrati
- Page 105 and 106:
13.2 Creating a user accountWarning
- Page 107 and 108:
13.2 Creating a user accountFigure
- Page 109 and 110:
13.2 Creating a user accountStore p
- Page 111 and 112:
13.2 Creating a user accountNote: T
- Page 113 and 114:
13.2 Creating a user accountFigure
- Page 115 and 116:
13.3 Editing User AccountNote: When
- Page 117 and 118:
13.5 Removing user accountsKerio Ma
- Page 119 and 120:
13.9 Administration of mobile devic
- Page 121 and 122:
13.9 Administration of mobile devic
- Page 123 and 124:
13.10 Import Users• MailAddress
- Page 125 and 126:
13.10 Import UsersFor detailed info
- Page 127 and 128:
13.10 Import UsersFigure 13.24Impor
- Page 129 and 130:
13.12 User Account TemplatesNote: C
- Page 131 and 132:
Chapter 14User groupsUser accounts
- Page 133 and 134:
14.1 Creating a User GroupGroup add
- Page 135 and 136:
14.1 Creating a User GroupPublish t
- Page 137 and 138:
15.1 Mail Delivery over the Interne
- Page 139 and 140:
15.1 Mail Delivery over the Interne
- Page 141 and 142:
15.2 SMTP serverinterface originall
- Page 143 and 144:
15.2 SMTP serverAuthentication by I
- Page 145 and 146:
15.2 SMTP serverLimit maximum incom
- Page 147 and 148:
15.3 AliasesMaximum number of deliv
- Page 149 and 150:
15.3 AliasesCharacter typea-zA-ZDes
- Page 151 and 152:
15.4 remote POP3 mailboxesFigure 15
- Page 153 and 154:
15.4 remote POP3 mailboxesthe messa
- Page 155 and 156:
15.4 remote POP3 mailboxesFigure 15
- Page 157 and 158:
15.6 Advanced OptionsDescriptionA c
- Page 159 and 160:
15.6 Advanced Optionsnot have to wo
- Page 161 and 162:
15.6 Advanced OptionsPLAIN authenti
- Page 163 and 164:
15.6 Advanced OptionsWatchdog Hard
- Page 165 and 166:
15.6 Advanced OptionsFigure 15.22HT
- Page 167 and 168:
15.6 Advanced Optionsstartup of the
- Page 169 and 170:
15.6 Advanced OptionsKerio WebMail
- Page 171 and 172:
16.1 Spam Rating tab16.1 Spam Ratin
- Page 173 and 174:
16.2 Blacklists tabtration Console
- Page 175 and 176:
16.2 Blacklists tabInternet databas
- Page 177 and 178:
16.3 Custom RulesSORBSSpam and Open
- Page 179 and 180:
16.3 Custom RulesUse the Add button
- Page 181 and 182:
16.3 Custom RulesTypeType of condit
- Page 183 and 184:
16.4 SpamAssassinFigure 16.7SpamAss
- Page 185 and 186:
16.5 Email policy records checksend
- Page 187 and 188:
16.6 Spam repellentFigure 16.9SPFOn
- Page 189 and 190:
16.7 Recommended configuration of a
- Page 191 and 192:
16.7 Recommended configuration of a
- Page 193 and 194:
16.8 Monitoring of spam filter’s
- Page 195 and 196:
16.8 Monitoring of spam filter’s
- Page 197 and 198:
17.1 Integrated McAfee Anti-VirusBe
- Page 199 and 200:
17.4 Server responses to detection
- Page 201 and 202:
17.5 Filtering Email Attachments17.
- Page 203 and 204:
17.6 Antivirus control statisticsFi
- Page 205 and 206:
18.1 ArchivingPath to the archive d
- Page 207 and 208:
18.2 Backup of user foldersFigure 1
- Page 209 and 210:
18.2 Backup of user foldersFigure 1
- Page 211 and 212:
18.2 Backup of user folders• Save
- Page 213 and 214:
18.2 Backup of user folders2. The s
- Page 215 and 216:
Chapter 19LDAP serverThe built-in L
- Page 217 and 218:
19.2 Configuring Email ClientsFigur
- Page 219 and 220:
19.2 Configuring Email ClientsMaxim
- Page 221 and 222:
20.2 Creating a Mailing List• con
- Page 223 and 224:
20.2 Creating a Mailing ListFigure
- Page 225 and 226:
20.3 Posting rulesFigure 20.4Creati
- Page 227 and 228:
20.4 Moderators and MembersAdd this
- Page 229 and 230:
20.4 Moderators and MembersAdding a
- Page 231 and 232:
20.5 Mailing list archiving2. This
- Page 233 and 234:
20.7 How to use Mailing ListsExampl
- Page 235 and 236:
Chapter 21Status InformationKerio M
- Page 237 and 238:
21.2 Message queue processingFrom,
- Page 239 and 240:
21.3 Active ConnectionsActive Conne
- Page 241 and 242:
21.4 Opened FoldersComponentsThree
- Page 243 and 244:
21.5 Traffic ChartsTime rangeIn the
- Page 245 and 246:
21.6 StatisticsRefreshThis button r
- Page 247 and 248:
22.1 Log settingsFigure 22.2Save lo
- Page 249 and 250:
22.1 Log settingsLog debugSelect th
- Page 251 and 252:
22.3 MailAuth_type=’0’, Passwor
- Page 253 and 254:
22.4 SecurityMailing list messagesT
- Page 255 and 256:
22.4 SecurityAntibombingServer over
- Page 257 and 258:
22.8 Debug• From: jsmith@company.
- Page 259 and 260:
22.8 Debug• IMAP Server — commu
- Page 261 and 262:
22.9 Performance Monitor (under Win
- Page 263 and 264:
23.1 Viewing public folders in indi
- Page 265 and 266:
24.1 Kerio MailServer on WindowsFig
- Page 267 and 268:
24.1 Kerio MailServer on WindowsFig
- Page 269 and 270:
24.2 Kerio MailServer on LinuxExamp
- Page 271 and 272:
24.2 Kerio MailServer on Linuxdebug
- Page 273 and 274:
24.3 Kerio MailServer on Mac OSTo e
- Page 275 and 276:
24.3 Kerio MailServer on Mac OSFigu
- Page 277 and 278:
24.3 Kerio MailServer on Mac OSFigu
- Page 279 and 280:
24.3 Kerio MailServer on Mac OSFigu
- Page 281 and 282:
24.4 Starting Open Directory and Ke
- Page 283 and 284:
24.4 Starting Open Directory and Ke
- Page 285 and 286:
Figure 25.1Setting Windows NT domai
- Page 287 and 288:
25.1 Setting NTLM in MS Outlook ext
- Page 289 and 290:
Chapter 26Kerio MailServer Environm
- Page 291 and 292:
26.3 FirewallFrom technical reasons
- Page 293 and 294:
Chapter 27Deployment ExamplesThis c
- Page 295 and 296:
27.2 Dial-up Line + Domain Mailboxi
- Page 297 and 298:
27.4 A company with multiple sites5
- Page 299 and 300:
27.4 A company with multiple sitesF
- Page 301 and 302:
27.5 Setting up the backup mail ser
- Page 303 and 304:
Chapter 28Troubleshooting in Kerio
- Page 305 and 306:
28.2 Configuration Backup and Trans
- Page 307 and 308:
29.1 Installation of Active Directo
- Page 309 and 310:
29.3 User Account DefinitionFigure
- Page 311 and 312:
Chapter 30Kerio Open Directory Exte
- Page 313 and 314:
Chapter 31KMS Web AdministrationKMS
- Page 315 and 316:
31.2 Setting access rights to the w
- Page 317 and 318:
31.5 Page headerFigure 31.4Web Admi
- Page 319 and 320:
31.6 Welcome pageLocalizations of K
- Page 321 and 322:
31.7 User accountsFigure 31.8Templa
- Page 323 and 324:
31.7 User accountsFigure 31.10User
- Page 325 and 326:
31.7 User accountsFigure 31.12User
- Page 327 and 328:
31.8 User groupsMove user’s messa
- Page 329 and 330:
31.8 User groupsFigure 31.16Group a
- Page 331 and 332:
31.9 AliasesPublish this group info
- Page 333 and 334:
31.9 AliasesFigure 31.20Alias creat
- Page 335 and 336:
32.1 Kerio Outlook Connector (Offli
- Page 337 and 338:
32.1 Kerio Outlook Connector (Offli
- Page 339 and 340:
32.1 Kerio Outlook Connector (Offli
- Page 341 and 342:
32.2 Kerio Outlook ConnectorFigure
- Page 343 and 344:
32.2 Kerio Outlook ConnectorTIP: If
- Page 345 and 346:
32.2 Kerio Outlook ConnectorFigure
- Page 347 and 348:
32.2 Kerio Outlook ConnectorFigure
- Page 349 and 350:
32.2 Kerio Outlook ConnectorUse the
- Page 351 and 352:
32.2 Kerio Outlook ConnectorFigure
- Page 353 and 354:
32.2 Kerio Outlook ConnectorNote: I
- Page 355 and 356:
33.1 Installation• MS Outlook 200
- Page 357 and 358:
33.1 InstallationNote: Kerio Synchr
- Page 359 and 360:
34.2 Windows Calendar34.2 Windows C
- Page 361 and 362:
Chapter 35CalDAV supportSince 6.5.0
- Page 363 and 364:
Chapter 36Support for ActiveSyncSup
- Page 365 and 366:
36.2 Supported versions of ActiveSy
- Page 367 and 368:
36.3 RoadSyncabcdeDevice typeEmail
- Page 369 and 370:
36.4 SSL encryptionWarning: It is n
- Page 371 and 372:
36.5 Remote deletion of the device
- Page 373 and 374:
36.6 Removing a device from the adm
- Page 375 and 376:
36.8 Troubleshooting36.8 Troublesho
- Page 377 and 378:
Chapter 37Support for BlackBerry vi
- Page 379 and 380:
If any problem occurs regarding com
- Page 381 and 382:
Chapter 40Kerio Sync Connector for
- Page 383 and 384:
Figure 40.2Log settings in Kerio Sy
- Page 385 and 386:
Apple Mail options and settings are
- Page 387 and 388:
42.1 Email42.1 EmailOn Apple iPhone
- Page 389 and 390:
43.1 Contacts43.1 ContactsUSAKerio
- Page 391 and 392:
Nokia ® and Mail for Exchange ® a
- Page 393 and 394:
arising from, out of or in connecti
- Page 395 and 396:
Glossary of termsApplication protoc
- Page 397 and 398:
MX RecordsOne of the record types t
- Page 399 and 400:
IndexAaccess rightsgroups 131accoun
- Page 401 and 402:
mailing lists 220MAPI 396master aut
- Page 403:
403