Condair Dual 2 manual.pdf
Condair Dual 2 manual.pdf
Condair Dual 2 manual.pdf
- TAGS
- condair
- dual
- biossol.gr

Create successful ePaper yourself
Turn your PDF publications into a flip-book with our unique Google optimized e-Paper software.
5<br />
8<br />
18<br />
Y6 (red)<br />
Y7 (blue)<br />
Y8 (yellow)<br />
6 7<br />
B<br />
A<br />
B<br />
B<br />
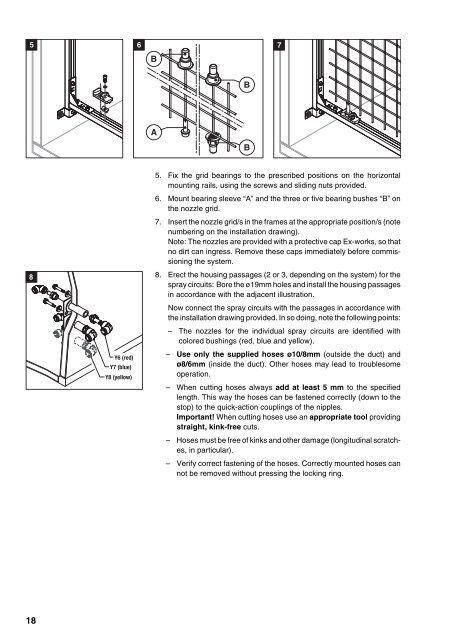
5. Fix the grid bearings to the prescribed positions on the horizontal<br />
mounting rails, using the screws and sliding nuts provided.<br />
6. Mount bearing sleeve “A” and the three or five bearing bushes “B” on<br />
the nozzle grid.<br />
7. Insert the nozzle grid/s in the frames at the appropriate position/s (note<br />
numbering on the installation drawing).<br />
Note: The nozzles are provided with a protective cap Ex-works, so that<br />
no dirt can ingress. Remove these caps immediately before commissioning<br />
the system.<br />
8. Erect the housing passages (2 or 3, depending on the system) for the<br />
spray circuits: Bore the ø19mm holes and install the housing passages<br />
in accordance with the adjacent illustration.<br />
Now connect the spray circuits with the passages in accordance with<br />
the installation drawing provided. In so doing, note the following points:<br />
– The nozzles for the individual spray circuits are identified with<br />
colored bushings (red, blue and yellow).<br />
– Use only the supplied hoses ø10/8mm (outside the duct) and<br />
ø8/6mm (inside the duct). Other hoses may lead to troublesome<br />
operation.<br />
– When cutting hoses always add at least 5 mm to the specified<br />
length. This way the hoses can be fastened correctly (down to the<br />
stop) to the quick-action couplings of the nipples.<br />
Important! When cutting hoses use an appropriate tool providing<br />
straight, kink-free cuts.<br />
– Hoses must be free of kinks and other damage (longitudinal scratches,<br />
in particular).<br />
– Verify correct fastening of the hoses. Correctly mounted hoses can<br />
not be removed without pressing the locking ring.