Condair Dual 2 manual.pdf
Condair Dual 2 manual.pdf
Condair Dual 2 manual.pdf
- TAGS
- condair
- dual
- biossol.gr

Create successful ePaper yourself
Turn your PDF publications into a flip-book with our unique Google optimized e-Paper software.
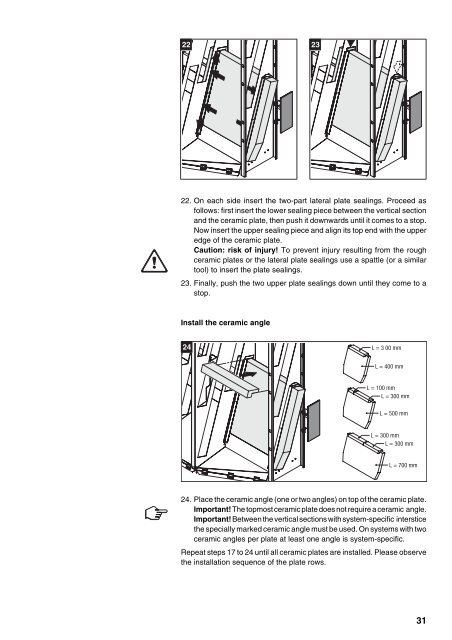
22<br />
22. On each side insert the two-part lateral plate sealings. Proceed as<br />
follows: first insert the lower sealing piece between the vertical section<br />
and the ceramic plate, then push it downwards until it comes to a stop.<br />
Now insert the upper sealing piece and align its top end with the upper<br />
edge of the ceramic plate.<br />
Caution: risk of injury! To prevent injury resulting from the rough<br />
ceramic plates or the lateral plate sealings use a spattle (or a similar<br />
tool) to insert the plate sealings.<br />
23. Finally, push the two upper plate sealings down until they come to a<br />
stop.<br />
Install the ceramic angle<br />
24<br />
L = 3 00 mm<br />
L = 400 mm<br />
L = 100 mm<br />
L = 300 mm<br />
L = 500 mm<br />
L = 300 mm<br />
L = 300 mm<br />
L = 700 mm<br />
24. Place the ceramic angle (one or two angles) on top of the ceramic plate.<br />
Important! The topmost ceramic plate does not require a ceramic angle.<br />
Important! Between the vertical sections with system-specific interstice<br />
the specially marked ceramic angle must be used. On systems with two<br />
ceramic angles per plate at least one angle is system-specific.<br />
Repeat steps 17 to 24 until all ceramic plates are installed. Please observe<br />
the installation sequence of the plate rows.<br />
23<br />
31