Condair Dual 2 manual.pdf
Condair Dual 2 manual.pdf
Condair Dual 2 manual.pdf
- TAGS
- condair
- dual
- biossol.gr

You also want an ePaper? Increase the reach of your titles
YUMPU automatically turns print PDFs into web optimized ePapers that Google loves.
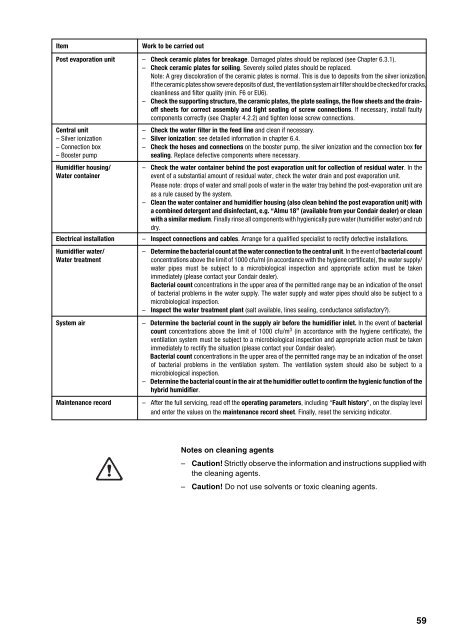
Item Work to be carried out<br />
Post evaporation unit – Check ceramic plates for breakage. Damaged plates should be replaced (see Chapter 6.3.1).<br />
– Check ceramic plates for soiling. Severely soiled plates should be replaced.<br />
Note: A grey discoloration of the ceramic plates is normal. This is due to deposits from the silver ionization.<br />
If the ceramic plates show severe deposits of dust, the ventilation system air filter should be checked for cracks,<br />
cleanliness and filter quality (min. F6 or EU6).<br />
– Check the supporting structure, the ceramic plates, the plate sealings, the flow sheets and the drainoff<br />
sheets for correct assembly and tight seating of screw connections. If necessary, install faulty<br />
components correctly (see Chapter 4.2.2) and tighten loose screw connections.<br />
Central unit<br />
– Silver ionization<br />
– Connection box<br />
– Booster pump<br />
Humidifier housing/<br />
Water container<br />
– Check the water filter in the feed line and clean if necessary.<br />
– Silver ionization: see detailed information in chapter 6.4.<br />
– Check the hoses and connections on the booster pump, the silver ionization and the connection box for<br />
sealing. Replace defective components where necessary.<br />
– Check the water container behind the post evaporation unit for collection of residual water. In the<br />
event of a substantial amount of residual water, check the water drain and post evaporation unit.<br />
Please note: drops of water and small pools of water in the water tray behind the post-evaporation unit are<br />
as a rule caused by the system.<br />
– Clean the water container and humidifier housing (also clean behind the post evaporation unit) with<br />
a combined detergent and disinfectant, e.g. “Almu 18” (available from your <strong>Condair</strong> dealer) or clean<br />
with a similar medium. Finally rinse all components with hygienically pure water (humidifier water) and rub<br />
dry.<br />
Electrical installation – Inspect connections and cables. Arrange for a qualified specialist to rectify defective installations.<br />
Humidifier water/<br />
Water treatment<br />
– Determine the bacterial count at the water connection to the central unit. In the event of bacterial count<br />
concentrations above the limit of 1000 cfu/ml (in accordance with the hygiene certificate), the water supply/<br />
water pipes must be subject to a microbiological inspection and appropriate action must be taken<br />
immediately (please contact your <strong>Condair</strong> dealer).<br />
Bacterial count concentrations in the upper area of the permitted range may be an indication of the onset<br />
of bacterial problems in the water supply. The water supply and water pipes should also be subject to a<br />
microbiological inspection.<br />
– Inspect the water treatment plant (salt available, lines sealing, conductance satisfactory?).<br />
System air – Determine the bacterial count in the supply air before the humidifier inlet. In the event of bacterial<br />
count concentrations above the limit of 1000 cfu/m 3 (in accordance with the hygiene certificate), the<br />
ventilation system must be subject to a microbiological inspection and appropriate action must be taken<br />
immediately to rectify the situation (please contact your <strong>Condair</strong> dealer).<br />
Bacterial count concentrations in the upper area of the permitted range may be an indication of the onset<br />
of bacterial problems in the ventilation system. The ventilation system should also be subject to a<br />
microbiological inspection.<br />
– Determine the bacterial count in the air at the humidifier outlet to confirm the hygienic function of the<br />
hybrid humidifier.<br />
Maintenance record – After the full servicing, read off the operating parameters, including “Fault history”, on the display level<br />
and enter the values on the maintenance record sheet. Finally, reset the servicing indicator.<br />
Notes on cleaning agents<br />
– Caution! Strictly observe the information and instructions supplied with<br />
the cleaning agents.<br />
– Caution! Do not use solvents or toxic cleaning agents.<br />
59