Condair Dual 2 manual.pdf
Condair Dual 2 manual.pdf
Condair Dual 2 manual.pdf
- TAGS
- condair
- dual
- biossol.gr

Create successful ePaper yourself
Turn your PDF publications into a flip-book with our unique Google optimized e-Paper software.
20<br />
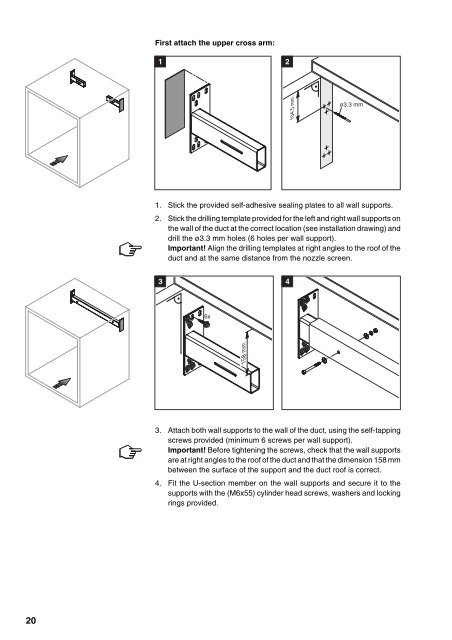
First attach the upper cross arm:<br />
1<br />
1. Stick the provided self-adhesive sealing plates to all wall supports.<br />
2. Stick the drilling template provided for the left and right wall supports on<br />
the wall of the duct at the correct location (see installation drawing) and<br />
drill the ø3.3 mm holes (6 holes per wall support).<br />
Important! Align the drilling templates at right angles to the roof of the<br />
duct and at the same distance from the nozzle screen.<br />
3<br />
6x<br />
158 mm<br />
3. Attach both wall supports to the wall of the duct, using the self-tapping<br />
screws provided (minimum 6 screws per wall support).<br />
Important! Before tightening the screws, check that the wall supports<br />
are at right angles to the roof of the duct and that the dimension 158 mm<br />
between the surface of the support and the duct roof is correct.<br />
4. Fit the U-section member on the wall supports and secure it to the<br />
supports with the (M6x55) cylinder head screws, washers and locking<br />
rings provided.<br />
2<br />
4<br />
104.5 mm<br />
ø3.3 mm