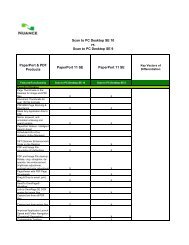
PDF Converter Professional and Enterprise 8.0 Eval Guide - Nuance
PDF Converter Professional and Enterprise 8.0 Eval Guide - Nuance
PDF Converter Professional and Enterprise 8.0 Eval Guide - Nuance

You also want an ePaper? Increase the reach of your titles
YUMPU automatically turns print PDFs into web optimized ePapers that Google loves.
To use the “Send to <strong>PDF</strong> Pro” option:<br />
1. Open a document in any application you can print from.<br />
2. Click the “File > Print” button or equivalent action.<br />
3. Select the “ScanSoft <strong>PDF</strong> Create!” printer from the list. Note: If the steps above were not performed to<br />
configure “Send to <strong>PDF</strong> Pro” as the Naming Method option, it can also be done at this point. Click the “Preferences”<br />
button in the Print dialog to open the Printing Preferences dialog, then select “Send to <strong>PDF</strong> Pro” as the Naming<br />
Method option on the <strong>PDF</strong> Settings tab.<br />
4. Click the “Print” button to confirm the print job.<br />
5. The Printed Document dialog will appear instead of the normal Save As dialog. Note: If a <strong>PDF</strong> file is not<br />
currently opened in <strong>PDF</strong> <strong>Converter</strong> <strong>Professional</strong>, the application will launch <strong>and</strong> the print job will be a new <strong>PDF</strong> file<br />
that is unsaved. The Printed Document dialog will not appear <strong>and</strong> the workflow is finished at this time.<br />
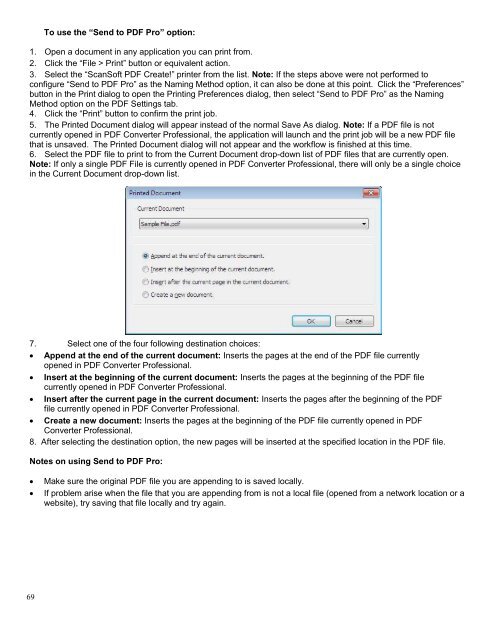
6. Select the <strong>PDF</strong> file to print to from the Current Document drop-down list of <strong>PDF</strong> files that are currently open.<br />
Note: If only a single <strong>PDF</strong> File is currently opened in <strong>PDF</strong> <strong>Converter</strong> <strong>Professional</strong>, there will only be a single choice<br />
in the Current Document drop-down list.<br />
7. Select one of the four following destination choices:<br />
Append at the end of the current document: Inserts the pages at the end of the <strong>PDF</strong> file currently<br />
opened in <strong>PDF</strong> <strong>Converter</strong> <strong>Professional</strong>.<br />
Insert at the beginning of the current document: Inserts the pages at the beginning of the <strong>PDF</strong> file<br />
currently opened in <strong>PDF</strong> <strong>Converter</strong> <strong>Professional</strong>.<br />
Insert after the current page in the current document: Inserts the pages after the beginning of the <strong>PDF</strong><br />
file currently opened in <strong>PDF</strong> <strong>Converter</strong> <strong>Professional</strong>.<br />
Create a new document: Inserts the pages at the beginning of the <strong>PDF</strong> file currently opened in <strong>PDF</strong><br />
<strong>Converter</strong> <strong>Professional</strong>.<br />
8. After selecting the destination option, the new pages will be inserted at the specified location in the <strong>PDF</strong> file.<br />
Notes on using Send to <strong>PDF</strong> Pro:<br />
<br />
<br />
Make sure the original <strong>PDF</strong> file you are appending to is saved locally.<br />
If problem arise when the file that you are appending from is not a local file (opened from a network location or a<br />
website), try saving that file locally <strong>and</strong> try again.<br />
69