- Page 1 and 2:
Volvo Maintenance FAQ for 7xx/9xx/9
- Page 3 and 4:
Electrical: Instruments Electrical:
- Page 5 and 6:
Buying a Used 7xx/9xx FAQ Home Volv
- Page 7 and 8:
Model Tips: Buying a Used 740: Chec
- Page 9 and 10:
have 25 bolts and two gaskets) and
- Page 11 and 12:
1995 New construction on the camsha
- Page 13 and 14:
[Response] My 850 was an absolute l
- Page 15 and 16:
Driving Styles. Rule One is slow do
- Page 17 and 18:
❍ Brake fluid - thoroughly flush
- Page 19 and 20:
unit (VR/BU) for wear while the alt
- Page 21 and 22:
the hood and instantly know when so
- Page 23 and 24:
couple bags of dessicant and put th
- Page 25 and 26:
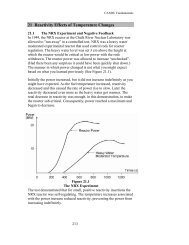
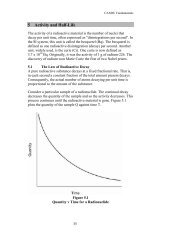
Engine Tune and Performance; Sympto
- Page 27 and 28:
Misfire and Broken Distributor Wire
- Page 29 and 30:
Car Won't Start: Neutral A/T Safety
- Page 31 and 32:
Symptoms and Why You Should Regular
- Page 33 and 34:
pour solvent in to soak. The intern
- Page 35 and 36:
screw 1/2 turn then lock it down wi
- Page 37 and 38:
BMW TSB for removing carbon deposit
- Page 39 and 40:
Start or Stall Problems: No Start;
- Page 41 and 42:
Basic Ignition and Fuel Injection C
- Page 43 and 44:
Sensor. [Inquiry:] Sometimes the
- Page 45 and 46:
the firewall had failed. This allow
- Page 47 and 48:
Mixture, Misfire or Idle Control Pr
- Page 49 and 50:
and sends tons more fuel to the eng
- Page 51 and 52:
also noticed a bare temp-sending wi
- Page 53 and 54:
● ● ● ● ● will understand
- Page 55 and 56:
OVER 1.8V each time a vane passes H
- Page 57 and 58:
sometimes sticks. Also the idle spe
- Page 59 and 60:
● Engine will not run at idle ●
- Page 61 and 62:
Retarded Timing or Knock Sensor Cod
- Page 63 and 64:
Slight Backfiring While Coasting; T
- Page 65 and 66:
[Response: Lincoln] I would check y
- Page 67 and 68:
Power stage at fender Knock sensor
- Page 69 and 70:
elay is cutting out. Behind the ash
- Page 71 and 72:
problems recently--the car won't st
- Page 73 and 74:
(like, say, at a stop light.) This
- Page 75 and 76:
of the regulator vacuum line, there
- Page 77 and 78:
splice in your own repairs, but for
- Page 79 and 80:
Jeremy] Symptoms in my turbo were c
- Page 81 and 82:
temperatures and reduce NOX formati
- Page 83 and 84:
ad (low pressure) regulator on fuel
- Page 85 and 86:
Abbreviations: or Won't Turn AMM Ai
- Page 87 and 88:
4. [Editor] Insert a small amount o
- Page 89 and 90:
After fully warmed up and running t
- Page 91 and 92:
is system voltage registered at bot
- Page 93 and 94:
constant hammering. This is akin to
- Page 95 and 96:
How to Replace Center Shaft Seal: S
- Page 97 and 98:
where it sticks onto shaft. This ef
- Page 99 and 100:
properly. See other timing tips in
- Page 101 and 102:
● Disconnect the negative battery
- Page 103 and 104:
Electrical: Engine Sensors FAQ Home
- Page 105 and 106:
Diagnosing ECT Failures. [Response:
- Page 107 and 108:
Symptoms of Failure: High idle at s
- Page 109 and 110:
computer receives a rich signal (hi
- Page 111 and 112:
When is Replacement Recommended? [T
- Page 113 and 114:
eliminate the faulty signal. Crank
- Page 115 and 116:
firewall. [DanR] To get the connect
- Page 117 and 118:
checks below. If all other tests ch
- Page 119 and 120:
diaphragm and valve, or follow the
- Page 121 and 122:
● -20°C (4°F) 15K ohms ● 20°
- Page 123 and 124:
ECT Engine Coolant Temperature sens
- Page 125 and 126:
1. Check for air leaks by spraying
- Page 127 and 128:
Fuel Injectors: Injector Cleaning.
- Page 129 and 130:
Removing the Injectors. [Tip from N
- Page 131 and 132:
Off the Car Diagnosis. You can remo
- Page 133 and 134:
Repair of Air Intake Hose. [Editor]
- Page 135 and 136:
Idle Air Control Valve. See the FAQ
- Page 137 and 138:
Test 1. If you suspect that your ra
- Page 139 and 140:
● clean off sensor connector, rem
- Page 141 and 142:
joint will be very tight. 3. Gently
- Page 143 and 144:
Caliper Guide Pins: Maintenance Cal
- Page 145 and 146:
REPCO 508 rep_508.gif (3906 bytes)
- Page 147 and 148:
740 740 740 740 740 760 760 88- 90
- Page 149 and 150:
[Cars with Girling Single-Piston Ca
- Page 151 and 152:
A pressure bleeder works by pushing
- Page 153 and 154:
ake pad. The friction material that
- Page 155 and 156:
much trouble. ● The spring pad re
- Page 157 and 158:
Brake Pad Anti-Squeal: Pastes and S
- Page 159 and 160:
made in a less controlled environme
- Page 161 and 162:
Wheel Torque and Warped Rotors. Vol
- Page 163 and 164:
Seized . [Report: Don Willson] Puls
- Page 165 and 166:
press the brake pedal to the floor
- Page 167 and 168:
Cable Replacement: Replacing One Si
- Page 169 and 170:
Master Cylinder: Don't Ruin Your Ma
- Page 171 and 172:
You first unscrew the male fitting
- Page 173 and 174:
(either ISO or double flare) into t
- Page 175 and 176:
un-out is above spec, the solution
- Page 177 and 178:
● Never lean on the reservoir or
- Page 179 and 180:
The Jumbo caliper brakes do provide
- Page 181 and 182:
Brakes: ABS FAQ Home Volvo Maintena
- Page 183 and 184:
Anti-Lock Brake System Service Prec
- Page 185 and 186:
1992+ Cars With Underhood Diagnosti
- Page 187 and 188:
All anti-lock brake systems control
- Page 189 and 190:
pushing up and twisting the bottom
- Page 191 and 192:
speedometer fails! Play around with
- Page 193 and 194:
and will need replacement if that i
- Page 195 and 196:
Volvo Radiator Destructive Test Rad
- Page 197 and 198:
the coolant drain is at the end of
- Page 199 and 200:
Which Thermostat? [Editor/Bob] Whil
- Page 201 and 202:
place radiator back in place proper
- Page 203 and 204:
intake manifold, and push the hose
- Page 205 and 206:
wool. A mirror and bright light hel
- Page 207 and 208:
failure. BUT it's a b*tch to remove
- Page 209 and 210:
Emergency Radiator Repair. [Tip fro
- Page 211 and 212:
Coolant Reservoir Replacement . [Ti
- Page 213 and 214:
link. ● Heater hose fractured due
- Page 215 and 216:
the level float rattling, then it h
- Page 217 and 218:
c) Remove the float and install it
- Page 219 and 220:
what this lamp looks like and what
- Page 221 and 222:
the voltage reading drops to zero,
- Page 223 and 224:
Electric Cooling Fan Operation. Ele
- Page 225 and 226:
Selection: I bought a Mr. Gasket hi
- Page 227 and 228:
leed the clutch and brakes. Test sp
- Page 229 and 230:
Note: For further information about
- Page 231 and 232:
in the engine compartment with a re
- Page 233 and 234:
❍ Install the cable into socket 2
- Page 235 and 236:
2-1-4 Not applicable NA NA 2-2-1* 2
- Page 237 and 238:
4-1-3* 3-3-4 EGR temperature sensor
- Page 239 and 240:
the positive battery terminal. § T
- Page 241 and 242:
M a Engine: FI and Ignition Compute
- Page 243 and 244:
each number discussed. The bad ones
- Page 245 and 246:
I have been able to test the self-b
- Page 247 and 248:
unit, take that into consideration.
- Page 249 and 250:
Turbo Loses Performance under Boost
- Page 251 and 252:
from filter 2 compressed air to int
- Page 253 and 254:
those failures that could be avoide
- Page 255 and 256:
spring design (spring in compressio
- Page 257 and 258:
2. Coolant Heat Exchanger by Oil Fi
- Page 259 and 260:
making boost. I could then hear a l
- Page 261 and 262:
kit and there's a direct oil feed l
- Page 263 and 264:
the engine, you blow black smoke/ov
- Page 265 and 266:
problem to be an oil LEAK, front or
- Page 267 and 268:
adaptor on the engine. Once off, th
- Page 269 and 270:
position. (Probably want to practic
- Page 271 and 272:
Turbo Hoses: Preventive Maintenance
- Page 273 and 274:
coolant lines at the radiator using
- Page 275 and 276:
Removing the Exhaust Manifold Brace
- Page 277 and 278:
out the exhaust. I have been told t
- Page 279 and 280:
the IPD kit and if an ordinary mort
- Page 281 and 282:
high mileage unit and face this pro
- Page 283 and 284:
Engine: V-6 FAQ Home Volvo Maintena
- Page 285 and 286:
number of turns you so determine. I
- Page 287 and 288:
If there are any problems the LED w
- Page 289 and 290:
Engine: Diesel FAQ Home Volvo Maint
- Page 291 and 292:
Synthetic Highly Recommended. [Warr
- Page 293 and 294:
superb detergent injector cleaner,
- Page 295 and 296:
fact that you could blow the motor
- Page 297 and 298:
e. Sometimes a leak can develop in
- Page 299 and 300:
Diesel Compression Test. [Inquiry:]
- Page 301 and 302:
Now take the whole assembly to a di
- Page 303 and 304:
Solenoid. [Noel DeSouza] To repair
- Page 305 and 306:
another brand unless you are in a p
- Page 307 and 308:
happen at my oil change shop over a
- Page 309 and 310:
● The power steering rack and rub
- Page 311 and 312:
pump cavities you will probably exp
- Page 313 and 314:
Clean pan and gasket leftovers. You
- Page 315 and 316:
Engine: Mechanical FAQ Home Volvo M
- Page 317 and 318:
Driver's side 1. Remove the top nut
- Page 319 and 320:
tube rearwards until there was enou
- Page 321 and 322:
Spark Plug Installation. Tips and C
- Page 323 and 324:
B23X Engines. Clean off the area ar
- Page 325 and 326:
to happen, then consider pulling th
- Page 327 and 328:
quality fasteners. 2. Thread Hole Q
- Page 329 and 330:
● There is a whole buch of stuff
- Page 331 and 332:
just pulled the small hose from the
- Page 333 and 334:
3. Timing order is 1-3-4-2. Number
- Page 335 and 336:
shims held in the valve depressor.
- Page 337 and 338:
separate -- and you're pulling the
- Page 339 and 340:
the block or the cylinder wall. Rem
- Page 341 and 342:
[Editor:] When you install a new sp
- Page 343 and 344:
Engine Mounted in Support Stand. [Q
- Page 345 and 346:
B234 Seals: Counterhold Tool Abbrev
- Page 347 and 348:
tension on the belt. Take off the o
- Page 349 and 350:
Changing Timing Belt: Procedures fo
- Page 351 and 352:
to be "timed".) Install the lower c
- Page 353 and 354:
Holding the outer section of B230 c
- Page 355 and 356:
the rope and jam the piston. Tighte
- Page 357 and 358:
[Editor] Once you find them, use "W
- Page 359 and 360:
Do I Wrap the Belt First Over the C
- Page 361 and 362:
you have blowby, you need to check
- Page 363 and 364:
yourself. Start by removing the ele
- Page 365 and 366:
otate the engine once, those paint
- Page 367 and 368:
friendly Volvo parts dealer if he c
- Page 369 and 370:
Crankcase Ventilation: A Treatise.
- Page 371 and 372:
hose is plugged solid. It's easier
- Page 373 and 374:
Oil cap modification for vacuum tes
- Page 375 and 376:
can be removed and replaced. It can
- Page 377 and 378:
If Your Car Has an EGR (Exhaust Gas
- Page 379 and 380:
carwash to cover the engine with cl
- Page 381 and 382:
[Another:] If you install the seal
- Page 383 and 384:
anyone can successfully install the
- Page 385 and 386:
the 92mm crankshaft. Insert this af
- Page 387 and 388:
housings that stop you from pushing
- Page 389 and 390:
Fuel System: Pumps, Relays FAQ Home
- Page 391 and 392:
loosen and push out the filter. Whe
- Page 393 and 394:
Now turn the ignition ON (without t
- Page 395 and 396:
These may include hard starting, in
- Page 397 and 398:
Fuel Sender and In-Tank Pump Replac
- Page 399 and 400:
way. The gasket will stretch around
- Page 401 and 402:
This required soldering. Nothing se
- Page 403 and 404:
in the fuel tank yet!!). Reconnect
- Page 405 and 406:
pump operating without a pre-pump (
- Page 407 and 408:
lean mixture at idle). Sometimes, t
- Page 409 and 410:
Noisy Fuel Pump: FPR Faulty. [Tip f
- Page 411 and 412:
the car accelerated back to the set
- Page 413 and 414:
2-1-2 Malfunction in the circuit to
- Page 415 and 416:
the turn signal. Sometimes it is ea
- Page 417 and 418:
Jump-Starting Procedures. When jump
- Page 419 and 420:
Troubleshooting the Starter In the
- Page 421 and 422:
polyurethane, which are more robust
- Page 423 and 424:
2) voltage regulator, then 3) alter
- Page 425 and 426:
pull the pigtail through. Once I pu
- Page 427 and 428:
have a digital voltmeter with Min/M
- Page 429 and 430:
Reconnect the battery to the car an
- Page 431 and 432:
attery temp changed. The voltage ne
- Page 433 and 434:
have some knowledge about batteries
- Page 435 and 436:
Transmission:Automatic AW 70 & ZF S
- Page 437 and 438:
● The engine must be on. ● Star
- Page 439 and 440:
it on); 1/2 inch I.D. will require
- Page 441 and 442:
Fluid Drain. [Procedure:] ZF 4HP22
- Page 443 and 444:
the pan and its bolts. 3. Remove th
- Page 445 and 446:
throttle spindle. To adjust, loosen
- Page 447 and 448:
get it right front to front...it ca
- Page 449 and 450:
1. Remove the center console betwee
- Page 451 and 452:
transmission. One attachment place
- Page 453 and 454:
Shift Indicator Lamp Replacement. S
- Page 455 and 456:
[Note from Abe Crombie] The 93 thro
- Page 457 and 458:
8. Remove all 6 bolts holding rear
- Page 459 and 460:
transmission from consuming the gas
- Page 461 and 462:
will cause the various hydraulic ac
- Page 463 and 464:
contact cleaner, allowed it to dry,
- Page 465 and 466:
You can also pull the solenoid enti
- Page 467 and 468:
AW7X Diagnostic Notes. Governor Pre
- Page 469 and 470:
the conversion. Remember that the c
- Page 471 and 472:
words, alignment on reinstallation
- Page 473 and 474:
Volvo Maintenance FAQ for 7xx/9xx/9
- Page 475 and 476:
Maintenance: See the Automatic Tran
- Page 477 and 478:
measure…note the position on the
- Page 479 and 480:
to see, use a flashlight. Remove tw
- Page 481 and 482:
the stall speed of torque converter
- Page 483 and 484:
Mine gave out at 48,000 miles. When
- Page 485 and 486:
the transmission cross member 12. P
- Page 487 and 488:
for OBD-I (pre-1996) 960 cars. 1. O
- Page 489 and 490:
3-1- 3 3-2- 1 3-2- 2 3-2- 3 3-3- 1
- Page 491 and 492:
Dexron. It takes about 2.4 quarts i
- Page 493 and 494:
Now shifts easily every time. The o
- Page 495 and 496:
(55), and the cone clutch (43) is i
- Page 497 and 498:
Further O/D Functional Notes. [Abe
- Page 499 and 500:
around 15 mph and with good actuati
- Page 501 and 502:
drive a block and see if it leaking
- Page 503 and 504:
for a used M47 instead. Just a few
- Page 505 and 506:
change the height of the pedal dise
- Page 507 and 508:
don't hot rod. Any thoughts on this
- Page 509 and 510:
Overdrive Rebuild: M- 46 FAQ Home V
- Page 511 and 512:
I used a "Martin" adjustable spanne
- Page 513 and 514:
direction as you look at the rear o
- Page 515 and 516:
Position cam follower on OD unit in
- Page 517 and 518:
44 Thrust Bearing Housing 1 45 NA 4
- Page 519 and 520:
series. Be sure to clean all of the
- Page 521 and 522:
Driveshaft, Driveline, Rear Axle FA
- Page 523 and 524:
Identifying Leaks. [Tip: Editor] I
- Page 525 and 526:
sarcasm. I too, have this very same
- Page 527 and 528:
Other Parts to Examine. [John Orrel
- Page 529 and 530:
earmost U-joint will be extremely "
- Page 531 and 532:
would also mark the yoke arms as we
- Page 533 and 534:
at assembly. Remove the pinion flan
- Page 535 and 536:
out with the nuts tapered side out
- Page 537 and 538:
is marked 1065 it's an ALD. ALL cro
- Page 539 and 540:
incompatible.That was my experience
- Page 541 and 542:
1990 740 Turbo B230FT AW70L/AW71 3.
- Page 543 and 544:
Rear Suspension: FAQ Home Volvo Mai
- Page 545 and 546:
1. Chock the front wheels. 2. Loose
- Page 547 and 548: How Shock Absorbers Fail. How do sh
- Page 549 and 550: control arm without unbolting it. U
- Page 551 and 552: Wheels and Tires: FAQ Home Volvo Ma
- Page 553 and 554: Brake pulls from the rear can be di
- Page 555 and 556: on the back. This also improved the
- Page 557 and 558: Torque Specs on Alloy & Steel Wheel
- Page 559 and 560: Alloy Wheels: Damage and Leaks Dama
- Page 561 and 562: do powder coating for a very reason
- Page 563 and 564: Exhaust Sensors: Oxygen Sensor Repl
- Page 565 and 566: egulator and leaking pressure regul
- Page 567 and 568: ut it can be done, and quickly. On
- Page 569 and 570: passing emissions dicey in some sta
- Page 571 and 572: Removing Broken Studs Using Tools.
- Page 573 and 574: ● Make sure top of stud is flat o
- Page 575 and 576: turbo/tube and tube/block gasket an
- Page 577 and 578: Stock or Performance Exhaust System
- Page 579 and 580: they go into the new holes & you ha
- Page 581 and 582: 3.Fender Guard Joints. [Chris Herbs
- Page 583 and 584: To avoid: appears not to give off a
- Page 585 and 586: Door Operation and Troubleshooting:
- Page 587 and 588: door fails to lock, then the timer
- Page 589 and 590: Has anyone replaced it? [Response:
- Page 591 and 592: [Response: DanR/Colin Shepherd] I w
- Page 593 and 594: equires a removal of the entire pan
- Page 595 and 596: 1. Unscrew the door lock stem. 2. E
- Page 597: this strip is actually exposed from
- Page 601 and 602: atteries are OK. I do not use the r
- Page 603 and 604: Body Glass, Mirrors, Moldings, Wate
- Page 605 and 606: Window Motor Slow. [Symptom:] My 95
- Page 607 and 608: Power Window Motor Removal. Diagnos
- Page 609 and 610: Replacing Windshield Glass. Removin
- Page 611 and 612: the windshield no longer securely b
- Page 613 and 614: use a flashlight to locate the clip
- Page 615 and 616: is a path for electrical current to
- Page 617 and 618: connection somewhere. Check for vol
- Page 620 and 621: Body: Sunroof FAQ Home Volvo Mainte
- Page 622 and 623: [Response: Kerry] (Applies to 1986
- Page 624 and 625: elow the roof line, while the leadi
- Page 626 and 627: Sunroof Wind Flap. Adjustment of He
- Page 628 and 629: it firmly. This will help make sure
- Page 630 and 631: Sunroof Overhaul. [Tips from Ken Di
- Page 632 and 633: and the roof would close after a fe
- Page 634 and 635: move the microswitch plungers out o
- Page 636 and 637: power supply, preferably the fuse w
- Page 638 and 639: Body & Engine- Accessories FAQ Home
- Page 640 and 641: Third Seat Installation for an illu
- Page 642 and 643: Trailer Hitch. [Inquiry:] I am cons
- Page 644 and 645: as always when dealing with plastic
- Page 646 and 647: electronic speedo/odo pickup on the
- Page 648 and 649:
Cupholders. Volvo OEM Cupholders. [
- Page 650 and 651:
wait a day before I unclamp it or m
- Page 652 and 653:
those look different (i.e. the anod
- Page 654 and 655:
Body Care, Paint, Waxes Etc. FAQ Ho
- Page 656 and 657:
Chip Repair Buffing. The Langka pro
- Page 658 and 659:
you've got a dent, you'd be working
- Page 660 and 661:
Promoter can. And make sure you don
- Page 662 and 663:
Seat Electricals: Interior: Seats,
- Page 664 and 665:
wait until the LEDs light up, then
- Page 666 and 667:
square) extends past the track on t
- Page 668 and 669:
and I doubt you can buy that piece
- Page 670 and 671:
deal with. There is also a bigger m
- Page 672 and 673:
pry outwards gently on the sides an
- Page 674 and 675:
pocket and the length of the bushin
- Page 676 and 677:
spectacular. The total cost for all
- Page 678 and 679:
panel firmly and pull out and left
- Page 680 and 681:
as you buy the car. Keep thy dash c
- Page 682 and 683:
Headliner replacement for sedans or
- Page 684 and 685:
more patience. My first board was b
- Page 686 and 687:
Storage Tray Under Radio. To remove
- Page 688 and 689:
generally an overlapping system, wi
- Page 690 and 691:
Removing/Repairing Tailgate Panel.
- Page 692 and 693:
Removing Rear Floor Panels for Acce
- Page 694 and 695:
for all new carpet. http://www.sale
- Page 696 and 697:
Radio Code Lost. [Problem: Lost rad
- Page 698 and 699:
960 96 Radio Bulbs Burned Out [Tip]
- Page 700 and 701:
cart, you can click on them to see
- Page 702 and 703:
just put it into the dash with the
- Page 704 and 705:
grease prevents proper grip on the
- Page 706 and 707:
the hole will do the trick. Avoid t
- Page 708 and 709:
Warning Lights Flickering: Bad Alte
- Page 710 and 711:
Difficulties? This bezel can be tou
- Page 712 and 713:
trim. To access the bulb, gently pr
- Page 714 and 715:
Courtesy of Jurgen Winkelvoss] [Tip
- Page 716 and 717:
Gauges or Warning Lights Stop Worki
- Page 718 and 719:
1993 + tank: right side of pointer
- Page 720 and 721:
the 3 screws that hold the gauge in
- Page 722 and 723:
jump back up to the correct speed,
- Page 724 and 725:
gauge cluster from the car and brou
- Page 726 and 727:
See also ABS Lamp Lights After Star
- Page 728 and 729:
Electrical: SRS Air Bag & Seatbelts
- Page 730 and 731:
2-2-1 Passenger module, short circu
- Page 732 and 733:
Chrome steel rod. Insert the rod do
- Page 734 and 735:
Electrical Diagnostic Supplies. [Ed
- Page 736 and 737:
740-940 Fuse Panel Location 960 Fus
- Page 738 and 739:
ad crimp jointin the base bad relay
- Page 740 and 741:
Relay Tray Removal and Replacement.
- Page 742 and 743:
failure in our 87 745T was caused b
- Page 744 and 745:
your local shop, or the cost of bur
- Page 746 and 747:
Clip the zip holding the two large
- Page 748 and 749:
will happen. If the problem really
- Page 750 and 751:
my Mercedes (the switch design is v
- Page 752 and 753:
Electrical: Lighting, Horns FAQ Hom
- Page 754 and 755:
Headlamps: How to Replace Headlamp
- Page 756 and 757:
with WD-40 and then drip/spray some
- Page 758 and 759:
low beam is set, the high beam shou
- Page 760 and 761:
Headlamp Capsule Loose. [Inquiry] I
- Page 762 and 763:
Parking Lamp Capsule Removal. 740/9
- Page 764 and 765:
there is heavy dirt in there, find
- Page 766 and 767:
4. With files and the Dremel tool,
- Page 768 and 769:
causes the raised plastic nipple in
- Page 770 and 771:
integral assembly combining the 3 b
- Page 772 and 773:
too strong. By contrast, the right
- Page 774 and 775:
down, limiting the effectiveness of
- Page 776 and 777:
Bulb Descriptions and Ratings: [ref
- Page 778 and 779:
Electrical: Wipers FAQ Home Wipers:
- Page 780 and 781:
finally came loose. After my operat
- Page 782 and 783:
position. ● Now you can attach th
- Page 784 and 785:
learn't the hard way never to tuck
- Page 786 and 787:
order to get the old one out. Seems
- Page 788 and 789:
Heating and Air Conditioning FAQ Ho
- Page 790 and 791:
Vacuum Check Valve Failures. [Inqui
- Page 792 and 793:
console against the firewall inside
- Page 794 and 795:
Repair or Replace? If your motor is
- Page 796 and 797:
88 w/ air conditioning blower motor
- Page 798 and 799:
uns right off the windshield and in
- Page 800 and 801:
illustrated instructions at its web
- Page 802 and 803:
vary other factors, the FOT (fixed
- Page 804 and 805:
aluminum pipe where it connects to
- Page 806 and 807:
700/900 92 B204/234/ Diesel R12 105
- Page 808 and 809:
● ● ● ● ● ● compressor
- Page 810 and 811:
test for you, skip all of this and
- Page 812 and 813:
● ● Hoses leaking throughout th
- Page 814 and 815:
ecause moisture may damage the drie
- Page 816 and 817:
place. The evap drain extension is
- Page 818 and 819:
diagnosed with an A/C gauge set. Po
- Page 820 and 821:
at the local import auto parts stor
- Page 822 and 823:
Mold Odor from A/C System. [Tip fro
- Page 824 and 825:
door (US/Canada models) the end of
- Page 826 and 827:
soldering. [Response: Brian Oliver]
- Page 828 and 829:
eading. Location of Ambient Tempera
- Page 830 and 831:
Blower Motor: 2-3-3 Starting curren
- Page 832 and 833:
hose = floor) and has a boot on the
- Page 834 and 835:
Steering: FAQ Home Volvo Maintenanc
- Page 836 and 837:
- Power Steering Racks The Cam gear
- Page 838 and 839:
on my '90 745 GLE (steering heavy,
- Page 840 and 841:
Rack Failure. Diagnosis of Power St
- Page 842 and 843:
easy. ● Disconnect the tie rod en
- Page 844 and 845:
cars. Steering Wheel Removal. [Inqu
- Page 846 and 847:
the caster is different from side t
- Page 848 and 849:
end of the strut rod is a round bus
- Page 850 and 851:
necessary to keep your suspension i
- Page 852 and 853:
● Secure a strut holder or a piec
- Page 854 and 855:
Tie Rod Replacement. Diagnosis. [Do
- Page 856 and 857:
Removal: Jack up the car and place
- Page 858 and 859:
that axial play just disappears" (V
- Page 860 and 861:
● Rear bar cannot be more simple:
- Page 862 and 863:
4. The Gothenburg Bible, by Paul Gr
- Page 864 and 865:
com ❍ Verrigni Auto and Marine. I
- Page 866 and 867:
Source of FI Computers. A failed EC
- Page 868:
General Mechanical Tips FAQ Home Vo
- Page 871 and 872:
when and where you apply heat). [Ar
- Page 873 and 874:
I used the slowest wire feed settin
- Page 875 and 876:
at 5 pounds. To read the scale accu
- Page 877 and 878:
the alternator and ground. If the d
- Page 879 and 880:
Using a Dial Indicator to Minimize
- Page 881 and 882:
contaminate your oxygen sensor and
- Page 883 and 884:
DOWN by between thirty and forty pe
- Page 885 and 886:
Volvo Special Tool Designs FAQ Home
- Page 887 and 888:
Crank Holder Rear View Plan Side Vi
- Page 889 and 890:
In-Line Pressure Tester Adapters. A
- Page 891 and 892:
M-46 Overdrive Tools. The following
- Page 893 and 894:
Pre-Pump Removal Tool. [Tip from Ro
- Page 895 and 896:
Turbo Nut Installer 5411 Diesel Too
- Page 897 and 898:
700/900 Series Model Identification
- Page 899 and 900:
99 B6254G 8 Doors 0 - Basic engine
- Page 901 and 902:
Engine: ● B230 and 234 series hav
- Page 903 and 904:
Volvo 780 FAQ Home Volvo Maintenanc
- Page 905 and 906:
showing at the window base, ask the
- Page 907 and 908:
960-90 Series Information FAQ Home
- Page 909 and 910:
coolant breakdown, so make sure you
- Page 911 and 912:
hole and retested. This time the ti
- Page 913 and 914:
ought. Wrap the side going down int
- Page 915 and 916:
Preventive Maintenance. [Tip from T
- Page 917 and 918:
underneath next to the motor mount
- Page 919 and 920:
960 B6304 Fuel Rail Leakage Problem
- Page 921 and 922:
drain tank. Drain about 1 to 1.5 qu
- Page 923 and 924:
you strip or otherwise wreck the bo
- Page 925 and 926:
psi. The new piston is made out of
- Page 927 and 928:
when I had mistreated it to a coupl
- Page 929 and 930:
If your car just sputters and dies
- Page 931 and 932:
positive cable. Outside I cut the b
- Page 933 and 934:
[Comment on Grease from Jim Bowers]
- Page 936 and 937:
Components Nm (ft. lb) or degrees E
- Page 938 and 939:
Conrod bearing caps, stage 2 (angle
- Page 940 and 941:
of additive. Consequently, using ch
- Page 942 and 943:
expensive machine. I don't think th
- Page 944 and 945:
attack certain sealing materials, s
- Page 946 and 947:
has a number of cast-iron engines.
- Page 948 and 949:
viscometrics. ● Group III. Severe
- Page 950 and 951:
of the base oil is a good measure o
- Page 952 and 953:
ewarded with a smoother running car
- Page 954 and 955:
[Response 1: Bernard] The B230FT en
- Page 956 and 957:
Question A: The engine cranks but d
- Page 958 and 959:
● Location: Cylinder head, under
- Page 960 and 961:
\4 inch hose connected to the forwa
- Page 962 and 963:
Alcohol 3. Clean gently with q-tips
- Page 964 and 965:
Volvo Oxygen Sensor Replacements FA
- Page 966 and 967:
VOLVO AC R134 refit kit instruction
- Page 968 and 969:
● Supplement #1 - $30.00 Go to: P
- Page 970 and 971:
maneuver.] Picture 2. diagonally up
- Page 972 and 973:
install the new valve, without the
- Page 974 and 975:
5. Remove knee bolster at driver’
- Page 976 and 977:
Volvo 700/900 Heater Core Replaceme
- Page 978 and 979:
Volvo Maintenance FAQ for 7xx/9xx/9
- Page 980 and 981:
Bilstein Shock I got them for about
- Page 982 and 983:
into the trailing arm hole. When th
- Page 984 and 985:
Volvo B6304 Oil Pickup Tube Repair
- Page 986 and 987:
clearance to get the oil pan out. 1
- Page 988 and 989:
24. Get all the oil pan screws back
- Page 990 and 991:
Volvo B230 Connecting Rod Bearing-O
- Page 992 and 993:
est when it comes to bearings and g
- Page 994 and 995:
The picture below shows the shaft a
- Page 996 and 997:
After pressing the seal in with my
- Page 998 and 999:
Adding Remote Door Locks in 900 Car
- Page 1000 and 1001:
3. Wires running to keyless control
- Page 1002 and 1003:
shank (the metal part that grips th
- Page 1004 and 1005:
(b) Gently lift and pull the block
- Page 1006 and 1007:
(a) Remove the two Torx screws in t
- Page 1008 and 1009:
(d) Move the any seat switch (e.g.,
- Page 1010:
Volvo Third Seat Installation FAQ H
- Page 1030 and 1031:
Engine: Turbo Rebuilding Volvo Main
- Page 1032 and 1033:
2. Remove all hoses from housing; c
- Page 1034 and 1035:
United Turbo Co., Spofford, NH, (ht
- Page 1036 and 1037:
Mitsubishi TD05 Turbo bolted to the
- Page 1038 and 1039:
Volvo Maintenance FAQ for 7xx/9xx/9
- Page 1040 and 1041:
Pan Gasket Gasket Kit It's a good i
- Page 1042 and 1043:
Volvo AW70/71 to M-46 Transmission
- Page 1044 and 1045:
from under the car. Step 2 : While
- Page 1046 and 1047:
Volvo Maintenance FAQ for 7xx/9xx/9
- Page 1048 and 1049:
Mount and elevate car safely so tha
- Page 1050 and 1051:
as noted in FAQ. Enjoy a much bette
- Page 1052 and 1053:
metal pipe is joined to the pump wi
- Page 1054 and 1055:
shellac or any other gasket sealers
- Page 1056 and 1057:
B234F (16 valve DOHC) Timing Belt R
- Page 1058 and 1059:
The timing belt used with the auto-
- Page 1060 and 1061:
without being noticed. The cam timi
- Page 1062 and 1063:
Unbolt the fan shroud from the radi
- Page 1064 and 1065:
a)For the manual tensioner, start b
- Page 1066 and 1067:
elt then place it over the right ba
- Page 1068 and 1069:
finger at the mid-point of the long
- Page 1070 and 1071:
elt and re-check the tension. This
- Page 1072 and 1073:
Volvo B230 Headgasket Replacement F
- Page 1074 and 1075:
use abrasive pads to buzz off the o
- Page 1076 and 1077:
The B6304 engine is more complicate
- Page 1078 and 1079:
Where to Find Euro Side Marker Lamp
- Page 1080 and 1081:
extension wires are just the OEM Vo
- Page 1082 and 1083:
Bulb-Out Relay Circuit Concerns. [D
- Page 1084 and 1085:
components. According to this hypot
- Page 1086 and 1087:
Repair Seat Belt Retractor FAQ Home
- Page 1088 and 1089:
number on small end. device ● Rem
- Page 1090 and 1091:
upper left and lower right not in s
- Page 1092 and 1093:
epair is around $100. The trickiest
- Page 1094 and 1095:
Volvo Wheel Balancing FAQ Home Volv
- Page 1096 and 1097:
two front wheels and tires. His car
- Page 1098 and 1099:
measured at the factory using a lar
- Page 1100 and 1101:
Match Mounting of Yokohama tires in
- Page 1102 and 1103:
ungees or EPDM hook straps. ● I h
- Page 1104 and 1105:
are glued together This is what the
- Page 1106 and 1107:
Volvo Maintenance FAQ for 7xx/9xx/9
- Page 1108:
1989 Volvo 740 Series 2.3L (None Tu
- Page 1114:
Volvo Maintenance FAQ for 7xx/9xx/9
- Page 1123 and 1124:
Go to: Page 1 2 3 4 5 6 7 8 9 10 74
- Page 1125 and 1126:
Detach: Go to: Page 1 2 3 4 5 6 7 8
- Page 1127 and 1128:
Go to: Page 1 2 3 4 5 6 7 8 9 10 Ex
- Page 1129 and 1130:
Go to: Page 1 2 3 4 5 6 7 8 9 10 If
- Page 1131 and 1132:
Go to: Page 1 2 3 4 5 6 7 8 9 10 Re
- Page 1133 and 1134:
Go to: Page 1 2 3 4 5 6 7 8 9 10 Co
- Page 1135 and 1136:
Go to: Page 1 2 3 4 5 6 7 8 9 10
- Page 1137 and 1138:
One end screws onto the can and the
- Page 1139 and 1140:
Here is a picture of the notice sti
- Page 1149 and 1150:
Volvo AW-7X Transmission Valve Body
- Page 1151 and 1152:
secured the plate using the 3 rearm
- Page 1153 and 1154:
10. Grasp the lower valve body, hol
- Page 1155 and 1156:
Volvo AW-7X Transmission Valve Body
- Page 1157 and 1158:
Volvo AW-7X Transmission Valve Body
- Page 1159 and 1160:
Page 1 2 3 4 5 6 7 8 9 Next Volvo M
- Page 1161 and 1162:
Valve body separator plate. This go
- Page 1163 and 1164:
Volvo AW-7X Transmission Valve Body
- Page 1165 and 1166:
Page 1 2 3 4 5 6 7 8 9 Next These a
- Page 1167 and 1168:
Valve body installed in transmissio
- Page 1169 and 1170:
Volvo AW-7X Transmission Valve Body
- Page 1171 and 1172:
Volvo Headliner Replacement-2 Home
- Page 1173 and 1174:
● Use a headliner tool (or wooden
- Page 1175 and 1176:
in fairly good shape. The fabric on
- Page 1177 and 1178:
Volvo Headliner Replacement-3 FAQ H
- Page 1179 and 1180:
using a razor knife (figure E). ●
- Page 1181 and 1182:
● Use your scissors to punch hole
- Page 1183:
oth cases this is a two person job.