Domino Document Manager - Lotus documentation
Domino Document Manager - Lotus documentation
Domino Document Manager - Lotus documentation

Create successful ePaper yourself
Turn your PDF publications into a flip-book with our unique Google optimized e-Paper software.
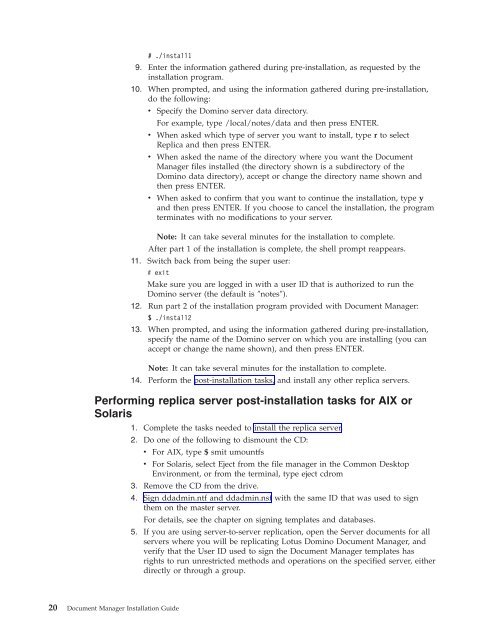
# ./install1<br />
9. Enter the information gathered during pre-installation, as requested by the<br />
installation program.<br />
10. When prompted, and using the information gathered during pre-installation,<br />
do the following:<br />
v Specify the <strong>Domino</strong> server data directory.<br />
For example, type /local/notes/data and then press ENTER.<br />
v When asked which type of server you want to install, type r to select<br />
Replica and then press ENTER.<br />
v When asked the name of the directory where you want the <strong>Document</strong><br />
<strong>Manager</strong> files installed (the directory shown is a subdirectory of the<br />
<strong>Domino</strong> data directory), accept or change the directory name shown and<br />
then press ENTER.<br />
v When asked to confirm that you want to continue the installation, type y<br />
and then press ENTER. If you choose to cancel the installation, the program<br />
terminates with no modifications to your server.<br />
Note: It can take several minutes for the installation to complete.<br />
After part 1 of the installation is complete, the shell prompt reappears.<br />
11. Switch back from being the super user:<br />
# exit<br />
Make sure you are logged in with a user ID that is authorized to run the<br />
<strong>Domino</strong> server (the default is ″notes″).<br />
12. Run part 2 of the installation program provided with <strong>Document</strong> <strong>Manager</strong>:<br />
$ ./install2<br />
13. When prompted, and using the information gathered during pre-installation,<br />
specify the name of the <strong>Domino</strong> server on which you are installing (you can<br />
accept or change the name shown), and then press ENTER.<br />
Note: It can take several minutes for the installation to complete.<br />
14. Perform the post-installation tasks, and install any other replica servers.<br />
Performing replica server post-installation tasks for AIX or<br />
Solaris<br />
20 <strong>Document</strong> <strong>Manager</strong> Installation Guide<br />
1. Complete the tasks needed to install the replica server.<br />
2. Do one of the following to dismount the CD:<br />
v For AIX, type $ smit umountfs<br />
v For Solaris, select Eject from the file manager in the Common Desktop<br />
Environment, or from the terminal, type eject cdrom<br />
3. Remove the CD from the drive.<br />
4. Sign ddadmin.ntf and ddadmin.nsf with the same ID that was used to sign<br />
them on the master server.<br />
For details, see the chapter on signing templates and databases.<br />
5. If you are using server-to-server replication, open the Server documents for all<br />
servers where you will be replicating <strong>Lotus</strong> <strong>Domino</strong> <strong>Document</strong> <strong>Manager</strong>, and<br />
verify that the User ID used to sign the <strong>Document</strong> <strong>Manager</strong> templates has<br />
rights to run unrestricted methods and operations on the specified server, either<br />
directly or through a group.