- Page 1 and 2:
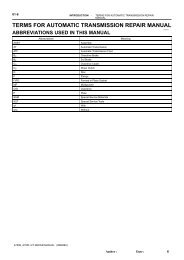
IN-6 INTRODUCTION - Abbreviations U
- Page 3 and 4:
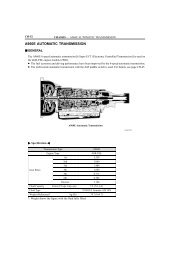
AT5715 AT5716 AUTOMATIC TRANSAXLE -
- Page 5 and 6:
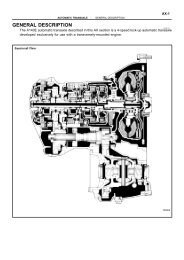
General Specifications Type of Tran
- Page 7 and 8:
FUNCTION OF COMPONENTS Component Fu
- Page 9 and 10:
Hydraulic Control System The hydrau
- Page 11 and 12:
AX-102 AT7927 A241E A240L, A243L AT
- Page 13 and 14:
AX-104 A241E AT8032 A243L A240L AT3
- Page 15 and 16:
AX-106 N-m (kgf-cm, ft-lbf) ♦ Non
- Page 17 and 18:
AX-108 SST AT8061 AT8078 AT8059 Pin
- Page 19 and 20:
AX-1 10 AT8497 AT2980 AT8058 AT2981
- Page 21 and 22:
AX-1 12 AT8484 AT8485 AT5831 AT7886
- Page 23 and 24:
AX-1 14 AT8005 AT8004 AUTOMATIC TRA
- Page 25 and 26:
AX-1 16 8. Be sure to install the t
- Page 27 and 28:
AX-1 18 AT2956 AT2911 AT0593 AT2910
- Page 29 and 30:
AX-120 AT0544 AT0700 AT0701 AT7931
- Page 31 and 32:
AX-122 AT2961 AT2901 AT2900 AT2899
- Page 33 and 34:
AX-124 AT8482 AT7999 AT1293 AT1294
- Page 35 and 36:
AX-126 AT0604 AT0523 AT2892 AT8034
- Page 37 and 38:
AX-128 AT0607 AT5829 AT3139 AT0610
- Page 39 and 40:
AX-130 AT5704 AT2965 AT2966 AT0798
- Page 41 and 42:
AX-132 AT2592 AT7891 AT0626 AT0627
- Page 43 and 44:
AX-134 AT2968 AT2023 AT2969 AT0635
- Page 45 and 46:
AX-136 AT0525 AT8484 AT5711 AT2766
- Page 47 and 48:
AX-138 AT2869 AT2867 AT2865 AT8302
- Page 49 and 50:
AX-140 AT5707 AT0643 AT5692 AT7991
- Page 51 and 52:
AX-142 AT5685 AT2975 AT2855 AT2854
- Page 53 and 54:
AX-144 AT5684 AT7926 AT7887 AT5683
- Page 55 and 56:
AX-146 AT5639 AT5730 AT7762 AT5638
- Page 57 and 58:
AX-148 22 (225, 16) Snap Ring Disc
- Page 59 and 60:
AX-150 AT8074 AT8069 AT8496 AT8079
- Page 61 and 62:
AX-152 AT2850 AT8071 AT8051 AT8057
- Page 63 and 64:
AX-154 AT0653 AT3135 AT3433 AT0108
- Page 65 and 66:
AX-156 AT3111 AT2863 AT3141 AT2865
- Page 67 and 68:
AX-158 A AT0352 AT3035 AT8049 AT065
- Page 69 and 70:
AX-160 AT2877 AT2878 AT0518 AT7891
- Page 71 and 72:
AX-162 AT2883 AT2884 AT0139 AT2885
- Page 73 and 74:
AX-164 AT2892 AT0523 AT0376 AT2888
- Page 75 and 76:
AX-166 AT0627 AT2893 AT7996 AT2895
- Page 77 and 78:
AX-168 AT8072 AT7999 AT2897 AT7889
- Page 79 and 80:
AX-170 AT0541 AT8058 AT0543 AT0544
- Page 81 and 82:
AX-172 AT2907 AT2908 Torx Wrench AT
- Page 83 and 84:
AX-174 AT7994 AT7995 SST AUTOMATIC
- Page 85 and 86:
Thrust Washer Direct Clutch Race Oi
- Page 87 and 88:
COMPONENT PARTS (See page AX-48 to
- Page 89 and 90:
AT8355 AT8356 AT8357 AT8358 AT8359
- Page 91 and 92:
Primary Regulator Valve Sleeve AT33
- Page 93 and 94:
AT3381 AT3380 Key 3 - 4 Shift Valve
- Page 95 and 96:
AT3383 AT3385 AT3389 AT3387 AUTOMAT
- Page 97 and 98:
AT8361 AT8362 AT3408 AT8368 AT8369
- Page 99 and 100:
AT8366 AT8367 AT8371 AUTOMATIC TRAN
- Page 101 and 102:
AT8270 AT8261 AT8262 AT8263 AT8264
- Page 103 and 104:
AT8279 AT8280 AT8271 SST AT7754 AT8
- Page 105 and 106:
AT7750 AT7751 AT7752 AT8287 AT8286
- Page 107 and 108:
AT8471 AT7753 SST AT7754 AT3498 AT8
- Page 109 and 110:
AT8375 AT8284 AT8277 AT8285 AT8296
- Page 111 and 112:
AT8299 AT8300 AT8291 AUTOMATIC TRAN
- Page 113 and 114:
♦ O-Ring 5.4 (55, 48 in.-lbf) AUT
- Page 115 and 116:
29 (300, 22) Governor Driven Gear U
- Page 117 and 118:
AT5652 AT2848 AT2849 AT2850 AT2851
- Page 119 and 120:
AT5684 AT7932 AT2852 AT0102 AT0103
- Page 121 and 122:
A240L A243L AT3135 A241E AT2584 AT3
- Page 123 and 124:
AT2861 AT3111 AT2863 AT3141 AT2865
- Page 125 and 126:
AT2872 AT0352 AT3035 AT0651 AT0652
- Page 127 and 128:
AT5596 AT2878 AT5648 AT7891 AT0519
- Page 129 and 130:
AT2884 AT0139 AT2885 AT0324 AT7892
- Page 131 and 132:
AT2892 AT0523 Ex. A240L AT0525 AT05
- Page 133 and 134:
AT0530 AT0531 AT0532 AT0533 AT2896
- Page 135 and 136:
AT2899 AT2900 AT2901 AT2902 AT2903
- Page 137 and 138:
AT0541 AT0542 AT0543 AT0544 AT2904
- Page 139 and 140:
AT2908 Q00981 AT2910 AT0555 AT2911
- Page 141 and 142:
AT4331 AUTOMATIC TRANSAXLE (A241H)
- Page 143 and 144:
Front Bearing Race Thrust Bering Re
- Page 145 and 146: AT5696 Torx Wrench AT5643 AT0548 AT
- Page 147 and 148: AT2960 AT2961 AT2901 AT2900 AT2899
- Page 149 and 150: AT7987 AT8072 AT7999 AT1293 AT1294
- Page 151 and 152: AT0076 AT0604 AT2962 AT2963 AT8483
- Page 153 and 154: AT2893 AT0527 AT0526 AT0606 AT0607
- Page 155 and 156: AT0612 AT0613 AT0323 AT0614 AT2965
- Page 157 and 158: AT2967 AT0620 AT0621 AT0622 AT2592
- Page 159 and 160: AT2759 AT0631 AT2593 AT2868 AT2023
- Page 161 and 162: AT1984 AT0381 AT2971 AT2595 AT3348
- Page 163 and 164: AT8047 AT3345 AT2870 AT2869 AT2867
- Page 165 and 166: AT0643 AT3114 AT0108 AT0645 AT3433
- Page 167 and 168: AT5645 AT3440 AT7992 AT8499 AT8057
- Page 169 and 170: AT0501 AT8040 AT8006 AT7762 AT8041
- Page 171 and 172: AT8074 AT3447 AUTOMATIC TRANSAXLE (
- Page 173 and 174: AX-48 Pin Second Coast Brake Band
- Page 175 and 176: AX-50 AT7707 Less than 5 mm (0.20 i
- Page 177 and 178: AX-52 AT3611 AT2732 AT0153 AT0154 A
- Page 179 and 180: AX-54 AT3611 AT0159 AT0160 AT0161 A
- Page 181 and 182: AX-56 AT0163 AT2733 AT2734 AT0165 A
- Page 183 and 184: AX-58 A241E AT3617 AT5832 AT7710 Fl
- Page 185 and 186: AT0187 AT2740 AT8081 AT2739 AT0187
- Page 187 and 188: ♦ Non-reusable part AT7716 AT2742
- Page 189 and 190: AT2699 AT0191 AT0323 Hold Align Sna
- Page 191 and 192: AT0323 AT7717 AT8055 AT7717 AT4304
- Page 193 and 194: AT2919 AT0200 AT2920 Front Bearing
- Page 195: N-m (kgf-cm, ft-lbf) Non-reusable p
- Page 199 and 200: AT0581 AT2934 AT7921 AT2929 AT0582
- Page 201 and 202: AT0589 AT0590 AT2938 AT0588 AT2939
- Page 203 and 204: ♦ Non-reusable part AT2942 AT0572
- Page 205 and 206: AT5834 AT5837 AT0576 AT0577 AT2948
- Page 207 and 208: Flange Disc Plate AT3113 AT2952 AT2
- Page 209 and 210: A241E ♦ Gasket Plate ♦ O-Ring N
- Page 211 and 212: A241E AT8032 A240L, A243L AT3048 AT
- Page 213 and 214: Check Ball Primary Regulator Plunge
- Page 215 and 216: LOCATION OF KEYS, PINS, VIBRATING S
- Page 217 and 218: SPECIFICATIONS OF VALVE BODY SPRING
- Page 219 and 220: A240L, A243L AT3051 AT3052 Plug Key
- Page 221 and 222: LOCATION OF KEYS AND STRAINER A240L
- Page 223 and 224: IN-4 Seal Lock Adhesive IN0036 INTR
- Page 225 and 226: IN-2 ♦ Oil Seal N-m (kgf-cm, ft-l
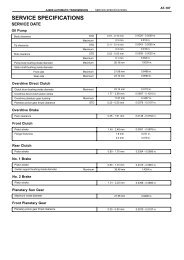
- Page 227 and 228: TR-40 SERVICE SPECIFICATIONS SERVIC
- Page 229 and 230: AX-232 SERVICE SPECIFICATIONS SERVI
- Page 231 and 232: AX-234 SERVICE DATA (Cont’d) Accu
- Page 233 and 234: AX-236 SERVICE DATA (Cont’d) Diff
- Page 235 and 236: AX-12 Illustration Part No. Part Na
- Page 237 and 238: AX-14 SST (SPECIAL SERVICE TOOLS) (
- Page 239 and 240: STANDARD BOLT TORQUE SPECIFICATIONS
- Page 241 and 242: TR-2 29 (300, 22) Transfer Right Ca
- Page 243 and 244: TR-4 AT3354 AT3360 AT3364 AT3362 AT
- Page 245 and 246: TR-6 AT7764 AT3357 AT3448 SST SST T
- Page 247 and 248:
TR-8 AT7767 AT7768 AT7769 AT8089 AT
- Page 249 and 250:
TR-10 AT7776 AT7777 SST TRANSFER (A
- Page 251 and 252:
TR-12 AT8009 AT7778 AT3342 AT7779 A
- Page 253 and 254:
TR-14 N-m (kgf-cm, ft-lbf) ♦ Non-
- Page 255 and 256:
TR-16 AT8068 AT8063 TRANSFER (A241H
- Page 257 and 258:
TR-18 AT7782 Matchmarks AT7783 AT77
- Page 259 and 260:
TR-20 AT7790 AT8354 AT7791 AT7792 S
- Page 261 and 262:
TR-22 AT7794 AT7788 AT7795 AT7787 -
- Page 263 and 264:
TR-24 AT7798 AT7787 AT7786 Matchmar
- Page 265 and 266:
TR-26 Transfer Shift Lever Shaft Di
- Page 267 and 268:
TR-28 AT8054 AT8064 AT8243 AT8244 A
- Page 269 and 270:
TR-30 AT8245 AT8244 AT3401 AT8260 A
- Page 271 and 272:
TR-32 AT8115 AT8267 AT8268 Adjustin
- Page 273 and 274:
TR-34 AT3361 AT3360 AT3308 AT3358 A
- Page 275 and 276:
TR-36 AT3362 AT3357 AT3415 AT8115 A
- Page 277 and 278:
TR-38 AT3361 AT3312 AT3356 AT3354 A