- Page 1 and 2:
E-MU Systems 1
- Page 3 and 4:
Table of Contents 1 - Introduction
- Page 5 and 6:
Transpose & Volume ................
- Page 7 and 8:
Tips for Using Chorus .............
- Page 9 and 10:
Convert to Mono or Stereo .........
- Page 11 and 12:
4-Band EQ .........................
- Page 13 and 14:
13 - Appendix .....................
- Page 15 and 16:
1 - Introduction & Installation Int
- Page 17 and 18:
Install the Emulator X Sound Banks
- Page 19 and 20:
Setting up the Preferences The pref
- Page 21 and 22:
Sample Buffers This control allocat
- Page 23 and 24:
VST Output Buses This control is on
- Page 25 and 26:
Controllers This is where you set u
- Page 27 and 28:
Undo •History size - The maximum
- Page 29 and 30:
2 - Emulator Architecture This chap
- Page 31 and 32:
Multisetup A Multisetup is like a m
- Page 33 and 34:
Preset Diagram The diagram below il
- Page 35 and 36:
If more than one voice is assigned
- Page 37 and 38:
3 - Getting Started Exploring the T
- Page 39 and 40:
Changing Presets (from Single View)
- Page 41 and 42:
Changing Presets (from the Multicha
- Page 43 and 44:
Create Your Own Custom Bank It’s
- Page 45 and 46:
Load a New Bank Load up a new bank
- Page 47 and 48:
6. This page controls the voices us
- Page 49 and 50:
7. Each Cord has its own attenuator
- Page 51 and 52:
Using DSP There are a number of DSP
- Page 53 and 54:
Pitch Shift 14. Select Pitch Shift
- Page 55 and 56:
Find your Files 4. Select the Libra
- Page 57 and 58:
4 - Multisetup / Preset Globals The
- Page 59 and 60:
To Select Presets by Category 1. Cl
- Page 61 and 62:
Output View Button This button allo
- Page 63 and 64:
To Use the Limiter 1. Press the Ena
- Page 65 and 66:
Filter Override The filter type of
- Page 67 and 68:
To Delete a Multisetup 1. Open the
- Page 69 and 70:
These parameters affect the entire
- Page 71 and 72:
Tuning Tables In addition to the st
- Page 73 and 74:
Key CC Window These controls work i
- Page 75 and 76:
Preset PatchCords Preset PatchCords
- Page 77 and 78:
5 - Voices & Sample Zones Each pres
- Page 79 and 80:
Voice Selection In each tabbed page
- Page 81 and 82:
Groups Voices can be categorized in
- Page 83 and 84:
Overview Section The bottom portion
- Page 85 and 86:
Direction For each voice (or zone i
- Page 87 and 88:
Mix/Tune Page Volume, pan, directio
- Page 89 and 90:
To Layer Voices and Samples The ran
- Page 91 and 92:
Velocity Window Page The Velocity W
- Page 93 and 94:
Set up the Voices 2. Select the Rea
- Page 95 and 96:
Continuous Controller Window Pages
- Page 97 and 98:
Cycle Groups The Cycle Group destin
- Page 99 and 100:
Cycle 3 Crossfading This next examp
- Page 101 and 102:
Region Page The Region window allow
- Page 103 and 104:
For example, if you set the sensiti
- Page 105 and 106:
Details Page Mute/Solo Group Select
- Page 107 and 108:
Expand Voice This function takes ap
- Page 109 and 110:
Links Links call up additional pres
- Page 111 and 112:
Mix/Tune Window This window allows
- Page 113 and 114:
6 - Voice Processing Voice Processi
- Page 115 and 116:
Oscillator Pitch Bend Range These t
- Page 117 and 118:
Glide Rate & Curve Glide is a smoot
- Page 119 and 120:
To Setup the Volume Envelope as an
- Page 121 and 122:
The chart below lists all the displ
- Page 123 and 124:
Sync Key Sync or Free Running. With
- Page 125 and 126:
Function Generators The function ge
- Page 127 and 128:
Modify the Sequence & Play 8. Click
- Page 129 and 130:
Modulation Destinations The followi
- Page 131 and 132: Filter Controls You can choose from
- Page 133 and 134: Filter Name Order Type Description
- Page 135 and 136: Programmable Morphing Filters There
- Page 137 and 138: Morph Designer Controls Control Fun
- Page 139 and 140: 2EQ + Lowpass Morph Peak/Shelf Morp
- Page 141 and 142: Voice Effect Sends Each voice has o
- Page 143 and 144: Modulation Sources Source Descripti
- Page 145 and 146: Modulation Destinations 6 - Voice P
- Page 147 and 148: Summing Nodes All the modulation in
- Page 149 and 150: Retune the Sample Move Loop End Poi
- Page 151 and 152: Poly Key Assign Groups The Poly Key
- Page 153 and 154: Poly Release Trig Release Vel Poly
- Page 155 and 156: 7 - Editing a Sample Sample Editor
- Page 157 and 158: Exporting & Importing Samples The E
- Page 159 and 160: Show Grid Show or hide the vertical
- Page 161 and 162: Go to Loop End Positions the cursor
- Page 163 and 164: Cut Section The Cut function remove
- Page 165 and 166: 4. Choose the paste mode— Insert,
- Page 167 and 168: More Information about Paste • Yo
- Page 169 and 170: Truncate Truncation shortens a samp
- Page 171 and 172: 4. Select the amount of gain increa
- Page 173 and 174: Bit Reduction This DSP tool takes y
- Page 175 and 176: Pitch Shift Pitch Shift offers thre
- Page 177 and 178: To Transform Multiply 1. Select a h
- Page 179 and 180: Batch Processing You can run most o
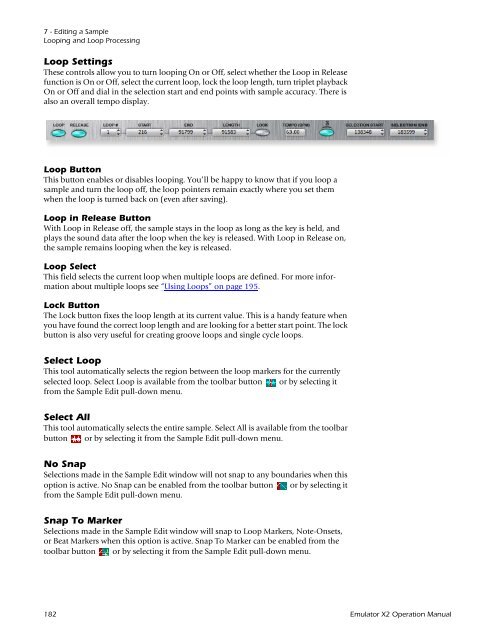
- Page 181: Crossfade Looping Crossfade Looping
- Page 185 and 186: Crossfade Looping & Loop Compressio
- Page 187 and 188: 8 - TwistaLoop Introduction TwistaL
- Page 189 and 190: Meter When analyzing a sample, shor
- Page 191 and 192: 1/8 Sensitivity Fine-Tuning Your An
- Page 193 and 194: To change the Tempo Granularity, ch
- Page 195 and 196: Using Loops Once you create some lo
- Page 197 and 198: Loop Speed and Tempo The speed at w
- Page 199 and 200: Loop Select (Jump) If you want to j
- Page 201 and 202: Multisample Voices and Looping You
- Page 203 and 204: 4. Set the TwistaLoop Speed to 100%
- Page 205 and 206: Select a region between two beat ma
- Page 207 and 208: Looping Doesn’t Occur You’ve de
- Page 209 and 210: 9 - Effects Overview In addition to
- Page 211 and 212: 7. Select one of the Effects from t
- Page 213 and 214: FX Routing Make sure that you are t
- Page 215 and 216: Main Output Window The Main Output
- Page 217 and 218: Controlling the Preset Effect Amoun
- Page 219 and 220: Preset FX Screen All effects have a
- Page 221 and 222: Effects Listing Reverb Delay (mono)
- Page 223 and 224: Parameter Description LF Damping Lo
- Page 225 and 226: Chorus / Delay This effect is a com
- Page 227 and 228: The Ratio control determines how st
- Page 229 and 230: Ping Pong, stereo This mode cross-c
- Page 231 and 232: Delay (BPM) The BPM Delay is simila
- Page 233 and 234:
4-Band EQ This 4-band equalizer pro
- Page 235 and 236:
Flanger (BPM) The BPM Flanger is si
- Page 237 and 238:
Limiter The Limiter sets a “maxim
- Page 239 and 240:
Pitch Shifter (mono) The pitch shif
- Page 241 and 242:
Ring Modulator Modulation Parameter
- Page 243 and 244:
Parameter Description Sync (LFO Pha
- Page 245 and 246:
Twin The Twin utilizes two “tube
- Page 247 and 248:
10 - Controls This chapter describe
- Page 249 and 250:
Changing Settings Entering Numeric
- Page 251 and 252:
Selecting Voices using your MIDI Ke
- Page 253 and 254:
View Menu Hide Object Numbers Show
- Page 255 and 256:
Tree View The Sample, Preset or Mul
- Page 257 and 258:
Templates For each module in the Vo
- Page 259 and 260:
11 - From Sample to Preset Acquire
- Page 261 and 262:
Record Audio Controls Level This co
- Page 263 and 264:
To Gate & Chop Samples After record
- Page 265 and 266:
10. Click on each of the Region nam
- Page 267 and 268:
6. The save to sampler controls all
- Page 269 and 270:
To Set Up SynthSwipe 3. Open Emulat
- Page 271 and 272:
10. To begin sampling your instrume
- Page 273 and 274:
Sort Buttons Selected Samples These
- Page 275 and 276:
Build Preset Options These sample o
- Page 277 and 278:
12 - Synthesizer Basics This chapte
- Page 279 and 280:
Miscellaneous Controllers A-P Any t
- Page 281 and 282:
Low Frequency Oscillators (LFOs) A
- Page 283 and 284:
The possibilities of clock modulati
- Page 285 and 286:
Modulation Processors Modulation pr
- Page 287 and 288:
Dynamic Filters Following is a bloc
- Page 289 and 290:
Another control found on traditiona
- Page 291 and 292:
The Z-Plane Filter A Z-plane filter
- Page 293 and 294:
Control MIDI Controller # Routing L
- Page 295 and 296:
13 - Appendix The Emulator X File C
- Page 297 and 298:
to DOS that represent the Akai form
- Page 299 and 300:
EXS-24 files can exist on PC- or Ma
- Page 301 and 302:
find where the separate file is in
- Page 303 and 304:
Emulator X VSTi Launching the VSTi
- Page 305 and 306:
Emulator X 19. In the VST Instrumen
- Page 307 and 308:
Keyboard Shortcuts File Menu New...
- Page 309 and 310:
Drag & Drop Operations From Drag &
- Page 311 and 312:
Toolbar Functions Standard Tools Up
- Page 313 and 314:
MIDI Implementation Chart MIDI Info
- Page 315 and 316:
MIDI Implementation Chart (part 2 -
- Page 317 and 318:
MIDI Implementation Chart (part 2 -
- Page 319 and 320:
Index Symbols ~, +, - modulation so
- Page 321 and 322:
Delete folder 220 multisetup 67 reg
- Page 323 and 324:
tuning tables 71 Keyboard CC Window
- Page 325 and 326:
PatchMix DSP, setting up for sampli
- Page 327 and 328:
Stop Button, sampling 261 Streaming


