Windows QTL Cartographer 2.5 - FTP Directory Listing
Windows QTL Cartographer 2.5 - FTP Directory Listing
Windows QTL Cartographer 2.5 - FTP Directory Listing

Create successful ePaper yourself
Turn your PDF publications into a flip-book with our unique Google optimized e-Paper software.
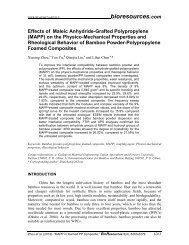
56<br />
<strong>Windows</strong> <strong>QTL</strong> <strong>Cartographer</strong> <strong>2.5</strong><br />
file. (You can view this summary in a larger window by clicking the Result button in the Statistical<br />
Summary group box, just to the left of the information pane.)<br />
5. In the Single Marker Analysis group box, click Result to view the analysis result for the selected<br />
trait. You can change the font used by the display window to make the results easier to read.<br />
Click the Save… button in this group to save the marker analysis results to a text file.<br />
6. In the Statistical Summary group box, click Result to view the summary in a larger display<br />
window. Click the Save… button to save the statistical results to a text file.<br />
The statistical summary includes:<br />
Basic summary of the data<br />
A histogram for the quantitative trait<br />
Win<strong>QTL</strong>Cart's summary of missing individuals that should be present, as indicated by the<br />
data. If markers show 0% data, there was likely an import problem.<br />
Summary of marker segregation<br />
Combines LR map <strong>QTL</strong> and Q stats<br />
7. Click the Graphic File… button to save the results to a <strong>QTL</strong> mapping result file (*.QRT). You can<br />
open this .QRT file later to view the results as a graph.<br />
8. Click Close to end the single-marker analysis session and return to the Form View of Source<br />
Data.<br />
Qstats show some important results:<br />
Tells you that the data were imported correctly. If a marker has 0% data, that indicates a problem<br />
(likely an import problem). For example, the original marker may be *Marker_1, but <strong>QTL</strong> sees<br />
that as *Marker-1, and the values won't match.<br />
Tests for segregation distortion<br />
Setting threshold levels (IM & CIM)<br />
Both Interval Mapping 58 and Composite Interval Mapping 60 use threshold values to determine <strong>QTL</strong>s. If<br />
you don't know the threshold value for a trait, you can have Win<strong>QTL</strong>Cart find them out and use them as<br />
inputs for the <strong>QTL</strong> search.<br />
The threshold levels control the rate of Type 1 errors (false positives). A lower threshold value means<br />
more false positives; but a higher value means you may miss more <strong>QTL</strong>s.<br />
When you look at a result graph 17<br />
, the horizontal line you see running across the graph is the<br />
threshold level. When the graph peaks over the threshold level, that is good evidence for a <strong>QTL</strong>. So,<br />
setting the threshold level in this form controls how high or low that line will sit on the graph. Too high<br />
and you'll see no <strong>QTL</strong>s; too low and you'll see too many. (The threshold value can be changed later in<br />
the Graph window.)<br />
Getting a very accurate threshold level may take a long time. Recommendations are included in the<br />
threshold procedures.<br />
1. Follow the instructions for the form you're working with (either IM or CIM). Be sure to select a trait<br />
or all traits for which you want to set a threshold level.<br />
2. The Threshold group box on the right of the form controls inputting or obtaining mapping threshold<br />
© 2010 N.C. State University, Bioinformatics Research Center