- Page 1 and 2:
ClearPath OS 2200 Software Planning
- Page 3 and 4:
Contents Section 1. Introducing Cle
- Page 5 and 6:
Contents 4.6.7. T9840A Tape Subsyst
- Page 7 and 8:
Section 6. Workstation-Based Softwa
- Page 9 and 10:
Tables 1-1. Product Status Summary
- Page 11 and 12:
Section 1 Introducing ClearPath OS
- Page 13 and 14:
Highlights for ClearPath OS 2200 Re
- Page 15 and 16:
Installation and Support Name Table
- Page 17 and 18:
Installation and Support Name Table
- Page 19 and 20:
Installation and Support Name Table
- Page 21 and 22:
1.5. Support Support One of your ke
- Page 23 and 24:
1.6.2. Performing a Search To perfo
- Page 25 and 26:
Section 2 New Products and Updated
- Page 27 and 28:
Exec FS-Keyin Enhancements FLIT Lev
- Page 29 and 30:
Section 3 Software Considerations,
- Page 31 and 32:
Considerations • The information
- Page 33 and 34:
• Media Distribution Changes Cons
- Page 35 and 36:
• MSCP considerations Considerati
- Page 37 and 38:
Considerations Beginning with Clear
- Page 39 and 40:
Internet Protocol Version 6 (IPv6)
- Page 41 and 42:
Internet Protocol Version 6 (IPv6)
- Page 43 and 44:
3.4. Future Considerations Future C
- Page 45 and 46:
Master SCN Software License Managem
- Page 47 and 48:
3.5.3. Ordering ClearPath OS 2200 S
- Page 49 and 50:
3.5.6. Frequently Asked Questions S
- Page 51 and 52:
Software License Management and LIB
- Page 53 and 54:
Software License Management and LIB
- Page 55 and 56:
Software License Management and LIB
- Page 57 and 58:
3.7. Keyed Tape Delivery Keyed Tape
- Page 59 and 60:
Keyed Tape Delivery • You need FU
- Page 61 and 62:
License Keys for TeamQuest Products
- Page 63 and 64:
License Keys for TeamQuest Products
- Page 65 and 66:
Dorado 400, 4000, 4100, and 4200 Se
- Page 67 and 68:
Dorado 300 and 700/800 Server Syste
- Page 69 and 70:
ClearPath and Plateau Interdependen
- Page 71 and 72:
ClearPath and Plateau Interdependen
- Page 73 and 74:
ClearPath Specialty Engines Interde
- Page 75 and 76:
ClearPath Specialty Engines Interde
- Page 77 and 78:
Section 4 Exec Software Compatibili
- Page 79 and 80:
4.1.2. ClearPath OS 2200 Release 13
- Page 81 and 82:
MSCP Changes When you install MSCP,
- Page 83 and 84:
General Exec Considerations With IO
- Page 85 and 86:
Migrating from a Nonmetered System
- Page 87 and 88:
Tape Mnemonics Table 4-1 describes
- Page 89 and 90:
Tape and DVD An encrypting tape dev
- Page 91 and 92:
• The following are compatibility
- Page 93 and 94:
OST4890 Tape and DVD OST4890 is a 3
- Page 95 and 96:
Table 4-2. Capabilities Supported b
- Page 97 and 98:
4.6.5. Linear Tape Open Ultrium LTO
- Page 99 and 100:
Restrictions • Encryption is rest
- Page 101 and 102:
Tape Format IBM 9840 (32-bit Block
- Page 103 and 104:
Tape and DVD The Exec provides the
- Page 105 and 106:
Tape and DVD The T9840D tape subsys
- Page 107 and 108:
4.6.10. T10000A Tape Subsystem Tape
- Page 109 and 110:
Table 4-5. T9840D and T10000A Summa
- Page 111 and 112:
Tape and DVD • The following prod
- Page 113 and 114:
Operator Interfaces The console key
- Page 115 and 116:
7831 0349-043 4-39 TIP A new TPM (T
- Page 117 and 118:
MIPS-Based Image Enabler Key Softwa
- Page 119 and 120:
Section 5 OS 2200 Software Compatib
- Page 121 and 122:
ClearPath OS 2200 Release 13.1 Ciph
- Page 123 and 124:
ClearPath OS 2200 Release 13.1 COMA
- Page 125 and 126:
Communications Platform for Open Sy
- Page 127 and 128:
Communications Platform for Open Sy
- Page 129 and 130:
Installation Considerations Communi
- Page 131 and 132:
5.9. COMUS COMUS COMUS is used to b
- Page 133 and 134:
5.10. cpFTP General Considerations
- Page 135 and 136:
5.12. DPS ClearPath OS 2200 Release
- Page 137 and 138:
ECLIPSE-2200 • If you are running
- Page 139 and 140:
ClearPath OS 2200 Release 12.1 EOM
- Page 141 and 142:
Enterprise Relational Database Serv
- Page 143 and 144:
FURPUR Two new RDMS system tables a
- Page 145 and 146:
Integrated Recovery Utility (IRU) T
- Page 147 and 148:
In addition to the format changes:
- Page 149 and 150:
Language Support System (LSS) • T
- Page 151 and 152:
Messaging Integration Services (NTS
- Page 153 and 154:
Open Distributed Transaction Proces
- Page 155 and 156:
Open Programming Environment (OPE)
- Page 157 and 158:
• /etc/shadow: Add the following
- Page 159 and 160:
Migration OSI-TP The installation o
- Page 161 and 162:
Repository for ClearPath OS 2200 (U
- Page 163 and 164: WITH ACCESS CONTROL ; COMMIT THREAD
- Page 165 and 166: SOLAR and SOLAR/E • Continue to u
- Page 167 and 168: Sort/Merge (SORT) Refer to the SOLA
- Page 169 and 170: For AEDIT$: A$EDATn (n = 1 - 5) A$E
- Page 171 and 172: 5.49. TeamQuest Products TeamQuest
- Page 173 and 174: • Change in summary reports TeamQ
- Page 175 and 176: Utilization Report Utility for OS 2
- Page 177 and 178: Virtual Machine for Java Platform (
- Page 179 and 180: 5.55. Web Transaction Server (WEBTS
- Page 181 and 182: WebSphere® MQ Version 7 for ClearP
- Page 183 and 184: Section 6 Workstation-Based Softwar
- Page 185 and 186: Section 7 Installing ClearPath OS 2
- Page 187 and 188: Installation Considerations • If
- Page 189 and 190: 7.4. Description of Fast-Load Tapes
- Page 191 and 192: Following are the recommended steps
- Page 193 and 194: Installation and Support Name Level
- Page 195 and 196: Caution Installing from Fast-Load T
- Page 197 and 198: Installation and Support Name Insta
- Page 199 and 200: Installation and Support Name Level
- Page 201 and 202: Installing from Package Tapes b. Cr
- Page 203 and 204: Installing from Package Tapes 4. St
- Page 205 and 206: Installation and Support Name Secur
- Page 207 and 208: Installation and Support Name 17. I
- Page 209 and 210: Installation and Support Name 21. I
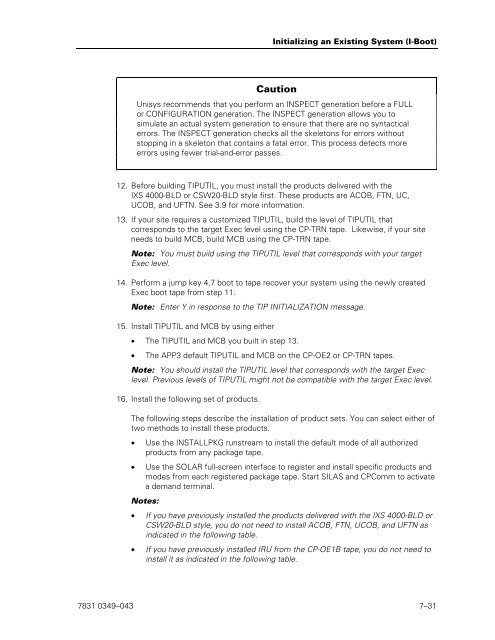
- Page 211 and 212: Initializing an Existing System (I-
- Page 213: Initializing an Existing System (I-
- Page 217 and 218: Installation and Support Name 18. I
- Page 219 and 220: Migration for Existing Dorado 4000
- Page 221 and 222: Notes: Migration for Existing Dorad
- Page 223 and 224: Section 8 Operations Sentinel (Form
- Page 225 and 226: Appendix A Media Contents This appe
- Page 227 and 228: Dorado Models 800, 700, and 300 Wor
- Page 229 and 230: Dorado Models 800, 700, and 300 Wor
- Page 231 and 232: Dorado Models 800, 700, and 300 Wor
- Page 233 and 234: Dorado Models 800, 700, and 300 Wor
- Page 235 and 236: Dorado Models 800, 700, and 300 Wor
- Page 237 and 238: Dorado Models 800, 700, and 300 Wor
- Page 239 and 240: Dorado Models 800, 700, and 300 Wor
- Page 241 and 242: ClearPath Dorado Model 400, 4000, 4
- Page 243 and 244: ClearPath Dorado Model 400, 4000, 4
- Page 245 and 246: ClearPath Dorado Model 400, 4000, 4
- Page 247 and 248: ClearPath Dorado Model 400, 4000, 4
- Page 249 and 250: ClearPath Dorado Model 400, 4000, 4
- Page 251 and 252: ClearPath Dorado Model 400, 4000, 4
- Page 253 and 254: Appendix B Product Interdependencie
- Page 255 and 256: Installation and Support Name Table
- Page 257 and 258: Installation and Support Name Table
- Page 259 and 260: Installation and Support Name Table
- Page 261 and 262: Installation and Support Name Table
- Page 263 and 264: Installation and Support Name Table
- Page 265 and 266:
Installation and Support Name Table
- Page 267 and 268:
Installation and Support Name Table
- Page 269 and 270:
Appendix C Fast Load and Package Ta
- Page 271 and 272:
Installation and Support Name Produ
- Page 273 and 274:
Installation and Support Name Produ
- Page 275 and 276:
Tape Name Installation and Support
- Page 277 and 278:
Tape Name Installation and Support
- Page 279 and 280:
Tape Name Installation and Support
- Page 281 and 282:
Appendix D BDI Allocation A bank de
- Page 283 and 284:
D.3. BDI Groups BDI Groups At prese
- Page 285 and 286:
BDI Allocation Listing Dynamic BDIs
- Page 287 and 288:
BDI Bank Name Product 154 PL1$E PL1
- Page 289 and 290:
BDI Bank Name Product 415 IP$SSCB D
- Page 291 and 292:
BDI Bank Name Product 643 RPGII$13$
- Page 293 and 294:
BDI Bank Name Product 1155 KEY$BANK
- Page 295 and 296:
BDI Bank Name Product 1414 IP$$IK14
- Page 297 and 298:
BDI Bank Name Product 1652 CGO$ACB
- Page 299 and 300:
BDI Bank Name Product 2120 RDMS$EMI
- Page 301 and 302:
BDI Bank Name Product 2346 RM$BANK0
- Page 303 and 304:
BDI Bank Name Product 2651 APS5$HND
- Page 305 and 306:
BDI Bank Name Product 3124 HTL$ACB
- Page 307 and 308:
BDI Bank Name Product 4640 LINC$MON
- Page 309 and 310:
BDI Bank Name Product 5062 RESERVED
- Page 311 and 312:
Appendix E Acronyms and Abbreviatio
- Page 313 and 314:
DAD Device Area Descriptor DAP Dump
- Page 315 and 316:
HLC Host LAN Controller HMP Heterog
- Page 317 and 318:
Open DTP Open Distributed Transacti
- Page 319 and 320:
SLAR System Log Analyzer and Report
- Page 321 and 322:
XIOP eXtended I/O Processor for con
- Page 323 and 324:
Glossary A absolute element An exec
- Page 325 and 326:
Glossary database A set of permanen
- Page 327 and 328:
L Glossary Linking System The featu
- Page 329 and 330:
Relational Data Management System (
- Page 331 and 332:
TIP Glossary The OS 2200 environmen
- Page 333 and 334:
Glossary TREG utility A TIP utility
- Page 335 and 336:
Index A ACOB package tape location,
- Page 337 and 338:
microcode, 3-48 CTS9840C tape subsy
- Page 339 and 340:
installing products from package ta
- Page 341 and 342:
RDMS (Enterprise Relational Databas
- Page 343 and 344:
VTH, 1-10 XPCEXEC, 1-10 XTCEXEC, 1-
- Page 345 and 346:
elease level, 1-9 UDUPLEX current l
- Page 348:
© 2012 Unisys Corporation. All rig