Getting Started With AuthorIT - instructional media + magic
Getting Started With AuthorIT - instructional media + magic
Getting Started With AuthorIT - instructional media + magic

Create successful ePaper yourself
Turn your PDF publications into a flip-book with our unique Google optimized e-Paper software.
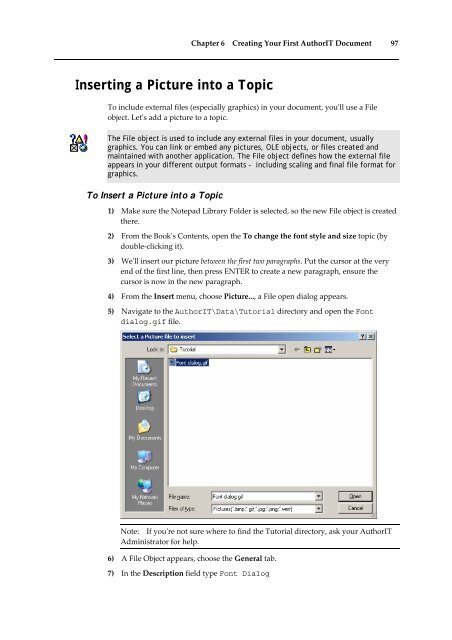
Chapter 6 Creating Your First <strong>AuthorIT</strong> Document 97<br />
Inserting a Picture into a Topic<br />
To include external files (especially graphics) in your document, youʹll use a File<br />
object. Letʹs add a picture to a topic.<br />
The File object is used to include any external files in your document, usually<br />
graphics. You can link or embed any pictures, OLE objects, or files created and<br />
maintained with another application. The File object defines how the external file<br />
appears in your different output formats - including scaling and final file format for<br />
graphics.<br />
To Insert a Picture into a Topic<br />
1) Make sure the Notepad Library Folder is selected, so the new File object is created<br />
there.<br />
2) From the Bookʹs Contents, open the To change the font style and size topic (by<br />
double‐clicking it).<br />
3) Weʹll insert our picture between the first two paragraphs. Put the cursor at the very<br />
end of the first line, then press ENTER to create a new paragraph, ensure the<br />
cursor is now in the new paragraph.<br />
4) From the Insert menu, choose Picture..., a File open dialog appears.<br />
5) Navigate to the <strong>AuthorIT</strong>\Data\Tutorial directory and open the Font<br />
dialog.gif file.<br />
Note: If youʹre not sure where to find the Tutorial directory, ask your <strong>AuthorIT</strong><br />
Administrator for help.<br />
6) A File Object appears, choose the General tab.<br />
7) In the Description field type Font Dialog